


Good morning! Let’s end the week with a little tip involving embroidery hoops.
This is a topic we’ve touched on before, but I don’t think it hurts to revisit it. I’ll use a note from a reader as a springboard into today’s article:
When you’re doing projects like a tablecloth or your runner that you showed us today, how do you keep the cloth clean in the hoop and around the hoop, and what about all the other cloth you have to hold? What if the circles from the hoop don’t come out? Wouldn’t it be better to work on a frame? …

These are good questions!
First, I’ll address the last question: Wouldn’t it be better to work in a frame?
If I weren’t working on a pre-finished blank – if I were working on fabric that I would cut out and finish into a runner after I finished the embroidery – and if I wanted to go through the labor of setting up a slate frame (because a stretcher bar frame the size of this runner would not be feasible), then I could use a frame.
But would I use a slate frame instead of a hoop on a project like this? No. There are several reasons, among them:
1. This is not a long-term project. It’s a quick project. The time involved in setting up a slate frame would not be worth it to me, especially because a hoop works great with this kind of project as long as you follow a few guidelines.
2. A slate frame (or any kind of embroidery frame that would accommodate this type of project) is an unwieldy thing, and normally, it is set up on a pair trestles. It doesn’t normally go anywhere without a whole lot of effort. Hoops are remarkably transportable, and this project needs to be transportable. I want to carry with me hither and yon to work on it in different places as time allows.
Some hoop tips to help protect your fabric and to avoid any permanent hoop marks:
1. Wash your hands before each stitching session and sometimes during the stitching session, especially if your hands tend to sweat or start to feel grimy.
2. Don’t leave your work in a hoop between stitching sessions. Always undo the hoop. This allows the fabric and the stitches that might be under the hoop to relax.
3. Bind the inner ring of your hoop. This provides more tension on your fabric, but it also provides a bit of padding between the fabric and the hoop.
4. Use scrap fabric to cover the edges of the hooped area, especially if you are concerned about skin oils collecting near your hoop, where you hold it. This is a reasonable concern. If your hands tend to be oily or sweaty and you’re holding the edge of that hoop and the fabric, the moisture or oils from your skin can affect the fabric. Dirt tends to adhere to those areas, and a dirty hoop ring is much more difficult to remove than a simple creased ring.
Scrap fabric also provides a little more padding and protection for the stitched areas.
This is how you use scrap fabric over your embroidery area:
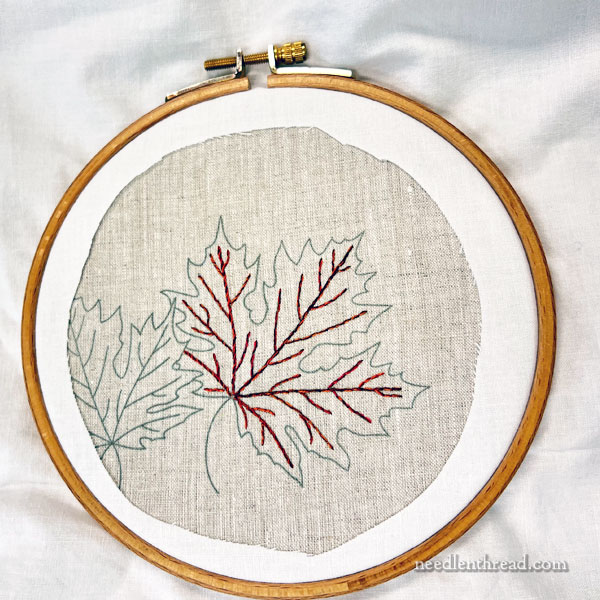
Cut a piece of scrap fabric (I usually use muslin, calico, batiste – whatever I have small scraps of here in the studio) that fits several inches beyond your hoop on all sides. Be generous if you can! I usually go 4 or 5 inches beyond my hoop on all sides.
In the order of hooping, put your inner ring on your table, your ground fabric (what you’re embroidering) over the inner ring where you want the hoop situated, your scrap fabric over your ground fabric, and your outer ring on top.
Make sure the screw on your outer ring is open enough to accommodate both layers of fabric and your inner ring.
Push the outer ring down firmly, pulling all the fabric taut, and tighten the screw a little bit.
Then, carefully separate the fabrics, and slide your scissor blade into the top scrap fabric only. I use the tip of a needle to grab and pull the scrap fabric away from the ground fabric, and then I stick the very tip of my sharp scissors into the top scrap fabric to make that initial slit.
Trim out a “window” from the top fabric, so that your stitching area is revealed.
Finally, adjust your fabric as you need to and give your hoop screw another tightening to hold everything in place and tensioned well.
Using scrap fabric this way gives you an area to hold onto around the hoop, so that your fingers don’t have to come into contact with your embroidery fabric. The excess scrap fabric outside the hoop also gives you something to hold around the excess embroidery fabric, so that you’re not grasping the embroidery fabric all the time, either.
Increase the Size of Your Hoop
When you use scrap fabric this way, you decrease your visible stitching area due to the “window” cut out around the stitching, inside the edge of the hoop. This can be inconvenient.
I normally use a larger hoop when I’m using scrap fabric this way – so, instead of a 5″ hoop that accommodates the design well enough, I’m now using a 6″ hoop, which accommodates it better with the scrap fabric in place.
Plastic Wrap
Lots of stitchers use plastic wrap – like Saran Wrap, Cling Wrap, or whatever type of kitchen film one prefers – to accomplish a similar end. If that’s how you wiggle, go for it!
I don’t use plastic wrap because I hate the stuff. It’s the devil. It clings to anything else in the world except what I want it to cling to, and it especially tends to have a narcissistic affinity for itself. It drives me batty, and I rarely use it, even in the kitchen.
Besides, the scrap fabric is reusable. I’ll use this whole piece through this entire project, moving it from each spot to the next, and at the end, I’ll still have it for the next time I use a 6″ hoop in this way.
And that’s it – a little tip on working with a hoop and still keeping your fabric clean on this type of project. I hope it comes in handy!
Have a lovely weekend!
This is such a cool idea!
I currently have a fancy project going (that’s laced up in a slate frame, and covered whenever I’m not working on it) and a casual project (that I use a hoop for and I can stick it in my bag and take with me to coffee shops, family events, etc.) I don’t worry as much about cleanliness on the casual project because it’s mainly for the fun of stitching. But I just noticed that the hoop closure area makes a perfect handle if I position it correctly, and then I don’t have to hold the fabric while stitching. Years of embroidery, and I’d never noticed it before!
Thank you Mary. I usually clip a piece of scrap fabric onto my hoop in the area I may have to touch, lean my palm against, as I use a Lowery stand to hold my hoops, but I love your window method which just makes so much more sense. No need to fuss with a clip and wad of fabric, just spin the hoop and voila!
You can also make a hoop guard and then tuck extra fabric outside of the hoop out of the way
And with peak gardening season or peak cold dry winter for those in the southern hemisphere, I’d also add be cautious about using hand lotion right before stitching.
I’ve seen some people use grime guards – a short bit of fabric sewn into a tube, with elastic alone each opening to slip over the hoop. They are not as securely held over the fabric, but nice that they can be removed easily.
Thank you – this is the best, most stream-lined looking (I have found the elasticized fabric hoop protectors tacky looking, and I completely agree that cling wrap is the devil) solution I have seen. And yes, reusable! Once again, you’ve taught me something new, and I appreciate your generosity.
Kelly
Another “keeping it clean” tip: For a larger project like a quilt top or table linens that won’t fit neatly onto a lap* while working, I make sure that the excess fabric is stuffed into a clean basket or drawstring bag. Even a clean floor or carpet can transfer some dust or dirt to trailing edges of fabric and make it look dingy. (And of course, getting a trailing edge caught under your chair leg or run over by a caster is just \(*m*)/ !)
*And about the lap thing: Many of our great-grandmothers wore special aprons and/or spread a clean white tea towel or similar over their laps when doing fine work, especially in light colors. There’s a lot to be said for that practice if you are serious about keeping your needlework as pristine as possible.
(Doggone it, why do I always find the perfect link just AFTER I post my comment?! lol)
A discussion of making 19th-century sewing aprons or “lap-bags”, “to keep the work from getting soiled, and hold the thimble, cotton, needles, scissors, etc.”:
https://twothreadsback.com/2021/05/27/a-sewing-receptacle-entirely-unique/
I’ve good luck keeping things tidy using plastic wrap, Don’t know where I first saw this being done… Somewhere on youtube is my best guess. It works like acharm for me, sorry your plastic wrap is unruly, maybe a different brand? They really are hell to use when covering food but work just fine for covering embroidery on a 6 to 8 inch hoop. I just splurged and bought myself a hoop holder that I can sit on the base and leave both hands free to work on my stitching. I’ve always wanted one and found a good price with good reviews and said what the heck! And went for it. Now I just have to be patient and wait for it to arrive. I hope I like it as much as I think I will.
Thanks Mary for giving all of us so many beautiful projects and valuable how-to’s.
It’s much appreciated!
Sue H
I was wondering the best way to wash embroidery, like a table runner or table cloth. My ground fabric is usuallymachine prewashed/dried cotton or linenthen ironed before putting in the hoop. Iuse dmc floss which doesn’t run. I suppose hand washing would be the safest choice then blocking it out and let it dry completely. Somewhere I’ve read ironing over the stitched areas will flatten the stitches and ruin the look. How do I iron something like a tablecloth, which needs pressing to look its best for a holiday dinner. If
I lay the fabric stitching down and iron the back.Is it common to put something like a thick fluffytowel down under the stitched part to keep the stitches from flattening out too badly And if it were a gift I’d need to include instructions. or shouldI just say to send it back to me and I’ll take care of it. I have done this with baby items I’ve knitted as gifts from expensive yarn where I thought the busy new mom would be more apt to toss them in the washer/dryer and totally ruin the item. What are your methods of washing/drying/ironing embroidered pieces?
Yes, to everything – you’ve pretty much answered all your questions! I normally hand wash in cool water. Spot clean any stains. Block and let dry (or mostly dry). Press upside down, on a soft padded surface. I don’t like using bath towels for this process. Instead, I use cotton flour sack towels – usually about four layers. I have a couple pressing cloths I’ve made by sewing layers of white cotton flannel together, too. They work great. It’s the kind of cotton flannel you’d purchase to make baby clothes, blankets, and similar.