I’ve been exploring extra-wide cast-on stitches.
Are you familiar with the cast-on stitch? it’s a lovely and versatile stitch, perfect for adding texture and dimension to embroidery. In the scheme of dimensional, textured stitches, it’s fairly simple to work, too.
If you aren’t familiar with the stitch, you can find a video tutorial for cast-on stitch here, a tutorial for a simple cast-on stitch flower here, a tutorial for a cast-on stitch rose here, and even a tutorial for a beaded cast-on stitch here. Lots of opportunities for learning the cast-on stitch!
And now, we’re going to look at the extra-wide cast-on stitch, and we’re going to look at it from two different approaches, in two installments. This is the first installment. Next week, we’ll explore a little more.
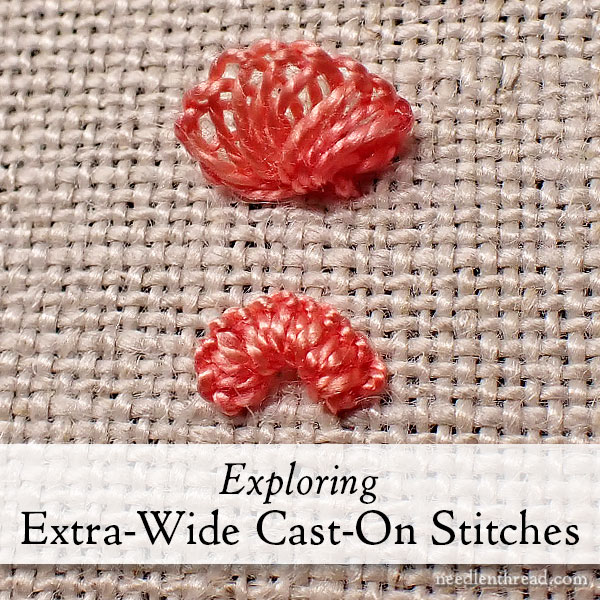
Why extra-wise cast-on stitches? Mostly because someone wrote in and asked me about the topic. It went like this:
Mary, will you look at this video and tell me what stitch this is?
Sure.
I looked. It was a reel on Facebook. This means that, in a very short amount of time and at a super-sonic speed, the stitcher completed a flower made with wide cast-on stitches. To accomplish this in such a short space of time, the video was sped way up, and the middle step of casting-on the stitches was never shown.
If the intention was to instruct, this made the video somewhat frustrating. But often, reels are not intended to instruct – just to captivate or mesmerize (and give Facebook somewhere to plug in some advertising). Because of this, if you’re looking for instruction, a reel isn’t always helpful.
I decided to work up a photo tutorial for these wide cast-on stitches so folks can see how they’re accomplished and try them, too.
Admittedly, this is not my favorite type of stitching, and I’ll discuss why as we go along.
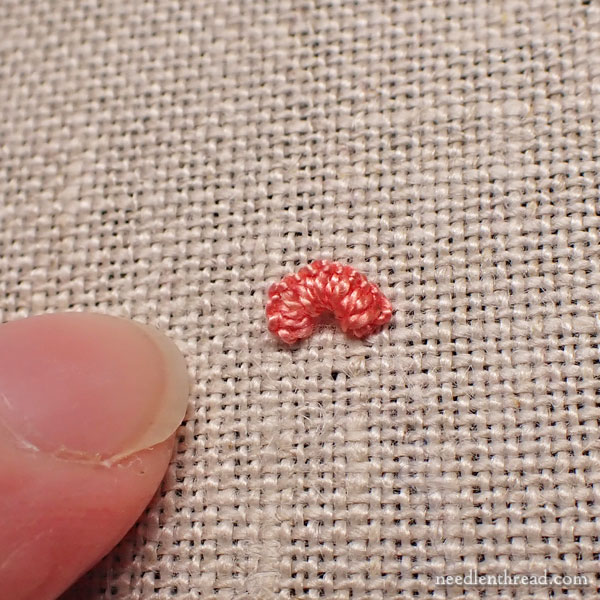
Behold a regular cast-on stitch loop, which can be used effectively for flower petals and other textured, dimensional uses.
This cast-on stitch is worked on the needle, cinching the stitches right up around the barrel of the needle – it is a regular cast-on stitch.
The loop forms because I’ve cast on more stitches than will fit in the space of fabric picked up by the needle for the stitch. This causes the stitch to “buckle” into a loop.
My finger’s in there to give you an idea of size. The stitch is worked with a #12 perle cotton and is small.
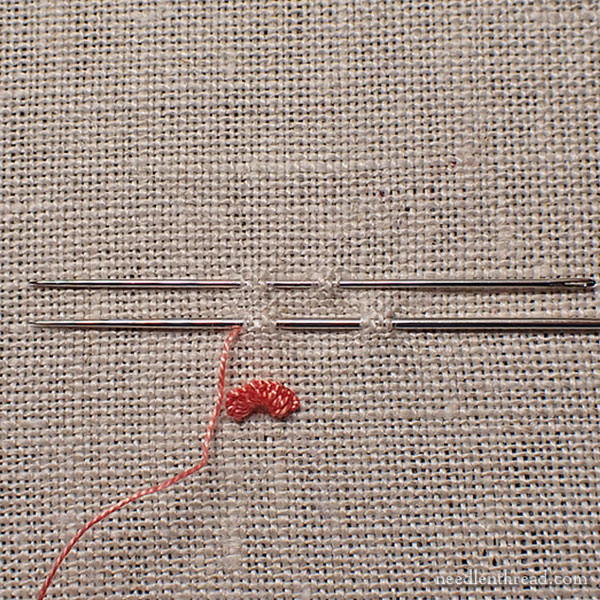
Here, we see the set-up for the extra-wide cast-on. I’m using two needles for this approach. The lower needle (which is a very long milliner needle, because that’s what I had out) is the stitching needle. The top needle is the tool that will allow me to make the stitch wider than usual.
Notice that I have anchored both needles in the fabric twice. Why? So that they don’t shift and pull closer to each other when I tension the cast-on stitches.
You don’t absolutely have to anchor the needles into the fabric twice like I did, but after much trial and error and error and error, I discovered that I achieved more consistent results if I could assure that the two needles did not pull towards each other while casting on the stitches. This seemed to be the most sensible way to avoid the needles pulling towards each other.
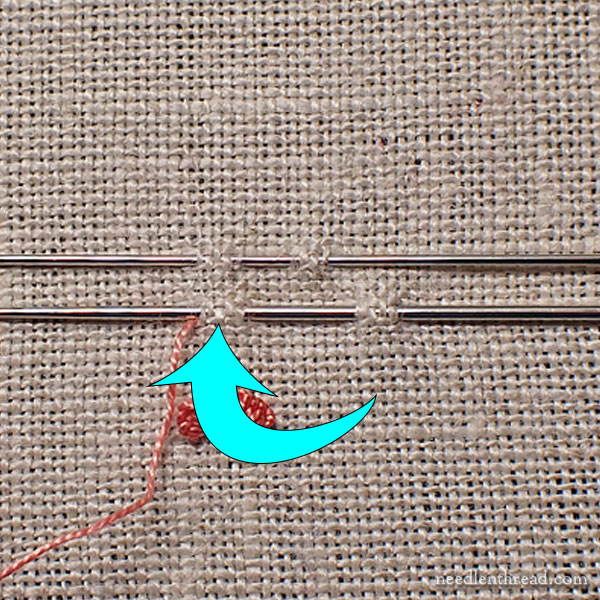
See where that blue arrow is pointing to that little stretch of fabric on the needle? That’s the part of the fabric where the stitch is actually going to form. All the other little spans of fabric on the needles are just to hold the needles firmly in place.
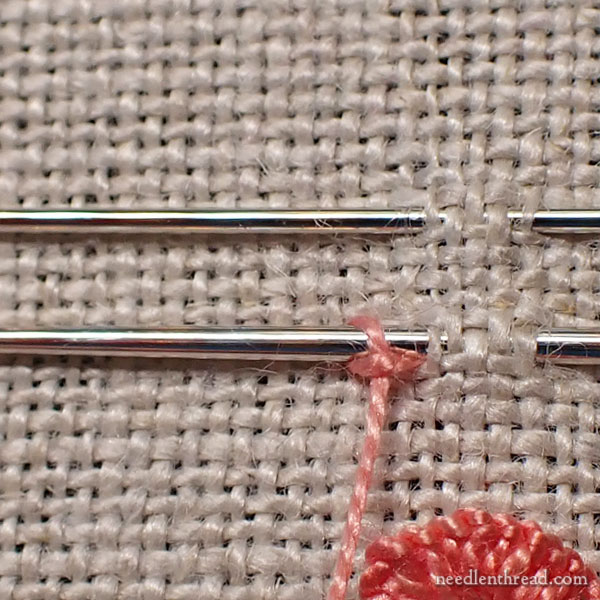
At this point, you can unthread your needle, because it’s easier to cast on stitches without your needle threaded, and you’ll have to unthread it later, anyway.
Remember, the lower needle is the stitching needle.
I’m starting on that needle with one regular cast-on stitch that hugs around the needle.
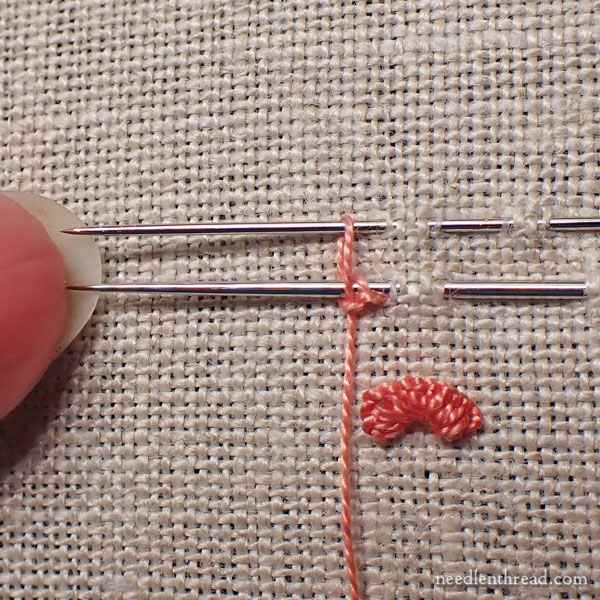
And now I’m going to cast on some stitches around both needles.
I use my fingernail to pick up the tips of the needles so that I can slip the cast-on stitch in place.
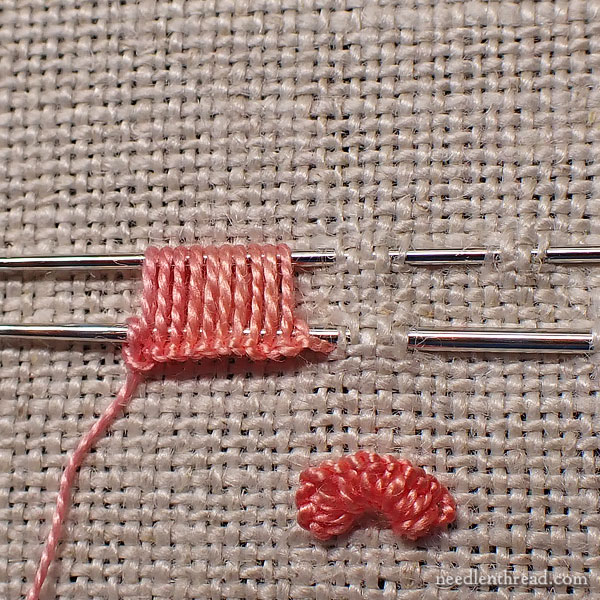
Here you can see all my cast-on stitches cast onto both needles.
The last stitch on the left is another regular cast-on, hugging just the lower needle.
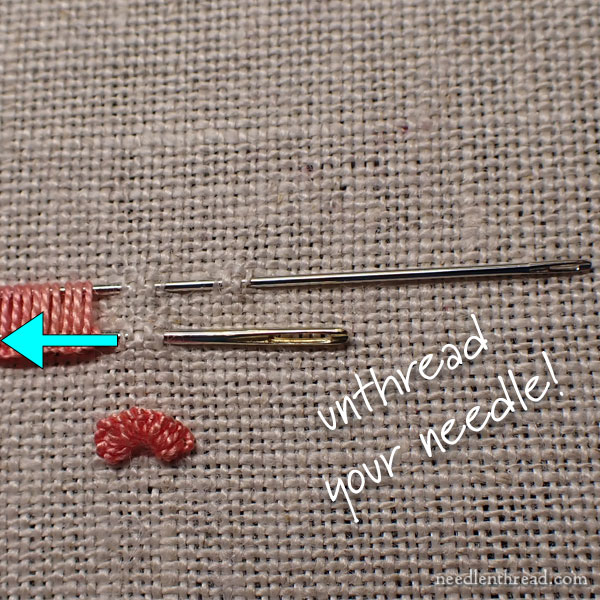
Once the stitches are cast onto the needles, the lower needle needs to be carefully pulled to the left (following the direction of the blue arrow) in order to get the eye out of the “holding” bit of fabric.
Before pulling the needle to the left, you have to unthread the needle (if you didn’t do so earlier), because you don’t want the thread to pass through that first bit of “holding” fabric.
So, unthread the needle if it’s threaded, and slowly pull the needle towards the left, but stop once past the first little bit of “holding” fabric.
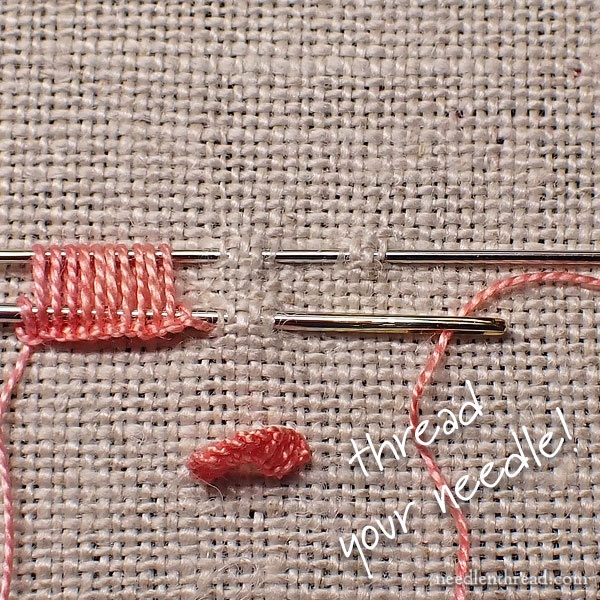
At this point, you’re ready to finish the stitch – but at this point, you need your needle to be threaded! So thread your needle!
It really helps to have a needle threader for this part.
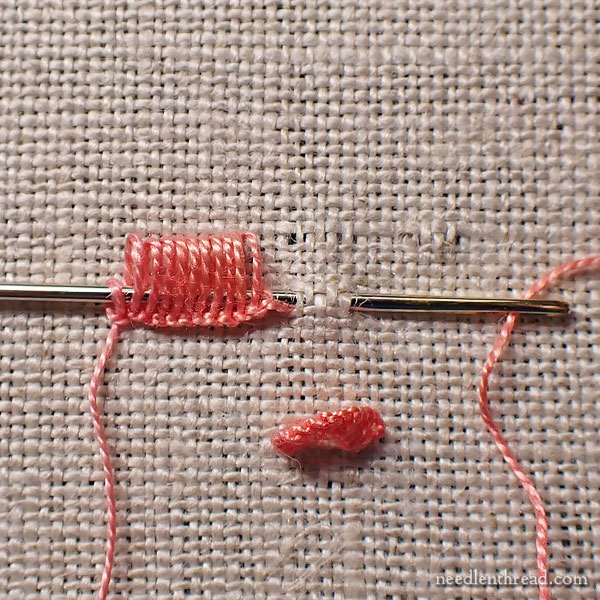
Now, remove the top needle completely from the fabric and the loops.
You are left with very open, loopy loops on the lower needle.
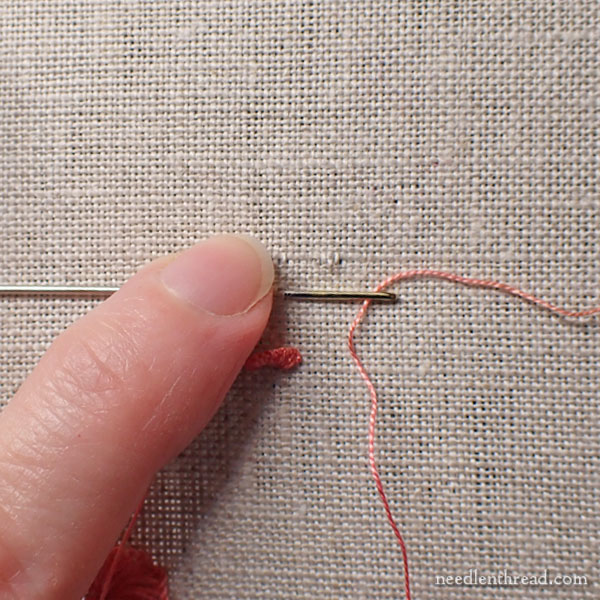
You’re ready to pull the stitching needle through the loops. It is essential that you hold the loops in place as you pull the needle through, so just rest a spare finger on top of all the loops before you pull the threaded needle through.
Then pull the threaded needle through.
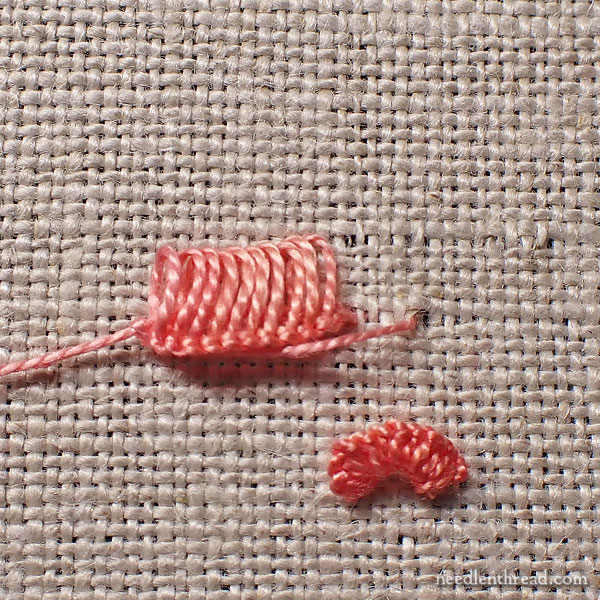
I’ve pulled the needle and thread through the loops, traveling to the left. Now, I need to bring the left side of the loop sequence over to the right side of the stitch space on the fabric.
To do that, hold onto the loops in place again, and take the needle over to the right side of the stitch space, where you will enter the fabric again (just like you do with regular cast-on stitch).
I found it easiest just to pinch the loops with the fingers on the my left hand, to hold them in place.
It’s really important that these loopy, open loops don’t get messed up at this point!
And here you have one reason why this is not my favorite type of embroidery endeavor. It gets very fiddly in here, and it’s easy to mess up those loops!
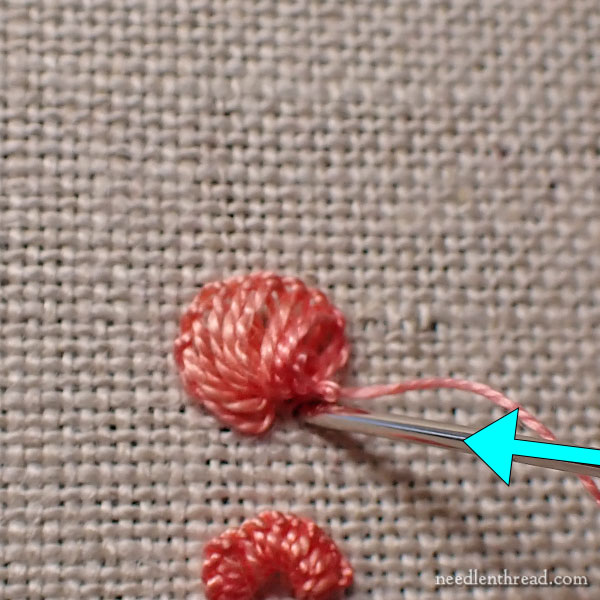
As you move the stitches over to the right, basically flipping the row of cast-on loops from left to right, you also have to turn the loop so that the cast-on stitches are on the outer edge of the resulting “arch” of stitches.
Take your needle to the back of the fabric in the same hole as the beginning of the stitch, and pull the thread through gently. At this point, I still like to have a finger on top of the loops to keep them in place.
As you reach the end of pulling the thread through, release your finger and make any extra adjustments you need to make, in order for the resulting arch or petal of larger loops to take shape and look respectable.
Secure the stitch on the back of the fabric.
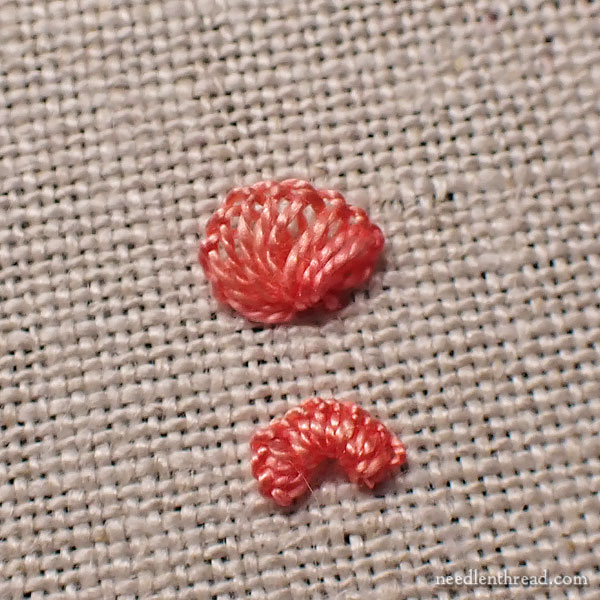
And there you have an extra-wide-looped cast-on stitch (top) next to a regular cast on stitch (bottom).
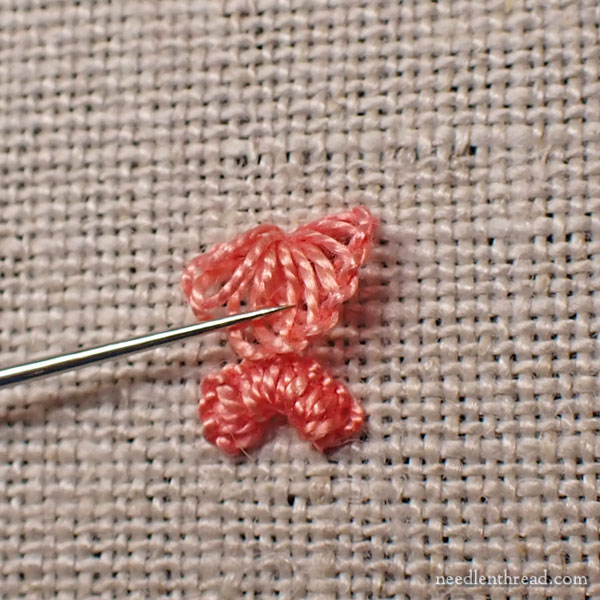
Using the tip of the needle, I’m folding the wide-looped cast-on downwards so you can see the underside of the stitch. I tend to think the underside actually looks better, but for it to hold its place, I’d need to tack it down with some anchoring stitches through the outer edge of the loops.
This is not something I want to do with this particular demonstration, so we’ll leave it as it is!
That, my friends, is a wide cast-on stitch, worked with two needles. I find it a fussy sort of stitch, rather slow and labor intensive as stitches go, and I’m not super fond of the outcome. I don’t love loose, loopy stitches, though in the right setting, I can see their usefulness.
I tend to worry over a stitch like this. Will it keep its shape? Will it snag on things? Will I snag things on it? These are the things I think about.
But, for what it’s worth, that’s how this stitch is made using two needles!
It takes a lot longer than the 30 seconds demonstrated in a reel, just in case you’re wondering.
Next time we’ll look at a slightly different approach to the same stitch. It makes a little more sense and is less complicated, but it also has its own little set of difficulties.
Looking for More?
If you’d like more in-depth stitch tutorials, check out my Stitch Fun! Tutorials here on Needle ‘n Thread. There, you’ll find all kinds of embroidery stitches to explore, demonstrated step-by-step.
Have a wonderful weekend!


Wow!
That stitch would take forever. And if there are other options, that’s for me.
But my favorite part of your lesson, Mary, was just before the stitches were flipped. At that point, you wrote “just rest a spare finger on top of all the loops…” and I thought “but I need all ten fingers, Mary! None of them are spare fingers!” — a chuckle that made the lesson more palatable.
I suppose you could always borrow an extra one, if you know anyone who has one available! LOL!
Mary you continue to inspire me! Thank you for all your helpful tutorials. What a blessing to have your website on my line of vision! God Bless You!
Linda
🙂 Thanks, Linda!