Happy Wednesday! I hope you all had a fabulous weekend. Here in the States, it was a three-day weekend in honor of Memorial Day. We had terrific weather through the weekend, until Monday evening, when we had some fantastic storms. It was nice to have a bit of a break, but it was great to get back to work yesterday.
Today, we’re going to look at three more bands on Cotton Quartet – bands K, L, and M. The last one (M) is a bit more time consuming than most of the bands we’ve had so far.
Members on Patreon will find these bands (and more) in the last PDF I posted, so you already have this information. I can fit a lot more in a PDF than I can in a regular blog post, so you’re already a bit farther ahead. I’ll post the next PDF once we’re a little closer to catching up on the blog.
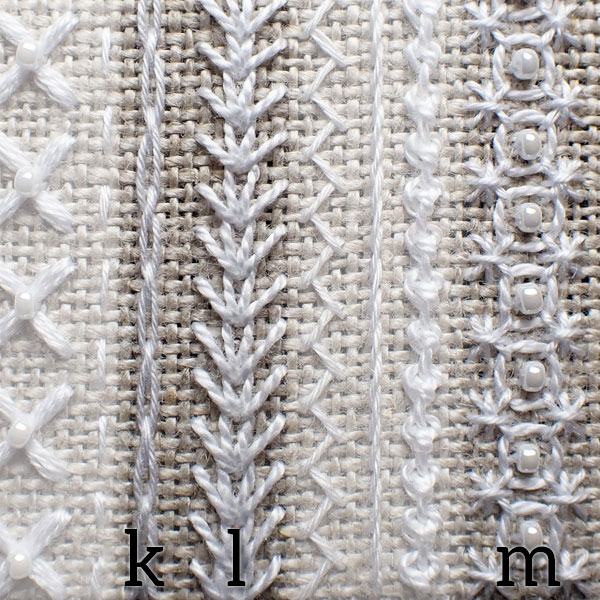
Bands K, L, and M on the sampler cover of Cotton Quartet are a little out of order, for the reasons we discussed in the previous installment of the project.
You don’t have to follow my sequence. You don’t even have to use the same stitches I use! This is simply a guide to show you what I did, but you are free to mix up the stitches in any way you want.
Just remember that results will be different, and, if you’re stitching from the Cotton Quartet Materials Kit, you might want to be somewhat mindful of thread usage (even though you can use the easy-obtainable perle cotton #8 and the floss for as much of the stitching as you want).
Band K
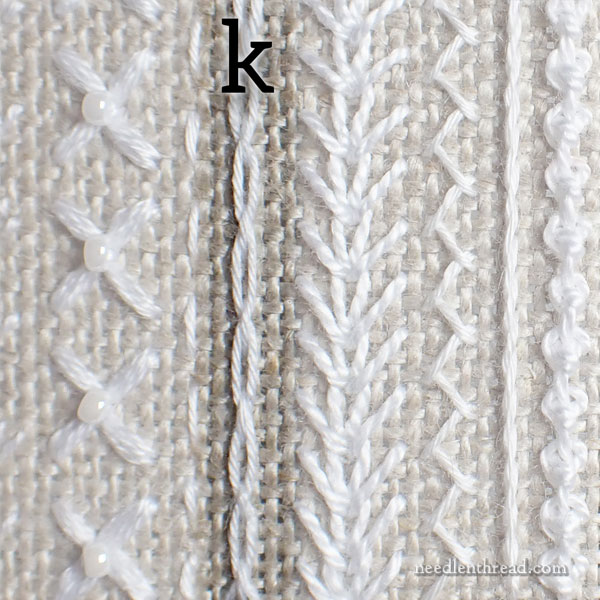
Band K is a laced running stitch band worked in coton a broder.
The running stitch foundation for this band is three threads to the right of Band E (the running stitch band from lesson 2).
The running stitches are worked over three threads of fabric, with two threads between each stitch.
Lace the running with coton a broder in both directions, using a tapestry needle and running the thread underneath each stitch on the way up, and then on the way back down.
To see how to lace stitches (running stitch or any kind of stitch), check out this video for laced backstitch.
Band L
Band L is a mock wheatear worked in perle cotton #8.
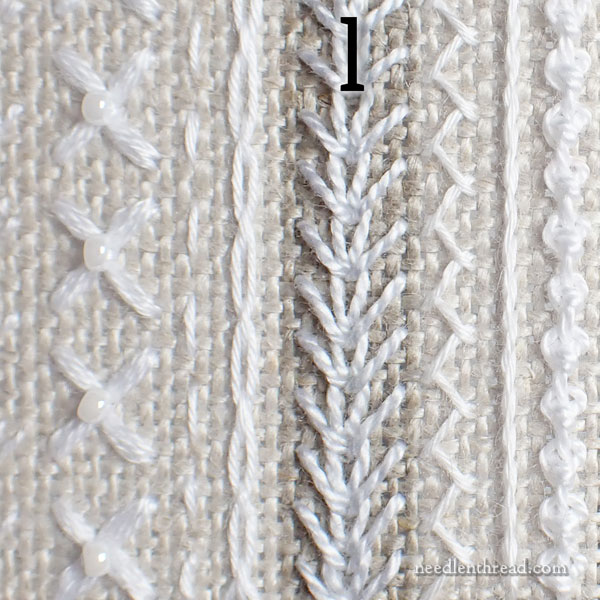
Mock wheatear is slightly different from regular wheatear stitch.
Begin by stitching a regular chain stitch from the bottom to the top of the design. Remember, we talked about design orientation in the previous installment – the bottom is the flap edge, and the top has the beaded loop stitched on it.
I worked the chain stitches over four threads of fabric. Since the perle cotton is a slightly heavier thread, the stitches look a bit better (less crunched!) a little larger.
The “arms” of the wheatear can be stitched on the return journey down the band from the top. They are diagonal straight stitches over three threads of fabric, beginning or terminating in the same hole that each chain stitch begins in.
You can find a tutorial for mock wheatear stitch here.
Note: At the top edge of the sampler (up on the end where the beaded loop is), you might have to stitch only half a chain stitch, by stitching straight stitches that look like the chain stitch without the curved part of the loop. So you can either truncate the last chain stitch at the top by stitching a simple “V” with straight stitch, or you can try to gauge the length of your stitches as you reach the top, in order to end the line with a full chain stitch.
Band M
Band M is a composite stitch that requires a little more time. It is, in fact, a basic form of chicken scratch embroidery (or gingham lace embroidery). I moved over to work it on the far edge, because I wanted to fit this band in on an edge and I needed to stitch it before I filled in with other bands between L and M.
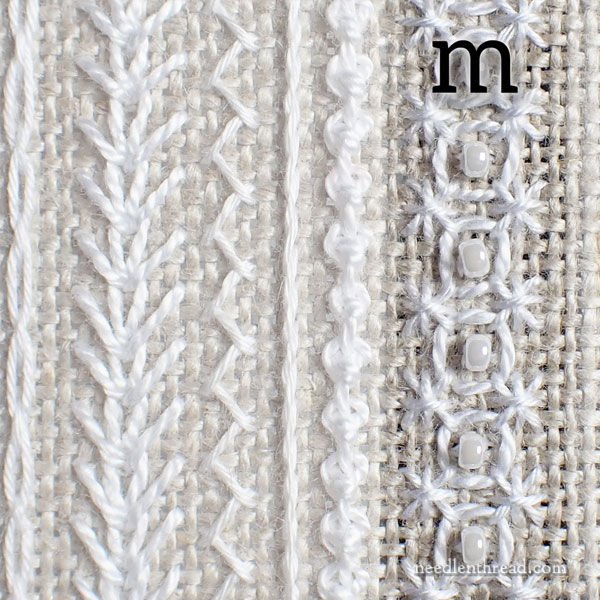
This band is repeated on the inside of the tool wallet, on the gingham.
You’ll start with coton a broder, working two bands of double cross stitches. Make sure that the right side of the right band of double cross stitch is at least two threads of fabric from the design line on the right side of the sampler.
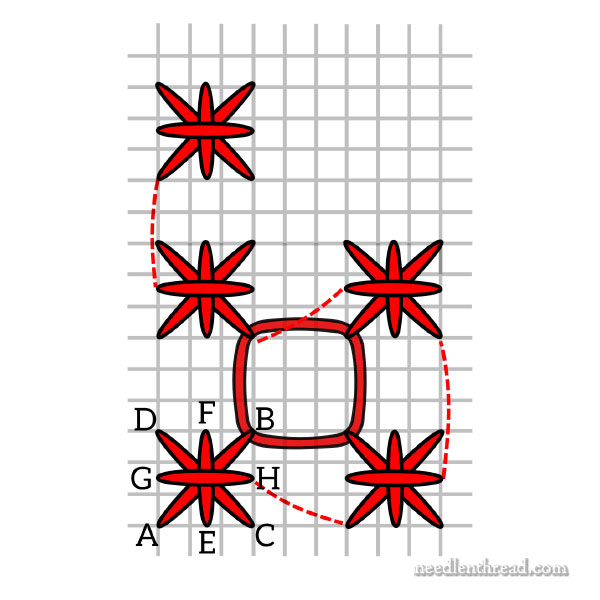
The diagram above demonstrates how to work the double cross stitches, traveling your thread up both bands. If you want to work each band singly, that’s fine, too.
When you get to the top of the sampler, it is likely that you will have to stitch “half” double cross stitches on the edge, in order for the spacing to be correct.
Note that the top stitch on each double cross stitch is a horizontal bar. This is important, as it keeps the stitches consistent all the way up the band.
After working the two lines of double cross stitches, switch to perle cotton #8.
Starting behind B (diagram) in the first group of four double cross stitches, run the perle cotton under each corner of the double cross stitches as shown, ending under the corner again at B. This creates a ring of perle cotton inside each group of four double cross stitches.
Finally, sew a bead in the center of each ring, using the beading thread and the method demonstrated for sewing on beads in the first lesson.
More to Come!
We’ll finish up the whole right side of the sampler in the next lesson on Cotton Quartet!
You’ll find all the lessons for Cotton Quartet in this index, where they are listed chronologically.
Members on Patreon will find the lessons included in PDFs for easy downloading, saving, and printing. There are fewer PDFs than there are lesson on the website, and the PDFs that are available now on Patreon cover all the website lessons so far, including this one and the next.
New Books in Stock!
On Saturday, I added some new books to my shop – three of the lovely Reticello books by Giuliana Buonpadre. One has already sold out, but more are coming!
By this weekend, I hope to have four more of her books added to the shop. I think Giuliana’s books are some of the best instructive books on reticello. The text is Italian, English, and French, and the books are loaded with diagrams, photos, and charts. One of the volumes I’ve yet to post is her Hardanger book, so if you or someone you know is a Hardanger enthusiast, keep an eye out for it!
Thank You!
Many, many thanks for all the kind words of encouragement and support concerning the stroke-in-the-eye issue from last week. The damage is irreparable, but in the scheme of things, it could have been much worse. I’m very thankful it was not! My eyes just need to get used to the difference in vision. I’m still plugging away, never fear!


Hello Mary,
I am really sorry about your eye but you will get used to the change in your vision and it will feel normal for you. But you are a very busy lady and it could be your body telling you that it is time to slow down.
Is there any possibility of you getting a partner or an employee.? Someone who would do standard non-stitching stuff like packing and mailing, Someone who would share and reduce the stress for you. My medical background says that this is a warning and it is time to see what you can offload. And that is a tough move and decision I know.
All the best of good wishes. You are more important than what you do.
Ann
Hi, Ann – Thanks for your note! I do have an employee now, thank goodness! My niece, Anna, has been working with me for over a year now. She’s become a pivotal part of Needle ‘n Thread! 🙂
Mary:
I am glad to hear you are adapting to your “new normal” as far as your eye goes. I suffered a small stroke in my eye several years ago. My other eye compensated as far as distance vision goes, but I still have a small blank spot that I’ve had to adjust to when working up close. I’ve also found I need to rest my eye when stitching by looking up/away more often than I did before. I wish you a continued recovery and adjustment!
Jan
Thanks, Jan! Good to know I’m not in the same boat, and the outcome is definitely livable!