I’ve recently had some questions about changing fabric sizes for gridded embroidery, especially in relation to petit point on silk gauze.
The questions stem from my Thousand Flowers miniature silk gauze projects, because the kits are available again and several intrepid folk who love the medieval tapestry look and who enjoy a stitching challenge are working the projects as we speak!
I thought I would address the question here, for those who struggle with calculating fabric size for counted work. I also want to point out four important considerations when changing fabric sizes. This way, when questions comes up, I can direct folks here as a resource.
No matter what type of counted work – whether it’s petit point on silk gauze, counted needlepoint, counted cross stitch, or other myriad counted techniques – the concepts we discuss below will apply to them all, to some degree.
For those of you who are experienced in counted work, this will be old hat to you! For those who prefer to work off the grid, no worries – we’ll be off it again soon enough!
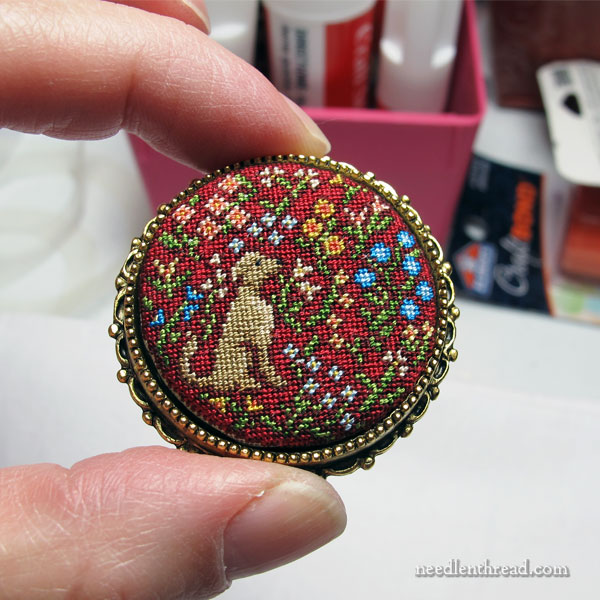
This is the dog design in my Thousand Flowers miniatures collection. I finished it as a brooch, and I’m including the photo here not just because I think he’s a mighty fine doggy, but because it gives a better sense of the size of these pieces.
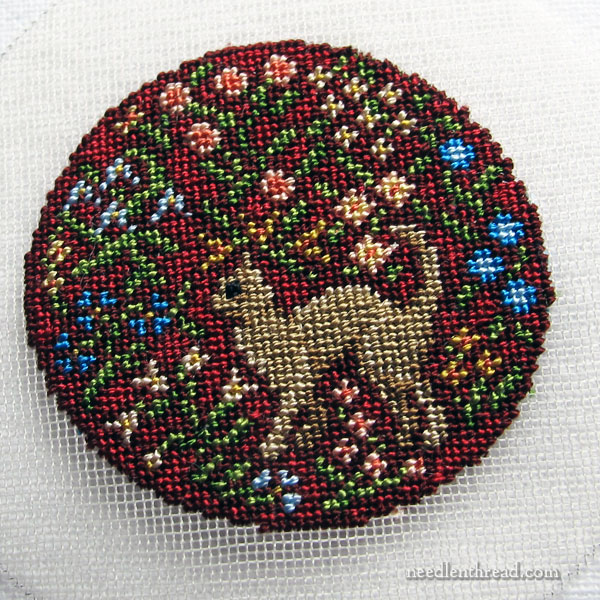
For a basic explanation of following a chart for counted work, here’s the cat before she was duly finished into a tiny little ornament. You can see the cut out silk gauze around the finished piece.
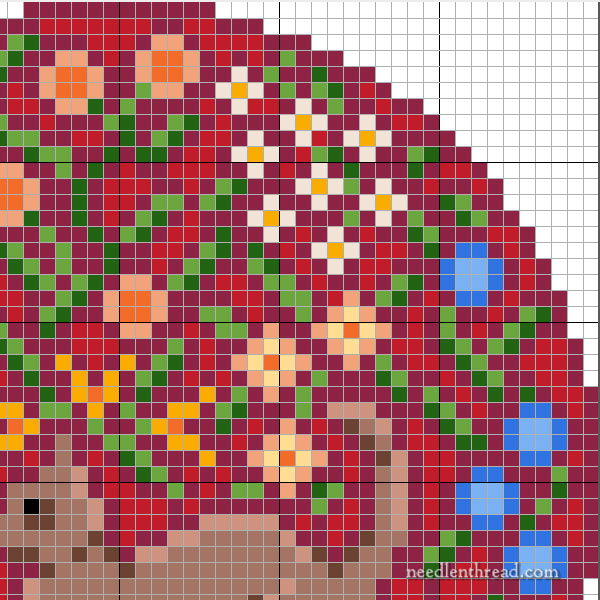
Here’s a section of the working chart for the cat. Notice that the chart is a grid. Each square of the chart represents one stitch on the gauze.
On the printed chart, you’ll find a symbol in each square. Each symbol represents a color (and sometimes a particular thread type), so that you know what color (and thread) to use when stitching the corresponding squares on the gauze.
This is how counted work develops. It’s the whole basis for working gridded needlework.
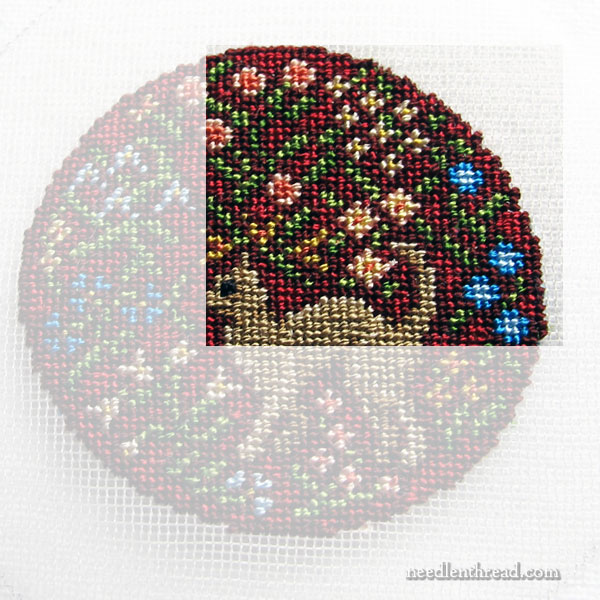
The section of the chart above, then, represents approximately this stitched area on the cat.
For every box on the chart, there’s a corresponding stitch on the gauze, in the color indicated by the symbol on the chart.
So, in a nutshell: a chart is made up of boxes in a grid; in each box is a symbol; the symbol represents a particular thread (color and type); the fabric is made up of a similar grid; stitches indicated on the chart go in the corresponding place on the fabric, using the thread and color indicated by the symbol in the box on the chart.
For those who have never done counted work, I should explain that this is just a sketchy overview of what counted work is about. You might need a more thorough explanation of how to get started before you delve into anything huge!
Thread Count on Fabric & How it Works
The miniatures in A Thousand Flowers are worked on 48 count silk gauze. This means there are 48 holes per inch in the silk gauze.
When working on even-weave linen or other fabric, the gauge of the fabric is threads per inch – that is, how many threads of the fabric cover one inch. Silk gauze is a little different, because the holes are much bigger than the threads, so the gauge of the fabric is indicated in holes per inch (or HPI). But the concept is the same.
To put it very simply, if you work 48 stitches in a horizontal row on the silk gauze, in theory, the row of stitches should measure one inch wide.
Each design in A Thousand Flowers is 60 blocks wide on the chart, at the widest point, and 60 blocks high on the chart at the highest point. So, stitched, each design is 60 stitches wide and 60 stitches tall at their farthest points.
If you divide 60 (the number of stitches wide) by 48 (the holes per inch in the silk gauze), the resulting 1.25 should be the width of the whole piece in inches.
So, each tapestry round, when worked on 48 count silk gauze, is 1.25″ in diameter.
Changing the Fabric
If you change the fabric to something with a lower thread count, then it logically follows that the design will be larger.
Take, for example, this squirrel design from A Thousand Flowers:
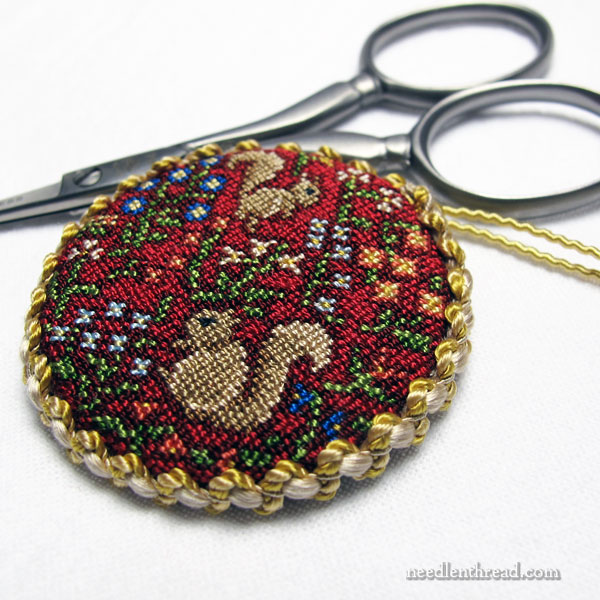
I worked this particular sample on 40 count silk gauze and finished it as a scissor fob.
The chart didn’t change. It is still 60 blocks across and 60 blocks high at the farthest points.
The gauge of the fabric did change. The holes per inch were reduced in number to 40, which means that the resulting finished embroidery will be larger.
Divide 60 (the width in number of blocks on the chart) by 40 (the holes per inch in the silk gauze) and the result is 1.5″.
So, the diameter of the squirrel scissor fob is 1.5″ in 40 count silk gauze, as opposed to 1.25″ in 48 count silk gauze.
Going Further, Considering Threads, and Pixels
If you want to stitch a charted design on a lower count of fabric – maybe to ease your eyes, maybe because you want a larger image overall – then there are a few points you should take into consideration.
1. Your design will be larger. To calculate the size for any fabric, take the number of blocks across the width and the height of the chart and divide that by the threads (or holes, if gauze or needlepoint canvas) per inch in the fabric.
2. Your threads will cover differently. If your design is larger, then it follows that your stitches are larger. If your stitches are larger, the thread may not cover the stitch area as fully as intended in the original design samples. With the Thousand Flowers projects, the beautiful silk threads cover 40 and 48 count silk gauze quite well with one strand, as directed in the instructions.
But if you decide to work the designs on 36 count fabric or gauze, or 32 count, then the threads will not cover the same way. If you use only one strand, the stitching will look sparse. You may have to use two strands instead of one to get good coverage on your stitches.
Some threads that are used in petit point on silk gauze (or even some threads used on needlepoint, cross stitch, and other counted work) are not necessarily the types of threads that blend well when two are used in the needle at once. So, in that circumstance, you might have to seek out a different type of thread that will give you the coverage you want.
3. You will use more thread. If you have to double the thread in the needle, it follows that you will use twice as much thread.
4. The finished design will look different. The larger the stitches in a gridded design, the more pixelated the finished stitching will look. This is because the square nature of the grid becomes more evident with larger stitches.
Basics are Good!
It’s always good to be aware of the basics when contemplating a project. I hope that this brief overview comes in handy for those who are working A Thousand Flowers, or really any counted design. It’s good to know how to calculate fabric and sizes and threads per inch and all that wondrous what-not!
If you’re interested in working the projects from A Thousand Flowers – maybe you bought the e-book and you haven’t launched into them yet – you’ll find a full kit with everything you need to successfully complete the tapestry smalls (including 15 full spools of gorgeous silks, 48 count silk gauze, and the perfect needles) available here in my shop now. Once they’re gone, they’re gone! So if it’s on your bucket list, now’s a good time to grab one!


Morning Mary – an interesting article this morning, I enjoyed reading it and you made the math so easy. Having changed the ground fabric on any number of projects it’s been an exercise I’m familiar with. I’ve never worked with anything as small as silk gauze, I think the smallest I ever went was 32 count even weave and I’m so glad you pointed out the fact that pixels will change the look of the design when worked on a lower count.
Happy stitching – Brenda
I have to tell you, this has always confused me. But you explanation was perfect. Thank you for this!
“You will use more thread. If you have to double the thread in the needle, it follows that you will use twice as much thread.”
Yes, but even if you don’t the stitches will be bigger, using more thread in each, so you will need more thread to work the whole design.
Correct! Good point!
Good information. I have done crosstitch for years & still make mistakes getting my project centered correctly. The one I am working on now has several pages to the pattern & I miscalculated because of that. I will have to do something creative to allow room for framing. Lesson learned!