Gosh, I have rotten eyesight. Often, when I’m embroidering, I don’t see a mistake right away. Often, I don’t see it until I start editing photos.
Even when I use my CraftOptics – which come in very handy if you’re eyes are not so great and you really want to see detail – I don’t catch certain mistakes. I think working with Soie Perlee is especially difficult for me, when I’m filling with it. The way the light plays on the silk makes it difficult to distinguish the stitches.
Still, what a thread to work with! I love it! (You can see how Soie Perlee lines up to other silk threads in this article, if you’re curious about the thread.)
I’ve made the tiniest bit of progress on my Jacobean design and Anna has made some progress on her version, too. If you’re just now joining me on this project, you can find the previous article on my progress here, and the backstory on Anna’s version here. Anna is my niece who works with me right now. She’s 26, and while she’s had a bit of experience in general embroidery, she’s never done this type of project. It is making her bead-obsessed.
Today, I’ll show you where we are, talk about what stitches we’ve used and why, point out my mistake and muse about how I’m going to fix it.
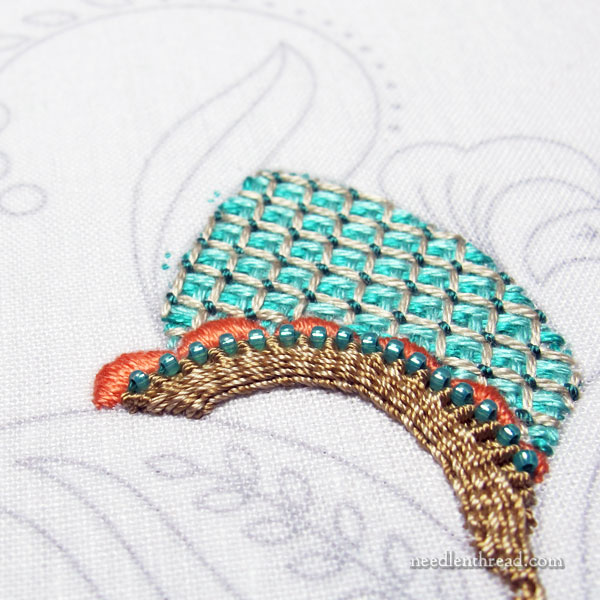
I had to add some beads. Why should Anna have all the fun, after all?
To put things in perspective, those are size 15/0 beads, so they’re quite small.
On the tweedy brown element in the photo above, which sits in front of a low line of scallop tops situated on top of the background filled with battlement couching, I wanted to raise the element up a little. I wanted to play on a mix of the browns & tans to get a mottled look, and I wanted to use Silk Perlee for some thread variety.
I decided to fill that area with a diagonally striped raised band. You’ll find a photo tutorial for a diagonally striped raised band here. It’s a fabulous and fun stitch, worked over a foundation of straight stitches and interweaving two different colored threads.
For my threads, I selected Silk Perlee in a darker and just-barely-lighter sandy brown. I didn’t want a lot of contrast or noticeable pattern in the band – just enough speckle to give some sense of variation in the shades. So I chose shades that were pretty close to each other.
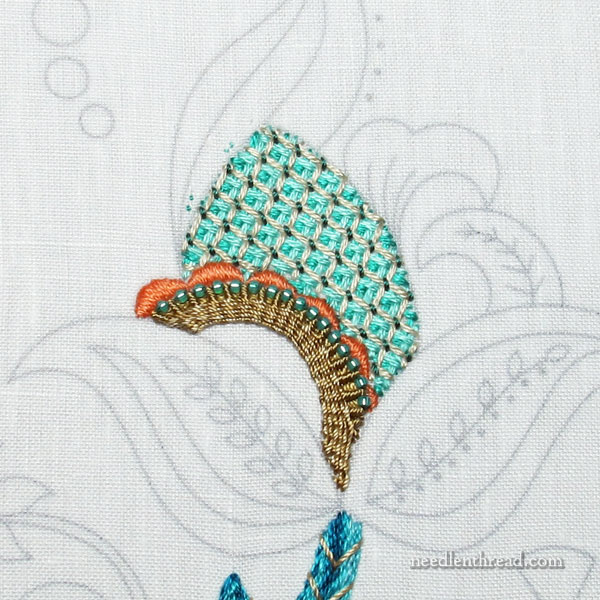
As the band approached the scalloped edge, I switched to the darker of the two browns and to a different stitch – a ribbed spider web – to turn the foundation stitches into little spiny fingers that I could set beads between.
That was the plan, and I’d say it worked, more or less.
But you can see the mistake, right?
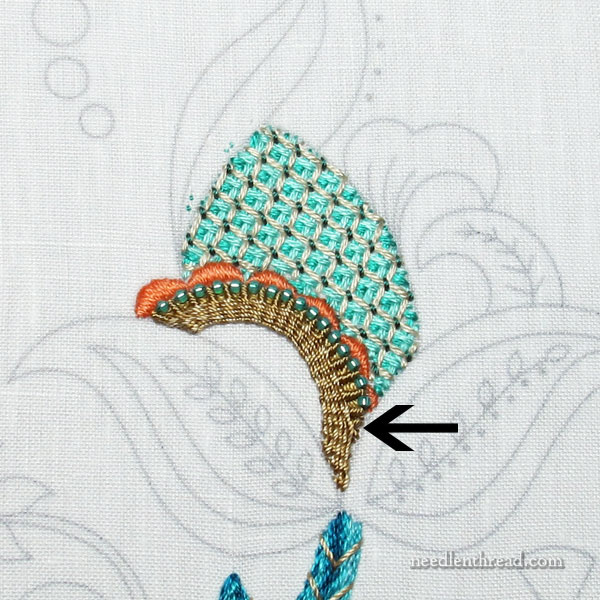
I’m not exactly sure what happened there. I think I may have missed weaving under a foundation stitch.
Whatever the case, this must be fixed because, otherwise, it will drive me nuts. It’s all can see when I look at the photos.
Strangely enough, when I look at the actual embroidery, I can’t see it very well. The reflection of light on the twist of the Silk Perlee causes all the stitches to kind of meld together in my eyes, making it really difficult to distinguish individual stitches when working a filling like this. In fact, I can see it better if I turn my stitching light off completely and work in dim lighting.
But how to fix it? I think I may be able to bring in the dark thread and weave over and under two foundation stitches adjacent to the out-of-place long stitch, pushing it into place. If that doesn’t work, I’ll probably cut the thread and pick out as much as I need to, sink the cut threads, and re-work that area.
I keep telling myself, “It’s just part of the process!”
Gaaaah.
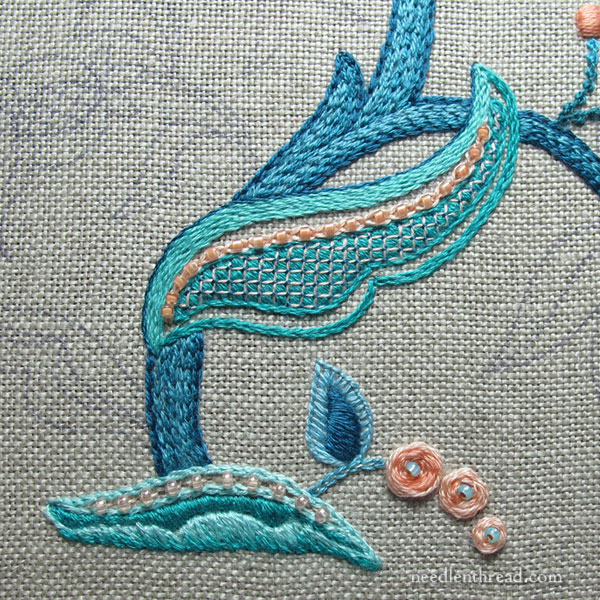
Anna’s plugging away. She’s never done long and short stitch, so the front section of the base leaf was a first for her. I think it looks good. She might end up re-doing it, now that she has the concept down. I didn’t actually instruct her on it. I just suggested long and short stitch shading. So shame on me for being a bad teacher. Good for her, for being self-directed and figuring it out.
If you’re not familiar with long and short stitch, you can find some tutorials on it here – which is exactly what I told her.
I like her little woven buds, made from woven wheels. And yes, of course she had to add beads.
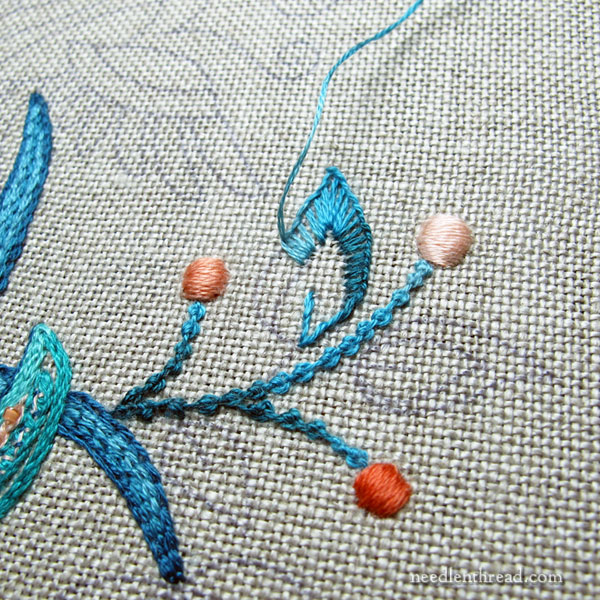
Since Anna’s working with cotton, she has access to a lot of overdyed threads in the color scheme we’re using. I think she made good use of an overdyed cotton on this stem in Palestrina stitch. I like the way she manipulated the thread to give her a dark to light movement on the color.
Satin stitch dots? Satin stitch ovals? Either way, they work! Here’s a tutorial on stitching satin stitch dots, if you’re keen to try some.
I like her use of the buttonhole stitch around the outside of the leaves, and I think she was smart to do the buttonhole first and then work the satin stitch centers. There’s nothing worse than going through the whole angst of getting a smooth satin stitch and then running into it with other stitches and messing it up!
Take away: if it’s at all possible, do your satin stitch elements last.
So that’s where we are! Anna is significantly further along than I am.
Project Availability
Many of you have written in to ask if this design is available right now, if there’s a kit available, an e-book, and so forth. Not yet! I need to develop the project first, fix any kinks in the design, and make adjustments in my materials, color, and stitch selections before I can make it available as a project for you.
The initial design for this project, though, is available for patrons on my Patreon page, for those who are eager to toy around with it.
Previous Articles
If you’re interested in reading the backstory on this embroidery project, the links below will take you to previous articles in chronological order:
Trying Different Threads and Fabric
Changing the color palette, ground fabric, and threads
Progress: Stem Complete & Battlement Couching
Introducing Anna’s Version, with cotton threads on natural linen


I just decided to pick out some rather lame filling on a project and replace it with battlement couching. Love that look!
I like the look of Jacobean designs and your work looks like it will be inspiring!
I do not see any mistake! Even when I enlarged the pic. Don’t bother to fix mistake that isn’t really a problem.
Your tension and evenness of stitches makes my heart happy! Beautiful work!
I know you’re a total perfectionist :), so this may not appeal, but I thought I’d throw it out just in case. Find some matching sewing thread and tack down the silk thread where your silk should have gone down. If needed, add a filler of silk thread to go over again. Hope that makes sense, hard to describe what I mean, and of course I can’t really look at your piece to see if it’s practical. But I’m a handweaver, and have experience fixing little errors in the weave, which isn’t all that different from the stitch you used.
That said, I’m about to cut out some stitching on a handkerchief because I didn’t like how I didn’t manage to follow the lines, so I understand!
Holly
Mary, your work is incredible! Anna’s is very beautiful too.
🙂 Very kind of you! Thanks!
wow, very nice work.it is neat and clean embroidery work. loved it. thank you for sharing such this thing.
I became a Patreon at lowest level today. Wish I could do more but my husband just retired and we are still working out the budget without full time pay. I was reading your Jacobean blues project. Did you do an ebook for this project? I only use DMC cotton floss, no silk. Can you share the DMC colors Anna used? Thank you. I love your site.
Sincerely,
Lori
I haven’t finished writing up this project yet.