


One recurring question that keeps showing up in my inbox ever since we broached the subject of adding beads to embroidery is this:
How do you organize and store your beads?
A month ago, my first reaction to the question was pretty forthright:
Organization? Hahahahhahahahahaha!
It’s not something I’d actually bothered with… until recently.
How did I store and organize beads? In the little ziplock bags they arrive in, or in the tubes and cylinders they’re packaged in, all jumbled together in a box here, a basket there, a larger bag inside that particular box, tossed into this drawer or that drawer.
You get the point: I had no organizational or storage solution for beads until about a month ago.
I finally capitulated. I was fed up with foraging and weary of wondering what beads I have, in what color, size, and type.
This is The Thing, though: the main reason I never really bothered with organizing beads is because I don’t use beads often in embroidery. If you don’t use beads often, or if you don’t really like adding beads to your embroidery (and this is a whole different discussion!), then you might not have any reason to seek a solution for organizing beads and keeping track of what you have.
Chances are, if this describes your situation, you won’t have enough beads to bother with a storage and organizational solution.
The wee ziplock bags, the tubes and cylinders, the tiny glass jars that housed your beads when you bought them – all kept together in a box or a drawer – is a perfectly suitable way to store a small or random collection of beads.
Disorganization & Waste
I’ve purchased beads off and on over the years, but not really in any quantity at any one time. Still, the collection has built up, and because I didn’t organize my beads from the beginning, I had no idea how many I had – what types, colors, sizes, and so forth.
Right now, I’m starting a project that involves some embroidery with beads, and in order to design the project and make it work the way I envision it, I thought I needed a wider supply of beads than the ones I had on hand (because I didn’t really know what I had on hand).
I placed an order for the types of beads I like to work with.
When the order arrived, I rummaged around in my workroom, collecting all the little packets, jars, and tubes of beads that I already had, and I put all those packages and all my new beads together in one place.
Then I sat and contemplated the heap.
I cannot, I said to myself, start stashing up beads.
Well, I chided myself, eyeing the heap with a sigh, it’s a little late to be thinking that, don’t ya reckon?
Two things I discovered as I sorted through the pile:
1. Duplicates.
2. Excess.
When you begin to build up a stash of anything – whether it be beads or threads or favorite cuts of fabric – if you don’t have some kind of organizational structure, the result will always be waste, in some form or another.
This isn’t to say that I will throw away any of the duplicates or excess amounts of the beads I have. It simply means I wasted something, due to a lack of organization.
The two waste products that come out of a lack of organization:
1. Money (I bought duplicates I didn’t need, and I bought excess that I didn’t need because I didn’t realize the variety I had on hand already)
2. Time
The former – money – I can absorb and make up, in a way. I can be aware of what I now have, and use it so it doesn’t go to waste. I can avoid spending money on beads that I don’t really need, because I have others that will do the job.
The latter – time – I can’t make up. All the time I spent foraging for particular beads, for example, could have been spent doing something much more productive.
All the time I had to spend organizing a newly grown collection so that I could see what I actually have – I can’t make that up. It could have been spent in better ways.
Now, I enjoy adding to my needlework stash when I can afford to, just as much as anyone else does. I love threads! I love useful and beautiful embroidery tools. And I like beads, too, even though they don’t play a dominant role in my needlework.
A long time ago, I learned the importance of organizing threads. For me, it’s necessary to have a thread stash, because this is what I do for a living.
But when I discovered that I was purchasing excess or duplicates because I wasn’t sure what I had, it became a priority to invest in a good storage solution to keep my threads in order, clean, and safe from deterioration, and to spend time organizing my threads. I use these cabinets to store threads.
And now I organize beads, too.
So I learned the same lesson about beads last month: better to organize them and know what you have, than to waste time and money.
I looked around for several storage solutions. I wanted something compact, visible, with small compartments, because most of the beads I use are tiny seed beads. And I wanted something affordable.
I visited craft stores to scope out their offerings. I contacted people who I know are into bead embroidery. I chatted with jewelry making friends. I read lots of reviews.
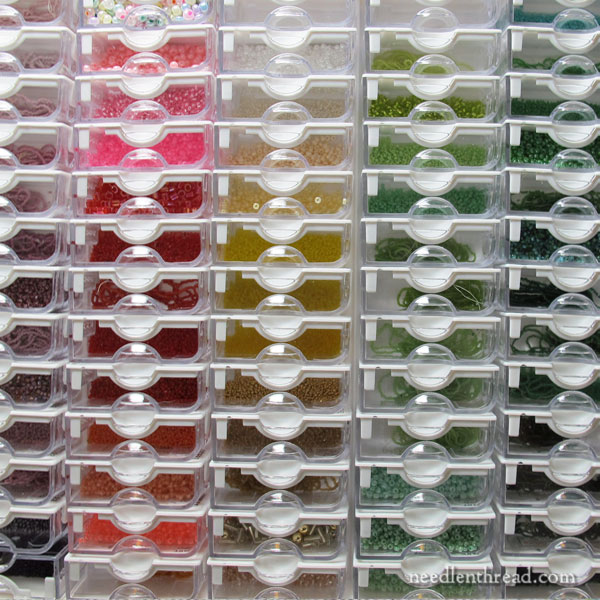
Finally, I settled on the >82-piece Bead Storage Solution tray that you can see in the first photo above.
The containers (there are 78 of them) are tiny and they all fit neatly in one tray. They’re not the easiest lids to manipulate at first, but once you get the hang of them, they work fine.
I use most of the containers to hold 8 grams of seed beads in sizes 11/0 and 15/0, along with other sizes of beads (6/0, 8/0, 10/0) in smaller quantities.
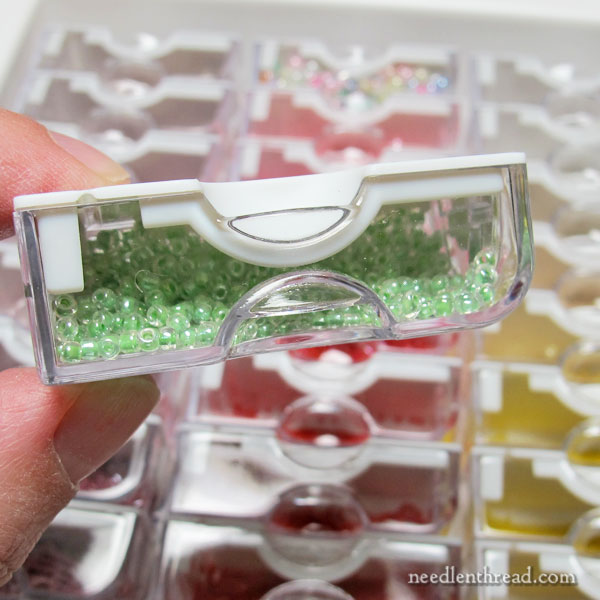
The wee containers are easy to pick up and replace in the tray, thanks to the little “handles” built into them.
The storage tray lid clips closed and holds everything in place. It’s see-through, so you can see the bead colors easily.
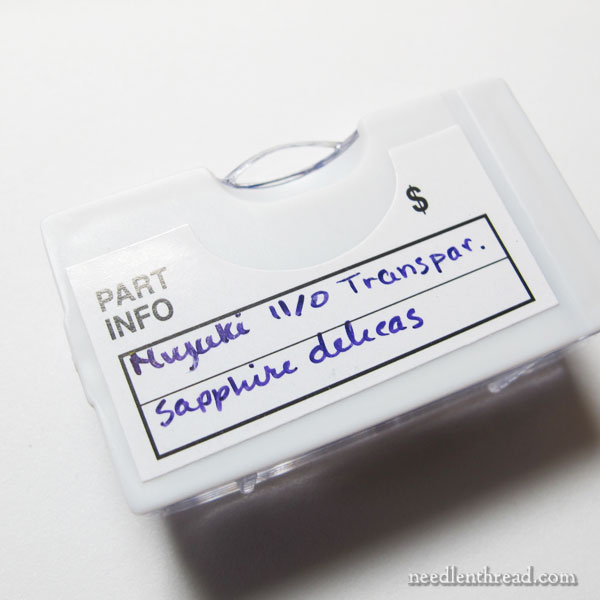
The tray comes with labels for the containers, and the labels are removable. I don’t really like the shiny writing surface on the labels, because ink tends to smear on them. But as long as you’re patient and wait for the ink to set, they work fine.
So far, I like this solution. It’s one tray, it fits neatly on a shelf, and now I know where all my beads are. I can see colors at a glance, and the labels tell me what’s what.
The same system is available in different configurations with various sizes of containers, too, so if you have larger beads or larger amounts of beads, you can use the same system with the larger containers.
Better!
And now I feel a little better about undertaking this upcoming project that involves a smattering of beads.
I know I won’t be wasting my time, scrounging about for beads that are somewhere. And I can tell pretty much at a glance what kinds of beads I have that will work well on the project.
What about you?
If you have a stash of beads, how do you store yours? Do you have any advice for folks looking for an organized storage solution for beads – any tips on what to look for, what works best, and the like?
Do you have any questions about other organizational or storage solutions that other readers might be able to help you with?
Feel free to join in the discussion below, if you want! I’d love to hear your take!
Where to Find It
You can find the bead organization system that I use listed here on my Amazon Recommendations page under Tools & Accessories.
My Amazon Recommendations Page is an affiliate link, which means that Needle ‘n Thread receives a small commission for purchases made through the links on that page, with no added expense to you.
Like what you see?
If you enjoyed this article and you’re looking for more inspiration, information, and instruction on hand embroidery, why not sign up for my daily newsletter?
There are all kinds of reasons to have Needle ’n Thread delivered to your inbox – check them out and sign up today!
This article contains affiliate links, which means Needle ‘n Thread receives a small kickback if you purchase through those links. Affiliate links are an easy way to help keep Needle ‘n Thread going without costing you anything! Thanks!
Gosh, Mary, you put your finger on it. Money? We can always get more or do without, but time? Time is non-negotiable. I feel it speeding by even now. Thanks for the reminder.
I love working beads into my embroidery, but I have a hard time matching the correct needle size to the correct bead size. Have you addressed this in a previous post? If not, I’d love to have a cheat sheet or something like that!
I don’t think there’s any “correct.” If you want tiny sparkle like size 15’s, then you need a tiny needle. It would have to be short, I’d think. It would have to go through the bead and also carry your thread. In some situations you would go back with strong beading thread to add the beads because your embroidery thread would need a different needle. I would not do a lot of beads with floss, for example. Stretched and waxed nylon would last better. I saw a gorgeous unwearable Native American dress covered in Size 10 beads. Too heavy! Smaller beads would have taken forever. No, making samples will give answers for each project. And then there’s couching where you pick up lots of beads with a long needle and fasten them down with another.
now that your beads are all organized, do you have any suggestions for trays to use while beading? I have tried pillboxes (too deep), empty Altoid tins (lid flops around), and the top of a Tupperware container (idea depth for picking up beads but a bit flimsy – have had to pick up too many seed beads off of the floor). I feel certain that someone has a creative solution!
That’s coming up, Ginny – I concocted one last week that works a dream!
An old-fashioned bone china “pin tray” works well. A pretty butter dish or saucer. For embroidery, a few colors can be puddled into a piece of flannel or fake suede. Many people use a Japanese white porcelain paint tray. That keeps colors separate. It isn’t too big. Depends on eye/hand, distance, what is efficient. Culling the beads for woven work is intense!
I use styrafoam meat trays. I don’t recommend them since they’re way too lightweight.
I like to use little salt cellars. they are pretty and not too deep. I like the way they look with the colorful beads in them while I work.
I use a lid from a jar with a circle of felt glued to the inside. The felt keeps the beads from rolling away when you try to stab them with your needle. Momma made one for me about, mmmmm, 50 years ago & I still use it!
Styrofoam meat trays with a piece of some sort of beading fabric cut to fit and taped in place. To keep the tray from flipping, buy inexpensive large metal washers at Home Depot and tape to the bottom.
I use a circular paint pallet I bought for under a dollar. It has several sections so I can separate the beads by color. I know some people use a product called Tacky Bob because it keeps the beads from rolling around.
At least with a system like that you can store duplicates together.=)
With few exceptions, I really only use Mill Hill beads so far and mostly just their regular seed bead size 11/0 and I also have a fair number of their petite 15/0 size ones, as well as one or two packs of bugles, pebbles, 6/0 and 8/0. I probably use them more than you do, Mary, but still not so very much. At the moment, anyway!
I store them in their original packs in 0.3 litre Really Useful Boxes (don’t know if you have those in the States, as they’re UK made). I can fir about 14 packs into each box and so I store them by colour families. You can see what my collection looked like last September by scrolling down on this post:
http://sew-in-love.blogspot.co.uk/2014/09/thread-reorganisation-essentially.html
although most of the RUBs in this drawer style storage unit contain metallic threads and other spools.=) I’ve increased my collection since then and I think there are another 2 RUBs on top now. Clearly, I need to do a new bead collection post!!
Great post to your blog. I enjoyed reading it. I do have some boxes similar to your RUB boxes. They are from Snapware, and I got them at JoAnn’s. My boxes are about 5″x8″ and have only one lid for a stack of 3 to 5 boxes. One box just snaps onto the next layer.
I also loved your blog post. For people in the states, you can find Really Useful Boxes at Office Depot. I love mine. I use them to store project material and scraps of fabric.
I bought exactly the same bead storage system from Amazon last year and now wonder how I managed so long without having all my beads properly organised!
Dear Mary
I really like your bead container, you can easily see the colours and sizes all neatly packed in their individual containers. I do use beads in embroidery in fact I’m currently using them on the Dorset buttons I’m crafting, I like beads I think they add a nice blend to any embroidery. I have a small stash of beads and other items like shells etc which fit nicely in my bottom cabinet draw. I have different sized plastic boxes which I keep some in and others I store in their original box. When I sort through my stash it’s not so bad as I only one drawer to search. But I agree about waste I’ve ordered embroidery supplies not realising I already have them stashed away and this is very annoying as it wastes time and money. Thanks for this review and your tips on how to store beads very useful.
Regards Anita Simmance
I use the storage system at Michaels or a JoAnn’s type store that are small boxes in a larger box (all clear plastic) used to store photographs. In these I have all my charms, buttons, beads, embellishment type stuff. They stack beautifully. They are clear so I can see what I have. I have all red buttons in one box, brown in another, silver charms in one. You get the idea. Then each larger storage container with its handle is labeled for buttons, beads, etc. I can open the lid and very easily see what is in it. Its portable to take along anywhere with me. It was a pretty large investment for the start up, but worth every penny in time in the long run.
Hi Mary. When I first started beading, I used a large fishing tackle carrier for storing beads. When that became full and after seeing an ad in one of my beading magazines I purchased a container from Harbor Freight. It has 4 drawers,each with 11 compartments plus a large storage area on top. I keep all my delicas in plastic tubes in these holders. Cost less than $15.00 each and they have a carrying handle for transport ease.
Would love to see the container from Harbor Freight.
I’ve got beads stashed all over the place. Most are cheap seed beads which came in a multicolored packs and I then separated out the colors.
I was given an old fishing tackle box which I stuck my most commonly used colors into the trays, and tools into the bottom section. (I don’t really recommend this method. It works, but it’s not ideal.)
Other beads in colors I don’t use as often went into a collection of pill bottles my grandmother saved for me and I soaked (some of) the labels off. Those went into a tupperware tub.
Then I have multiple ‘floss’ boxes filled with pony beads, E beads, bugle beads and seed beads.
I also saved the trays from turtle chocolates to store large beads that I only had a few of (and sequins). I don’t recommend this except as temporary useage.
All those beads are kept in different areas. The tub in my closet, the floss boxes in my desk, the fishing box and turtle trays in my “craft cabinet”.
I also now have 2 colors of mill hill beads for specific projects (and 1 substitution for a color I couldn’t find) which are going to be kept separate from my other 3 locations of beads in an under the bed stitchy stuff only box.
Most of the beads were from childish attempts at jewelry making or kiddy crafts. I’ve used some of them in xstitch projects when I didn’t feel like buying 12 beads or to replace a french knot here and there.
Wowderful container you found. I’m using a couple craft boxes with 1 inch square compartments, but the beads easily slip & move into other compartments when I tilt them slightly to remove them from the shelf.
Question:
Have you reviewed the Sulky Cotton Petite thread?
Reason: I can’t seem to find one on the website. I know you have used it, and I’m considerin buying the complete set. However, I don’t want to invest $$$ for all the colors until I hear your thoughts.
Thanks,
Linda
Hi, Linda – I’ve used the Sulky cotton petite blendables for tambour embroidery, and they work really well for that. I haven’t used them for regular surface embroidery. You can find the article where I mentioned them here: https://needlenthread.wpengine.com/2013/10/tambour-embroidery-project.html
Wow! That is impressive. My beads are a hot mess and I am not motivated to change it!
Maybe if I start using them more often because a certain person designs lovely projects to use them….???
I use inexpensive spice jars with screw-on lids and perforated shaker tops. I found them at World Market for about $1.00 each. The jars work much better for me than those tubes or anything with a flip top because I lose fewer beads in spillage accidents…and I HATE searching for lost beads! Those suckers go everywhere! The jars live in a handled box thingy I found at The Container Store. (Actually, I think its a shower caddy, like dorm students use for carrying around their toiletries.) The label on the jar is just a regular stick-on label with all the info written on it, and I glued one bead to the top of each jar so that I can see them immediately. I don’t use beads very often, so I don’t have tons of them. However many spice jars fit into a shoebox is about how many beads I have.
I also keep par sheets (like restaurants use, but for sewing doo-be-dads) to keep track of threads and sundries when I’m running low so that I don’t end up standing on the floss aisle thinking, “Do I need more of #388? Sure, why not?”…only to get home and see that I already had six skeins of #388.
I wrote about my bead storage solutions last year. http://meari.blogspot.com/2014/12/bead-storage.html
I used to be crazy for beading. Fine seed bead work calls for uniform sizing, so my Charlotte cuts are all together, Delicas, etc. I would rather budget for a latte than invest in silly “storage systems.” They’re marketing to us! I now have a rolling cart in a pantry closet. It has larger drawers at the bottom. It is possible to put the bead families into different sizes of zipped plastic bags! After 20-30 years, the tiny baggies do need replacing! So one big freezer bag has all the 11’s. Within that bag, the various colors may be all in a smaller sandwich bag. And so on. I’ve splurged on tiny sparkly beads and kept them all together with notes to myself because uniformity is crucial if you’re weaving them together! OTOH, if we’re gathering up light purples in various sizes and finishes — for surface embroidery to scatter across a silk blouse — our individual packets (tubes, bottles, baggies) will have to be clearly labeled so we can put them back in their families when the project is finished. We are only making it easy to pursue our artistry! We don’t have to show it to anyone else. If the labels are clear, it works! I do use pretty tin boxes with lids or children’s pencil boxes to keep some families of beads, i.e., little baggies of 14’s, 13’s. The real storage challenge comes with big beads, wire, earring hooks, fasteners — not your problem, Mary! I use clear plastic comparmented boxes for those, trying to keep colors or materials together, i.e., shell, crystal, semi-precious.
My beads are in one big box in little zipp lock bags. I have quite a few and I never seem to find what I am looking for unless I empty the complete contents of the box :(. Needless to say, I’ve asked the makers of the system you’ve showcased if they have a distributer in Germany. Will report back for all your European readers.
European stitchers can buy these trays from amazon.de at about €71 each. Delivery is super fast and the tray is really a dream! Thank you very much for mentioning this Mary!
I have no sensible suggestions, but am drooling with envy over your thread and bead storage systems. My bead ‘system’ is as you described your former state. My threads are stored in various drawer systems and boxes, tapestry wools in plastic drawers and boxes, stranded cottons and other cottons in little wooden drawers from Ikea, but tend to get muddled up, pure silks in their bags in a recycled clear plastic former chocolate box in a drawer.
With beads, I love the ability to get the same thing in a variety of sizes. One of my projects, currently stalled due to other commitments, is a galaxy, made from beads and diamantes and sparkly threads, on a black background. One day, I will finish it, when I have the space in my life…
True confession: On the rare occasion that I add beadwork, my experience is rather like going to a Macy’s rummage sale on opening day!
I store some of my beads in small zipper bags (mill hill), sorted by color into a small 3-drawer plastic unit. For my Myuki beads I use those small tic-tac containers, and stand them up in another drawer unit (old DMC floss cabinets). Both the tiny zipper bags and the tic-tac boxes can be found at most craft stores. This way when I drop one I don’t have to do the vacuum cleaner with the nylon stocking routine!
Oh my goodness, Mary, I thought you were talking about my bead stash! I just bought the same bead storage tray and absolutely love it! I have duplicates just like you and it takes forever to find what I need. I hate wasting so much time hunting for what I need. This system is perfect for my needs! I. Think I will order another one for all the sequins and other doodads that I use in my needlepoint! I always love reading your blog but especially when it seems like you are in my house talking about my problems and concerns! Thank you!
Carole
Well, dang it Mary, now you’ve got me thinking of beads…lol….just kidding. I do have a small bead stash as I use some beads in cross stitch, some in knitting but what i’m thinking of using this box is for jewelry findings, crystals, etc., which means TONS of tiny little things…lol. my beads and findings, etc., are in various things, tubes, baggies, boxes, you know the tune and in various locales in my house….this system looks interesting and i’ll have to go to a brick and mortar store and check it out. don’t get me wrong, I LOVE LOVE LOVE amazon. one can find ANYTHING there but the ONLY bad thing about amazon is it’s very difficult if not impossible to return something.
Hi, Sharyn – I’ve never had a problem with returns on Amazon. I return stuff on Amazon all the time. I just go to my order history, click return the item, fill out why, choose schedule a UPS pickup, print the return insert information they email, stick that in the box and tape the box back up, and leave it on the front porch the next day. UPS arrives with the label, they leave a receipt, and off it goes. I recently returned a bead storage box that I didn’t like, and they refunded my money the same day, even though UPS hadn’t picked up yet. Perhaps the difference is when purchasing from a third-party seller on Amazon, with an order that’s not fulfilled by Amazon? I don’t know – I’ll have to look into that.
I store my beads by color in clear plastic boxes and place them all in one large box. This way I can see what all I have colorwise.
My wires, fillers, etc are stored in these same type boxes.
I love your blog, and enjoy embroidery very much, nothing on your level, but it relaxes me and I enjoy seeing my progress each time I work on something. Thank you for all your research and teaching.
For the smaller amount of beads that I possess, I use a fishing tackle box. It is clear and if you need more than one they stack nicely. I purchase them at WalMart (in the fishing aisle) for around $6.00. Also if you wrap your floss on the cards that you buy, they fit into the fishing tackle boxes nicely too. Thanks for all the great ideas Mary! You’re great!!
I use these containers from the Container store. They come in three and seven sections that screw together in a long tube. 1 1/2 or 3 3/4 in diameter. They can be expanded to the size of your storage, They can sit upright or on their sides. Advertised as medication cases.
http://tinyurl.com/ocg29p9
If I wanted to, I could put the tubes in trays but I have a drawer in which I can store them horizontally and find what I need. I can then unscrew a section and have a cup to use them from. No need to put the beads back.
Hello Mary. I store my beads in the original pkg. add name, date, place and $ where purchased them. Watch the time go by and the price go up over the years I do not use them. Beads of all kinds are there when I get ready for my next project that require beads of all kinds. pat
Hi Mary,
I have the exact same bead organizer, BUT I have several of them and still it’s not enough. I’ve already spent more than my allotment on bead storage for awhile, and I’m sad that it doesn’t fit everything. The good thing is that it’s stopped me from buying more and multiples.
I noticed that each time I was buying beads they tended to be the same or very similar. I guess it shows my preferences and I didn’t even realize it.
Thanks for sharing your storage. I’m pretty anal about researching before I buy stuff and when I researched the bead storage I thought I’d found the best and now that you’re using it, it feels like I did.
Happy Wednesday to you!
Mary, what did you do with your bead tubes? I re-use mine to store my awls and laying tools in. Makes a real handy case and protects them at the same time. Now my seed beads are another problem….
Oh my. I just looked at your topic for the day and haven’t really read it yet (just glanced). I’m a little late visiting your site this time. When I saw the subject, I had to respond right away because I love all my beads but I’m obsessive about organizing. The quantity started to grow (and I was only going to buy a few colors) and I soon realized I had to organize them. I bought those plastic boxes that hold little clear plastic circular containers. I use a “labeler” to make adhesive labels for each one with the company and color number. These peel off easily so that I can re-label the box for another color later. My husband laughs at me because I now have a bead collection to go with my fabric and thread and book collections. He knew it would happen. Now I’ll go back and read your article.
Adorei este tema. Tenho o mesmo problema com as contas e miçangas. Já as linhas, tenho uma gaveta grande com divisórias e fica fácil arrumar. Obrigada pelas dicas!
You have a beautiful stash of beads, I have a few dozens and keep them in little clear container,with the size and color on the lid, but I do like the one you got pretty sharp.
I have also check the drawers you have for your threads gorgeous cabinet, and a nice array of threads,
I like what you share, and enjoy reading your post,
Thank you
Diane
Well…I have a bead collection of sorts,bits of old jeweller, geegaws,mother of pearl buttons,old buttons all squeezed Into two plastic shoeboxes. But then I also have three shoeboxes of so called ordinary buttons dating back when they were a dollar a pound. I will never use them all,whether I sew, craft or crazy quilt and spend way too much time picking through for whatever project I’m working on. Shoeboxes seem to be as good as I get so far.
This doesn’t have anything to do with bead storage since I don’t have that many beads yet. I just wanted to tell you how thrilled I have been with the last few posts on using beads! I have been working the flower bead chain and the alternating bead chain on my current project and just love the look of both of them! Such an easy way to brighten up a small border! I have become addicted to reading your blog everyday since I don’t want to miss a thing!
Now you are speaking my predicament. I have a collection of a lot of different crafting materials over the years. Did I say a lot? There should be another word that implies “excessive a lot”. But all through the years I comforted myself with one day my children will be gone and I’ll already have all the materials to indulge myself with any craft I decide or multiple crafts at one time. Did I organize? You bet. Did it help? Well somewhat. Not to bore you with the details- life changes in ways you never expect and even the best of plans can go a wry. The best answer for people like you and me (but probably not realistic) is to just invest in a store that can house every craft you are interested in and include a classroom to indulge yourself and like-minded persons. But back to reality- I continue to plan and try not to buy (that part is the most difficult) and I even manage a to work on project or two here and there. Great blog subject for your non-OCD (or as my family corrects me CDO) readers. Love all your posts Mary!
I like the containers you are using and have found them separate from the tray. I crazy quilt so have more than just seed beads. My collection is sorted by color and housed in one of the 6 drawer plastic units from the discount store. The containers you have are good. I also use plastic bags, clear film canisters, and old Coats & Clark zipper canisters. Barb
Love the storage containers you found! I will be ordering at least 2 sets and transferring all of my beads to one system instead of the myriad styles of storage I currently have. Bought over time with styles discontinued and so all my beads are in one place but not well organized… Trial and error :/ I do have a tip for being able to bead while riding in the car. Use extra wide masking tape loosely wrapped around your wrist with sticky side out. Put another piece of tape around 2/3 of band sticky side facing sticky side. Pour out your beads and pat the sticky part of the tape onto the beads so the beads adhere and voila ~ portable collection. Just pick beads off the tape with your needle as needed. Tape can be worn on your wrist or adhered to another surface … whatever works for your circumstances. At home ~ I use a small tray [actually a small chalk board (Joann’s purchase) with a small frame lip edge)with velvet glued to the surface. I spread my beads on the velvet surface and the nap of the velvet keeps the beads from rolling around when selecting with a needle. The tray holds many beads in various piles so all beads for a project are on the tray. Once done i use a little bead scoop (bead shop purchase) that helps pick up beads to put back in their storage spot.
I keep my beads, which are mostly 6/0, sorted by color palette in the round tubes. I place each grouping of tubes in a quart size bag. I only put as many tubes in a bag that will allow the bag to lay flat. I store these in a craft keeper box with a handle. I store this craft keeper with all my other beading supplies in a storage bin system with my quilting fabric. I no longer buy excess and having my supplies together and organized helps save me a lot of time. My bin with all my beading supplies is at my figertips whenever I need them.
Well, I have too many beads and lots of duplicates and certainly lots of waste BUT beads last a very long time…certainly longer than I will. I do have a question, one I’m not sure you have covered or I just haven’t seen it. How long do our various types of embroidery threads last? I store mine in a cardboard box container. Does wool last longer than synthetic? Is there a way to tell when one should throw out (ack!) old thread?
I ordered plastic pill shaped bottles that are clear with white tops in bulk, 0710-01 144 bottles for $20 and store them in those stack and lock containers. They stand up in them.
I ordered them from: https://www.sks-bottle.com/340c/fin69a.html
Thank you for sharing your experience on organizing beads. I just finished doing just that. And it’s made a huge difference in my crafting. You are right, I not only save money, but more importantly TIME! I also feel great when I can find my supplies quickly and have an idea of my inventory.
I love everyone’s organizing suggestions. I am almost finished re-doing my “sewing” room, and am looking for ways to organize my various textile supplies. Last year I organized yarn and knitting needles and made Excel spreadsheets to keep an inventory! I used different color stickers (stars, smiley faces, Hello Kitty, whatever I could find) and a label maker to identify what’s in each clear storage box. After adding each skein of yarn to my spreadsheet, I placed a corresponding sticker on the label so I know that it’s already inventoried. Nothing goes into those storage boxes until it’s in the spreadsheet. This system might be overkill for bead storage, but I guess it just depends on the quantity and what your individual needs are.
Darcie, the maker of your storage system has a nice video showing the system & it’s various components.
http://youtu.be/iCFqByCT8lI
Beads to tend to creep up on you, don’t they? Just like the bits & pieces for all the other hobbies My beads are not really organized. They are still in original packaging (mix of tubes, bags & boxes) separated by type (seed beads, bugle beads, findings, etc) in a drawer. I’d love to get them organized…someday.
Things holding me back –
a. too cheap to buy enough storage items at once
b. if I do buy a couple at a time, so often the item disappears from the shelves and I can’t find anything else that really works with what I have
c. when they do disappear and I find the same on internet, they often cost much more by the time you add shipping
d. probably the biggest – the current non-system doesn’t bother me all that much since I don’t use beads much.
Mine are in these little trays with 13 covered cups that hold a small package of beads – 8 trays ;-( I like the looks of the set you bought. And maybe only having one drawer st a time open would be an advantage. I lso have more beads and charms so maybe investing in 2 trays would be a smart idea and get them all in one place. I’m a CCSer and use beads a lot. I also have a chart of all the Mill Hill beads with the ones I have marked. Makes it easier not to duplicate. Pat in SNJ
please tell me how to “save” you newsletters. there was no place to Save.
Thank you, Nark
Hi, Nark – there’s no “save” on the newsletter itself. You’d save it in your email platform, by filing it in a saved folder that you name, just like you’d save any email you want to save. Or you can bookmark the articles you want to go back to, in your browser. Or, if you use an RSS reader, you can mark them as saved content there.
I’ve done a lot of beading in my embroidery life and I was getting a bit crazy about how to store them. I went to a big craft store and found in their bead section plastic trays that contain 24 small plastic … pots I guess you could call them, designed for beads, and they have screw-on lids like jars. Each is about 1/2″ high by about 1″ in diameter. They didn’t come with labels but I had some tiny labels anyway that I used for labelling my little thread drawers. The best thing about these little bead pots is that since the lids screw on tight, I can sling them into whatever I’m using to carry my stitching while I’m travelling and I know they won’t go all over the place.
For my threads, I looked in the craft store but there was nothing suitable so I went to Canadian Tire and bought a rack filled with little drawers just the length of a skein of DMC thread. The rack and drawers are actually meant for collections of screws and nails and things like that but it works really well for thread skeins. The drawers are opaque but I can label the outside of each one with the numbers of threads inside. They stay out of the light so they won’t fade but they also can lie out flat and when I pull a tray out, I can see immediately if I have the colour I need.
I use those trays with the 24 little “pots” and love them. You can easily see all your beads at a glance. You can stack the trays to store them but lay them out on the table to view all your choices without opening anything. I too, take a little “pot” with me during times of travel stitching. I got them at JoAnn’s, Walmart and Tuesday Morning. I even store unique buttons in these. It is a handy way to view what you have when you aren’t sure what bead or button you want.
I’m getting excited about Mary’s posts including needs. Now I finally am Using the beads I stashed!
I love the storage system, but wish the labels could be on the front. If I am looking for a specific number, it seems that I will have to take them out to find out number the bead is. If the case were clear on the bottom you could just flip it over and know where to go, but since it is opaque white you can’t do that. Or am I not understanding how this works?
Hi, Jean – the labels are on the top of the container. The container (except for the top) is clear. So you can see the colors of the beads in their containers fitted into the trays. When you take the container out, the label is on the top. So you can’t see the number (size) of the bead necessarily, but you can see the beads themselves very clearly. I like to pull out beads by color first and then sort them or choose them by size within a color range, so this actually works well for me. But I can see how, if you want to know the size of the bead first, you’d want to see the label. Of course, you could arrange your bead containers in the tray by size, within color families, which is what I do, so I know that, in the top of a line of certain colors, my smallest bead sizes will be found, and then they’ll progress to larger.
I have used beads and semiprecious gem stones in many projects over the years (30+) and have used almost as many organizational products. The system you have is the same one I use. It’s perfect!!!! And you can store lots of other little items: buttons, sequins, brads, etc. it can be pricey. But some Walmart stores carry them as well as Amazon and Fire Mountain Gems.
Thanks for the lead, Mary! I just ordered the little bead tray – so timely, as I’m organizing my stitching space as we speak. I know just what you mean about easing the bead package open and then suddenly it gives and you have beads all over! a few years ago I got a little tool just for cleaning up those spilled beads. It’s a handheld gadget with a rotating brush that sweeps the beads into it’s conatiner – like a miniature of those silent vacuum things they use in restaurants.
And weighing in on the beads on embroidery question… almost all of my Brazilian embroidery gets beads, but not so much on regular embroidery.
I love your storage unit for beads. I bought one after your first column and have never looked back. I bought a second one with larger sections and use it to store my decorative buttons. I am considering a 3rd one to store needles. They are fabulous.
Many thanks for the idea.
Many bead spackages are designed to better hang on racks . When they come one, no easy opening or storage.
LOL…your thoughts on opening bead boxes was very much something I can relate too. My granddaughter started beading a couple years ago and I remember all the beads on the floor I stepped on. But I did teach her how to open the bead boxes while inside of a large zippered freezer bags… bead box and one hand zipped inside…other clutching the box from outside…way less bead lossage…..but then she would put them into empty tic-tac cases…stacked on sides and can view colors….
Mary, that’s so funny! I totally agree with you on the containers. There are a few small things I buy that are like that, and it’s so frustrating (just fix the dang container!!). I just bought a similar container as yours to put my beads in. I use beads for embroidery and to make jewelry and have hung them on my peg board in small ziplocs, but it never quite worked for me. Now that the bead situation is taken care, what is the best way to store hand-dyed floss? Should I separate it into two strands (what I use the most) and then wind it around DMC cardboard floss holders and keep it in plastic containers or what? I’ve looked online but so far I haven’t liked any of the possibilities (except for the ones that are WAY out of my budget, like the beautiful wooden drawers). Right now I have them hanging in groups on large silver rings on my peg board. They look pretty, but that can’t be right. This is the first year I’ve been purchasing hand-dyed floss and I love it, but I just don’t quite know how to organize it. Any thoughts anyone?
I use reproduction cigarette holders with the sticky mat on one side, 1/2 the next side with the sticky mat, and a strip of magnet next to it for the beading needles and needle threader. Then you can just close it up and it’s ready for the next session.
I also have different holders for different needles, lined with magnet sheets.
A friend bought me a set of very small clear plastic boxes at the container store, and they fit in an antique type tray that I hung on the wall. The tray also holds a rainbow arry of Metler thread spools for my appliqué.
Boy, I’m really (4+ years) late to the party on this post: glad I followed a link and found it! I, too, have beads all over the place, and in eleventy-eighty different types of storage containers & in different places, too. I just ordered the large bead-storage unit and I can’t wait to get all the little buggers organized. THANKS for this suggestion!!
I bought this bead storage system last week for my beads (mostly Mill Hill, plus some leftovers from kits and other random odds and ends) and I love it! The only problem is that now that dealing with beads is less of a hassle I’ll probably be buying a lot more of them.
Oh, by the way, the labels stick much better to the bottoms of the containers. (I learned that from a video from the manufacturer; I have no idea why they don’t mention it on the box.)
But I also used my label maker to make tiny, tiny labels with the Mill Hill number on the side that faces out. (I can still see the beads through the 80% that’s not covered.)
I cannot find the bead storage box you mentioned in this article. There seems not to be a link to that particular 82 part box.?????
Hi, Charlotte – if you go to my Amazon recommendation page here: https://www.amazon.com/shop/marycorbet and look under “tools and accessories” it’s listed right at the front of that list. If you click on the bead box shown, it’ll take you to a listing for those boxes, and one of the choices is the 82 piece with all the smaller boxes. Hope that helps!
Thank you for this recommendation for bead storage, I just ordered it! Looking forward to getting my beads in order!
I used to be a bobbinator until I discovered floss drops. For now I arrange them by color on large binder rings and keep the rings on plastic hangershidden behindcloset doors I have smaller rings I use to collect all the colors I need for a project and keep them with all my projectsupplies in a ziplock bag, All but the largest rings will fit in a plastic grocery bag, not elegant but functional. I had ideas of getting large muslin tote bags’ which I’d planned to embroider with something cute related to embroidery. I never got around to getting the muslin tote bags so there they sit staring at me demanding to be finished.
I was wondering how other stitchers sort and store their floss on drops. I seems like the top hole would accomadateThank you
Sue.