Remember last week when we looked at an unconventional use for the telescopic magnet – using it, extended, as a thread rack?
I mentioned that I wanted to come up with a dowel system to use as a kind of thread rack while working.
Many readers suggested swinging towel bars, which would probably work great if you wanted to permanently mount them somewhere or onto some kind of rig that would be semi-portable or moveable. It’s certainly a possibility. I could see replacing the mounting system with a very strong magnet, for example, and putting a set of swinging towel bars on the side of my thread storage cabinets that support my work table.
A couple readers picked up exactly what I had in mind, though, and made the suggestion in their comments for what I was using.
And it is this:
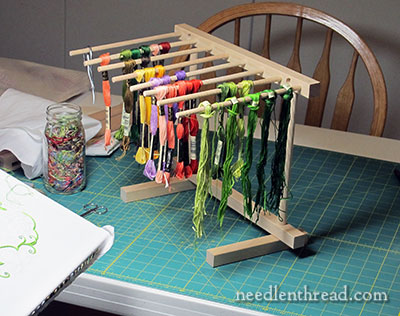
It’s a pasta drying rack. I’ve repurposed it and adopted it for my workroom, where it’s going to get a lot more use than it ever got in the kitchen.
I made homemade pasta once. I ended up using a broomstick propped between two chairs to dry the noodles. The rack was completely superfluous.
The rack works great as am embroidery thread rack. Better, I think, than as a pasta rack (but don’t tell Them I said that).
It’s a convenient size for the top of the table (if you don’t have a work table that you sit next to, you might find it too awkward – it needs a flat surface). It’s collapsible, so I can put it away when I’m not using it. And it offers plenty of space for arranging threads in different color families and groups.
There are some caveats, though! And some decided advantages. Let’s chat it all up, shall we?
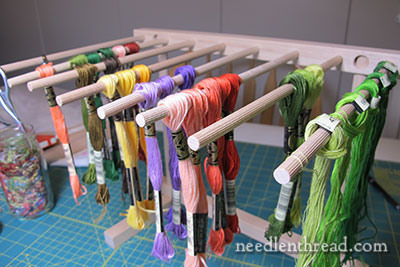
If you’re going to use a pasta drying rack for this type of job, the obvious point: if it’s been used for pasta before, you’ll need to do some careful cleaning.
The dowels will also benefit from a quick swipe all around with a fine sand paper. These weren’t made to hold embroidery thread, after all, and they aren’t smooth as glass. You probably won’t get them smooth as glass – this particular rack has little grooved dowels – but you do want to remove any significant roughness to the wood that might snag your threads.
It doesn’t take any time at all to sand them – just fold the fine sand paper around each dowel and run the dowel lightly through it a few times.
On the rack I have, when I assembled it, some of the dowels seemed loose. I turned them around and stuck the other end into the hole and twisted the dowel and they tightened up just fine.
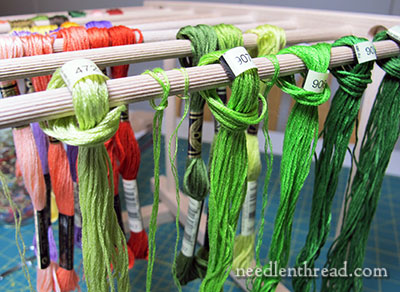
Using pre-cut threads is mandatory, if you want to conveniently be able to remove the threads from the dowels.
In the photo above, the greens are prepared for use on the Secret Garden project. I haven’t prepared the other skeins yet. I slid them onto the dowels as skeins, and you can see them in the background. You can’t conveniently use full skeins on this set up, though, because if you wanted a skein on the back of the dowel, you’d have to remove all the skeins in front of it to get to it.
So you do have to work with prepared and cut threads for this to be a convenient set-up. And that’s fine, because that’s how I like to work when I know I’ll be using a lot of thread. It’s more efficient to pre-cut your threads and have them ready to go.
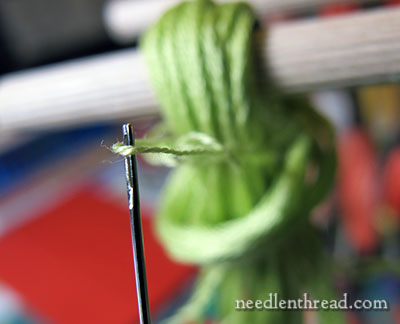
Another convenient point about using pre-cut threads that are hitched on a dowel or bar (or a thread card): you don’t have to “strip” or separate the individual threads from the larger group of six every time you need a new thread.
Instead, you can slip your needle’s eye under one tiny strand (even though it’s still comfortably “in” with the group), and pull just the one strand out. This is an efficient way of stripping your threads.
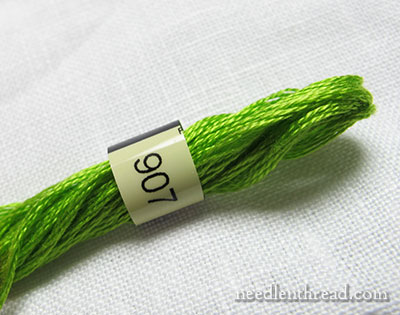
To set up my threads on this rack, I cut the threads into 18″ lengths. You can go longer or shorter, depending on what you’re comfortable with and the type of thread you’re using. With floss, I find an 18″ length is perfect. I know some folks stitch with much longer lengths because they don’t like to change threads too often, but I find 18″ keeps the threads looking fresh and eliminates frustrations from knotting and so forth.
When I remove the tags from the skein, I keep the one with the number on it and snip off just the number. This makes a short little sleeve. I fold the cut threads in half and push the folded end into this little number sleeve.
If you write down your color numbers ahead of time and a short description of the color, keeping the number tag isn’t essential, but I do it anyway. It doesn’t really take any extra time and it can allay confusion down the road.
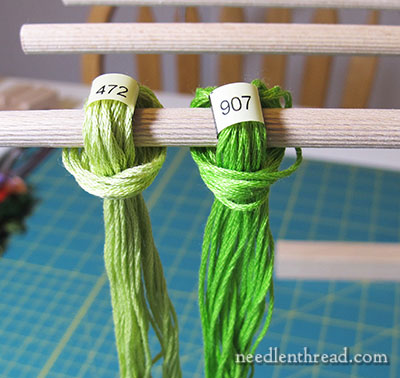
Then I hitch the floss onto the dowels, by taking the tail of the floss through the loop made by the fold. I keep the number sleeve above the hitch, as you can see in the photo above.
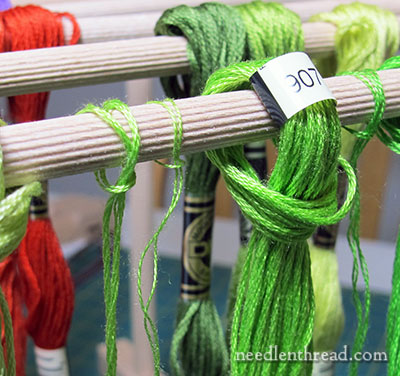
A marvelous advantage of this little dowel rack – I can hitch up unused individual threads, too, so that they don’t get accidentally allocated to the orts jar, or stuck on my clothes, or brushed onto the floor.
Another nice feature: I can move dowels that have thread on them already. If I want to move a dowel full of threads to the end position, I can. The threads are easy to access from the tops of the dowels, so it isn’t necessary to move them, but if you wanted one particular dowel full of thread in front of you on the end of the rack, you can pull the dowel out and trade locations easily. You don’t have to re-hitch all the threads.
Same Thing, Only Different
You might have noticed by now that the rack is really just a more “permanent” (even though it’s collapsible and storable) thread organizing fixture for when you’re working on a project. It is not a long-term storage solution.
You can accomplish the same type of organization (in a way) with thread cards which you can make with a large hold punch and some card stock, or with handy thread organizers such as these thread drops, which I love, especially for projects that travel.
The real difference that I’m finding with the rack is that the threads are kept a lot neater, since they are hanging and they are spaced out. They don’t tangle up with each other inside a bag – they just hang neatly on the rack.
Another thing I’ve noticed – I’m more prone to save thread and to hang usable threads back up on the rack.
Where to Find
If you have a worktable, the re-purposed pasta rack makes a great embroidery thread rack, if you keep in mind the points above. I’m really happy with it! I’ve been using it since I started the Secret Garden project, and I can see myself using it for future projects quite often.
There are many, many configurations of pasta drying racks out there, and many different types that look like this one I’m using. In particular, I’m using this: Fante’s Cousin Emily’s Pasta Drying Rack, because that’s what I had.
You can check specialty kitchen stores for them, if you want a new snazzy one, but I think you’d be paying too much for the materials and workmanship (or lack thereof) in these. It just depends. This isn’t something I’d spend a lot of money on, personally.
You could also make your own, if you’re handy with a saw and a drill. It’s not complicated – just dowels and 1″x1″ bars. And you could even snazz it up and configure it your own way. It could be kind of fun!
But if you make a snazzy one and market it and make millions on it, remember me, ok?


Could you fasten (hot glue maybe, or hang them) some of those small strawberry shaped emeries or small pincushions (or something) to the ends of the dowels to stick needles full of floss into while you are working? You know, if the color is on the dowel that is where you stick the color that you don’t need at the moment? I do not have a specific space for embroidery, so I cannot get a thing like that, but just thought I’d contribute my two cents.
That’s a good idea. The only problem I could see is weighting the front of the dowels too much, which could cause the stand to tip forward. Depends on how you did it. I might be inclined to put something across the back bar, rather than on the tip of the dowels.
However you want to do it is fine by me. 🙂 That was just my two cents. Maybe magnets along the bar? I thought emeries because that would maintain them AND hold them (two birds) but it is ultimately your call. 🙂
You could also hang the emeries or pincushions at the back of the dowels behind the floss instead of in front? Sorry, just another quick thought. 🙂
True!
I’m not a pre-threaded-needle person, myself… and I’m pretty sure dangling emeries would be difficult to quickly stab with a needle. In close quarters (with the other threads hanging around), I think the needles would also tend to tangle with the adjacent hanging threads.
I think the best bet for folks who wanted a pin cushion attachment of some kind would be to mount a pincushion “strip” area on top of the cross bar above the dowels. Otherwise, too many dangling parts, or too much weight on the ends of the dowels.
Heck, you could make the whole rack a tool stand, too. Part of that top cross bar could be pin cushion (or magnet) and part, you could drill with larger holes (between the dowels) where you could put your scissors. So many possibilities!
How ever it works for each stitcher is the way it needs to be done. 🙂 All I am doing is posting thoughts for people to use, elaborate on, or ignore. 🙂
I am only a “pre threaded needle” person myself to the extent that my embroidery sessions are often long and I am constantly switching colors and the color I just used I poke into my cushion because I will need it again in a few minutes. When you have a couple of dozen colors for four hours, it is sometimes easier to poke the pre threaded needle into a cushion instead of constantly un-threading it and re-threading it. The only time I did pre-threaded in a big way was on a project I did a bunch of years ago, I was using the same three colors over and over, and having five needles of each to grab was easier than constant re-threading…. I will never do that pattern again! 🙂
That is totally brilliant. I need a pasta rack now.
HI
The pasta dryer is very clever. However, as I was looking at it I couldn’t stop smiling and thinking that you don’t have a cat. I can just imagine how this would work at my house with two very curious felines!!
I have two kings of curiosity myself, and floss and needles are not good things for them to get curious about…… 🙂
True! No cat! I’m deathly allergic to cats. :-/ Love to look at them, I think kittens are adorable, but I could never have one in my house, and I can’t even visit people who have inside cats. It takes about 20 minutes before I can’t breathe. My eyes swell shut, my nose turns into a faucet, and eventually, breathing is impeded. It takes me at least two days to get over a cat encounter. So… no cats. Even if I had animals, though, they wouldn’t be around my embroidery. Pet hairs show up too much in close-up photos… But I almost envy people who exude that cozy camaraderie with their cats. It’s so homey, to have a cat curled up in a lap, a sunny window, or on the hearth!
Oh, yes! Instant cat toy in my house!
Hey Mary, I have a complete solution to your cat allergy problem….. Embroider yourself one! No allergies, no problems. 🙂 Yeah? No?
Heh heh! I’d feel so guilty, hanging it on the wall! 🙂
You are right Mary. You can’t hang your cat. You would soon have the ASPCA in your hair for animal CREWELty. (hahahahahahahahahaha)
Love this idea! I’m currently using an embroidery hoop to hold my wools for my latest project. The number sleeve is brilliant…….. something so simple, yet terrific for replacing colors when running low. I keep the sleeves with a bit of each color tied on………but I like your idea much better. Thanks for the new tips.
Dear Mary
Well! what a brillant idea, I’m always have a mess of threads in various small containers so when I’m stitching I have to open different boxes for different coloured threads. This would be great when a project requires several coloured threads. I’ve just looked it up in the UK and Lakeland sell them at £14.99 which is not bad. So I will order one ASAP. Thanks for sharing this with us a really convenient way to store threads while working on a current project, the photos are great as well.
Regards Anita Simmance
Wowsa! I love it, I love it! My husband knows his way around a saw, perhaps I can coerce him into making me one.
I simply put the threads for each project into a small plastic ziplock bag and have that to hand whilst I’m working. I sometimes lay them out (I now have a tray to hand for that as well, which is easy to move, if need be), but I never even heard of a pasta dryer!!=)
The first time I thought of using one, Elizabeth, was when I saw the whole line-up of silk hanks that are used in Chinese embroidery, that are hitched over dowels either on the frame set-up or right next to the frame. That type of set-up would be too large for me, but to have a smaller, more moveable, less permanent solution would be nice, I thought. And that’s when I first thought of the pasta rack…
I just looked, and Amazon has this same pasta drying rack for under $20. Great idea, by the way
I found this very nice one – http://www.jimcieslawoodworks.com/jimcieslawoodwork.html – however, $150.00 seems a little pricey to me! Perhaps when I win the lottery!
Whoa! That is a lot! But that’s a specialty hand made one. You can find the ones like mine on Amazon for $15 or so….
I like repurposing things I don’t use much. But, if I were going to go to the trouble of making something, I think I’d put a bunch of cup hooks or pushpins on a board (or cardboard, like a clean pizza box, to be frugal), or maybe even workbench style hooks on pegboard. A fancy version could have a hinged cover that might allow you to stand it up when opened, and keep things protected when closed. Maybe tape a sample piece with the label above the hook (or use the push pin)so I know where to return it, and not worry about losing the label. Pizza boxes could be labeled and lined up on a shelf like books.
When you first brought up this topic I had intended to reply and suggest a rack that bobbin lacemakers use to hang their wound bobbins. But those are hard to find, even with lace suppliers. Instead, now I have a great idea to use a pasta rack for my bobbons! GREAT IDEA! Thank you!!!
I hang my wound bobbins from a pretty necklace rack that I found at an arts and crafts fair. It wasn’t exactly cheap, but it’s beautiful and easier to find than a specially designated bobbin rack.
Interesting, I’ve been pre-threading and jabbing them into the (fabric)armchair next to where I do my embroidery work 🙂 It’s how I determine how much work to do, when the 5-6 needles are done I’m done for the day.
Hi Mary,
I haven’t seen any comments on your clever title for this article. The play on words from your blog name made me smile.
🙂 it was one of those corny puns I couldn’t pass up!
I hadn’t even noticed it!?! Thanks for pointing it out, it gave me a laugh.
Great idea Mary!
Mary, I love this solution – and the post today is such fun!!! Now I know that when we need you to be “quiet” thinking, instead of “top gear” thinking, we’re going to have to restrict your caffeine intake! This project is shaping up to be a Needlenthread highlight for 2014 – and I am loving every update.
Wonderful idea Mary! Thanks!
I put my prepped threads on rings, which I can then stick on any old stick or knob… I just started prepping and cutting threads (which I’ve been accumulating for a couple of years – a dozen here, a gross there)for a Very Large Project. To my utter amazement probably between 10 to 15% of virgin DMC skeins are short. Very consistently short — within and inch or few of five meters, not eight as labelled. Since I picked thread up in various places and at various times I can’t ascribe to one vendor or source.
I didn’t stitch for the better part of a decade due to medical issues and have only been able to get back to it in the last several months so I’m WAAYYY out of the loop, but have you or any other readers encountered this?
I do intend to write to DMC/US but just started prepping last night and out of ~100-125 skeins processed I have 18 short, so far. I have another ~250 skeins to process and am curious to see if the percentage holds up.
I’ve never paid attention to how much floss is actually in a skein as I use it but I will now. It would be very interesting to hear what response you get from your letter to DMC.
But what I’m most curious about is the project you’re prepping. 375 skeins?! Just the idea is boggling. It sounds like you’re making up for lost years all at once!
::chuckle:: This is for a design I’ve been developing for something like 20 years. It’s a family heraldry, complete with castles (our clan has two – one still occupied).
This doesn’t begin to touch the vestments and altar linens I ‘owe’ my brother the Father. For those I have three hundred-odd filament silks. (so far)
Because of my disabilities what I can do varies wildly from day to day. Right now I probably have a half dozen WIPs so I can go back and forth depending on how my body is up to at any given moment.
Mrs. Corbet,
hahahahahahah! When I saw ‘noodles ‘n thread’ I was planning on commenting to ask you if you misspelled needles on accident! Very clever pun! 😀
Sarah
Mary you are a genius! I love the drying rack, but the numbers on the floss is over the top! I am going to employ this to my next project. The projects I’m working on is already on thread cards so the next one will be using your method! Thank you!
This is such a clever idea, and it’ll be great to keep my thread tidy and organized for a change! But this post had me grinning for a different reason. When I was little my mom tried her hand at making fresh pasta. Well, she must have gotten her recipe from an army cook. There were noodles hanging everywhere! First along both the broom and mop handles, then the backs of the chairs, and finally on clothes hangers in all the door jambs. She stuck to packaged pasta after that.
You can find this very thing at Lakeland if you are in the UK!
Your story about the broom handle made me laugh: I had to use an arrangement of this sort when dipping candles!
I just love this idea. I also think that it would look very pretty sitting on the edge of the coffee table with the rest of my embroidery tools. Since I embroider every night I never put things away, but have them neatly arranged. I have never known what to do with my threads though. This is absolutely ideal. Thank you so much.
I wind my thread on to slices of foam pipe insulation… with the hole already through the middle it would be easy to store on a pasta rack! What a great idea…
I see this idea being picked up by all the needlework retailers and being sold for this very purpose. Great idea!
First thought : that’ll work just great for my Chinese flat silks and all their shades that I’m using
Second thought : That’s make a GREAT cat toy. They are very well trained not to play with my threads, but there is only so much a puss can resist, especially if there was any kind of breeze to make the threads move.
Oh well – I guess I’ll stick to my cardboard cards the threads are looped upon. 🙂
Yep, as I said above, I have two kings of curiosity myself. You are not alone, i’ll also be sticking to my bobbins in a box. 🙂
I found a hand crafted pasta rack on Etsy:
https://www.etsy.com/transaction/188382826
for a very reasonable price ($ 19.95 and free shipping) that can be assembled and disassembled repeatedly and used in this manner. The crafter was sort of stunned that his rack might be able to be listed in another way. He is going to make sure that the dowels are sanded completely smooth for me. It may be a little large, but I know it will come in handy.
Renee
I love this! I was going to use a vintage wooden linen rack, but they are spendy and hard to find. This is perfect!
ok I have a paintbrush holder
its perfect
its to hold my asian brushes
It looks to me about the same size as your pasta rack
I think its pretty its a dragon
I love asian style so you made my day
>I have two racks so put all my brushes on one rack .
My threads look nice hanging from it
Thank you for the ways to cut time with the embroidery
I know a couple of these will help
Lettie Lou