Recently, I began lending a helping hand on an embroidery project – it’s a project of reconstruction, re-creation, and repair. I’m not doing much of the “real” work – mostly just advising on thread selections, color matching, fabric selections, and so forth. Maybe towards the end of the project, if time allows, I may help with the final goldwork.
But I thought I’d show you the piece, and chat a bit about selecting colors and threads, the types of embroidery on it, and what exactly is going to happen to it.
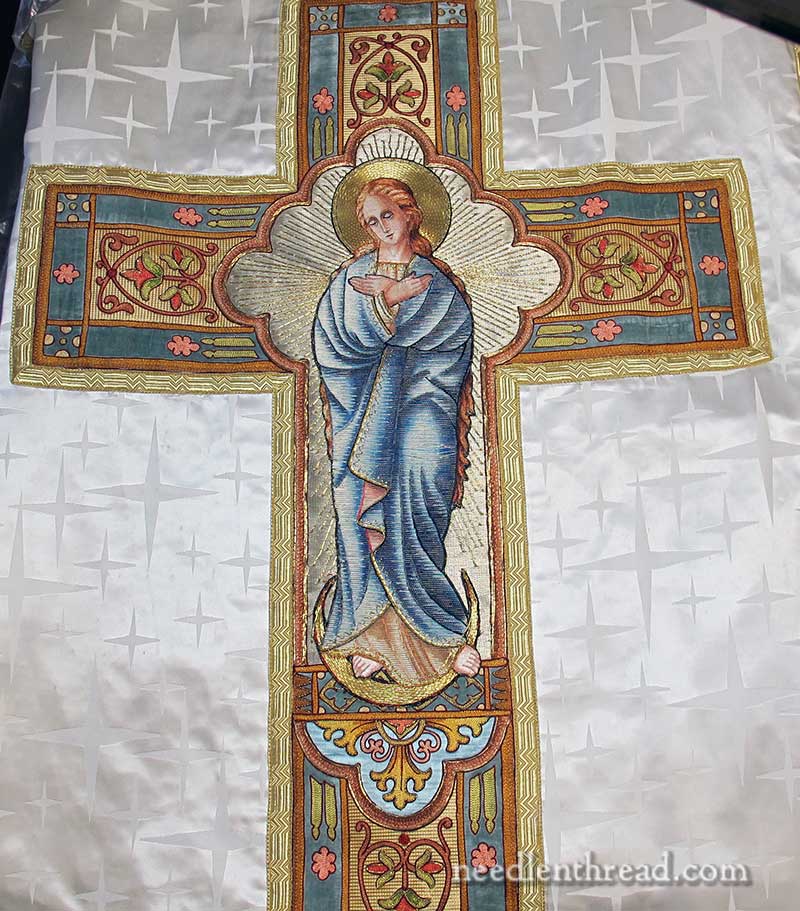
Above is the main piece of embroidery on the vestment. You can click on the photo above for a larger image.
The central image of the Virgin is in fairly good shape, and it really is an exquisite piece. It needs some minor repairs.
It’s a combination of paint and embroidery, though it takes getting close to see the combination.
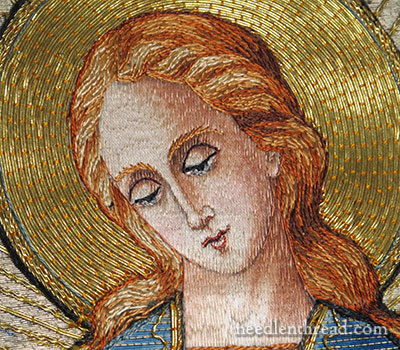
The face is quite nice. The shadows, the delicate lines, the hair – the details are very pretty.
The whole face is worked in a series of long and short split stitches in flat, very fine silk. The stitches are not crowded at all, are perfectly parallel to each other, and spaced so that you can see just a hint of the fabric behind them. Though a few different shades of silk are used, it is actually the painted image behind the silk that lends most of the detail to the shading.
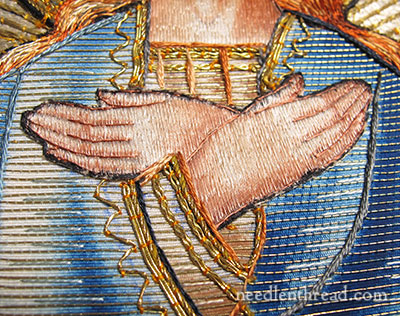
The hands are worked the same way – they are painted, and then embroidered over in a very fine silk, in long split stitches. Darker silk is used to outline the fingers.
You might notice the heavier black outline around the hands, when looking this close. If you look at the larger photo above, these black lines are not so noticeable, but up close, they are. The black along the edge is part of the appliqué. The hands were embroidered separate from the rest of the piece and fixed on top.
Around the hands, you can see the robes, and here, you get a better sense of the combination of paint and embroidery. Though the face and hands are more solidly covered with embroidery, the robes are not. The robes are worked in what I think of as a very loose relative of – you might almost call it “backwards” or “imitation” – Or Nué.
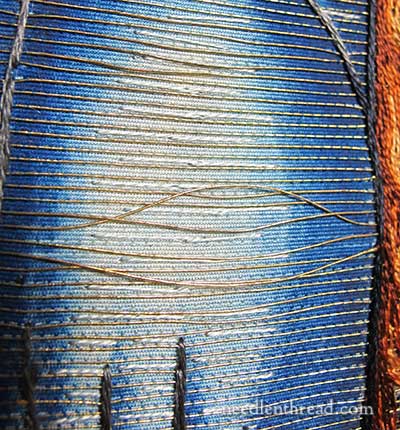
How’s it work? The robe is painted – so all the real shading you see on it, is done in paint. Then, over the painted robe, you have very neatly worked, tiny lines of gold couched horizontally. (Some of the couching has come undone in the photo above). The gold is couched with blue and white threads that match the shading on the painted background, and the couching stitches are about a consistent 1/8″ apart all the way across.
Between the horizontal gold lines, on top of the painted background, long silk split stitches are worked to highlight parts of the robe. So, in the photo above, you can see the white silk stitches over the lightly shaded areas. The silk would reflect the light and lend to that overall look of embroidered shading, when in fact, there’s not much silk embroidery actually going on here.
If you enlarge the first photo in this article, you’ll see that the little dashes of horizontal white (or light blue) encroaching over the darker blue painted areas on the robe help lend to the illusion of embroidered shading.
This combination of painting and stitchery on figures – common from the 1800’s – 1900’s – is a far cry from the intricately embroidered figures of early ages – of the Middle Ages (especially seen in Opus Anglicanum), the Renaissance, and the Baroque eras.
But it only stands to figure. After the Industrial Revolution, people began to want things much more quickly. And these “shortcuts” were a way to produce a “hand embroidered” figure relatively quickly. There’s still a lot of hand embroidery on the figure – and the figure is still beautiful and worth saving. But it isn’t quite the same as the solidly embroidered figures of previous eras. Ah, the evolution of embroidery…
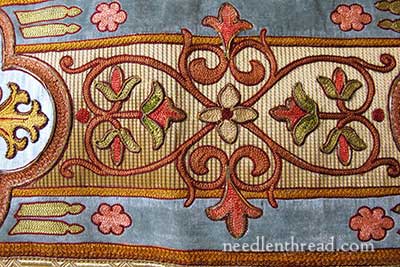
In any case, that figure will be fixed up – repairs will be done to the loose gold threads – and the whole figure will be re-applied to a new ground, recreated from the same designs and in the same techniques as the old.
In addition, the remainder of the set will be re-created, including dalmatics, cope, and all accompanying small pieces – stoles, maniples, and so forth. These don’t exist anymore, and they have to be made.
So, my first job was to meet with the embroiderer and seamstress involved and to discuss ground fabrics and thread types. The embroiderer is working the silk embroidery on the panels entirely in tambour work, so it was necessary to test different types of threads with the tambour needle to see how they would compare to the original. Then, it was time to color match the threads on the embroidered panels.
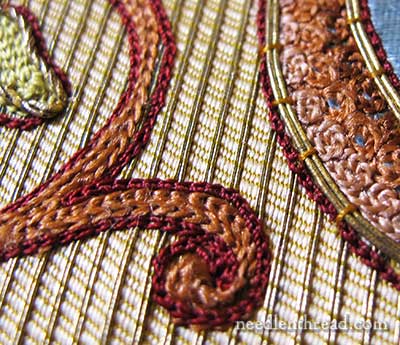
You can see that different types of thread are used in the tambour work. The thread in the center of the vine has little twist and a lot more “spread” than the outlining red thread.
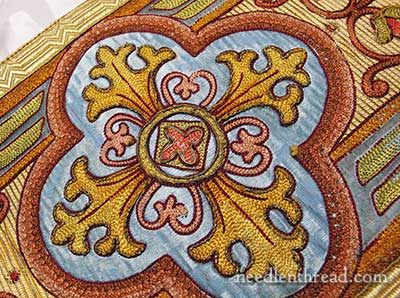
This particular medallion will be repeated thirty six times on the whole set of vestments!
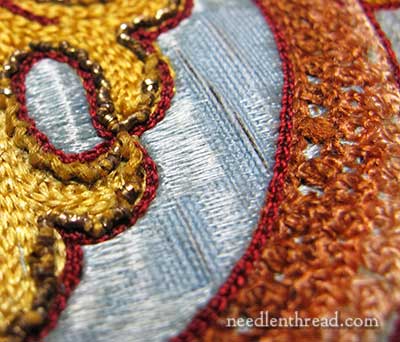
When you look up close, you can see that the fabric behind the tambour work (and much of the tambour work itself) is falling apart. From a distance, it’s not as noticeable, but get up close, and the piece is almost crumbling in parts.
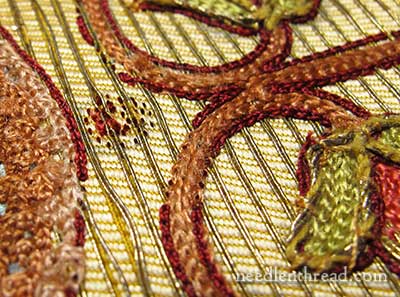
Some of the embroidery here is completely missing. And the goldwork around the leaf on the right is disintegrating as well.
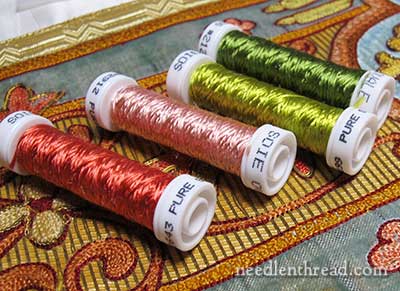
And so, onto the color matching and thread selections! I love doing this kind of stuff, because it gives me the opportunity to re-familiarize myself with certain threads.
The embroidery for the set will be done entirely with Au Ver a Soie silks of various types. They really are the best silks for this type of work, and they have the widest range of types and of colors within those types.
Are you looking at the bright green in the photo above and thinking “Whoa! That’s bright!”?
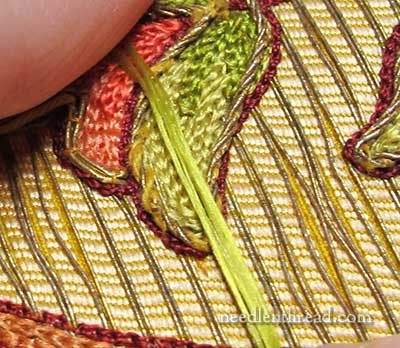
Originally, I almost didn’t even pick it up to test it. I thought, “No way – toooooo bright.” But it works. It is The Color.
When matching up colors to old pieces like this, you have to get close, and you have to get close in the areas that are least damaged, most clean, and would have been least exposed. That’s where you’ll find the true colors. Up close, you suddenly realize what a magnificent splash of color this whole piece must have been!
So, Soie Ovale is being used for the floral accents (leaves and buds). These accents extend down the front and back of the chasuble, down the double orphreys on the front and back of the dalmatics and on the horizontal banding on the dalmatics, and on the orphreys on the cope and on the hood of the cope. Lots of little buds and leaves…
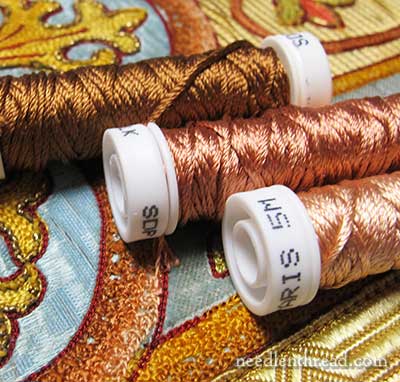
Soie de Paris will be worked on some of the “tendrils” on the floral pieces, and also in the outline around the various medallions.
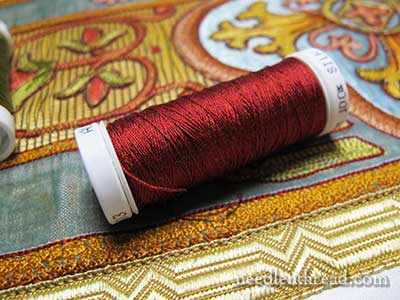
This Soie 100/3 in deep red is perfect for the all the outlines, dots, and occasional little wispy tendrils here and there.
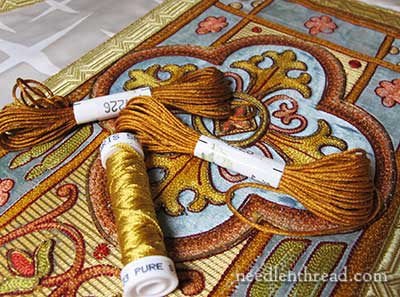
And a combination of Soie d’Alger and Soie de Paris (primarily Soie de Paris) will work for the center of the cross medallions and some of the frames.
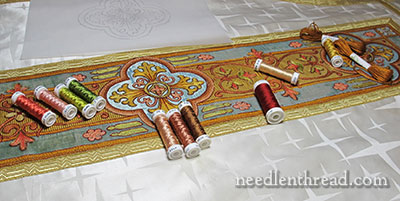
There they are, all selected and ready for ordering.
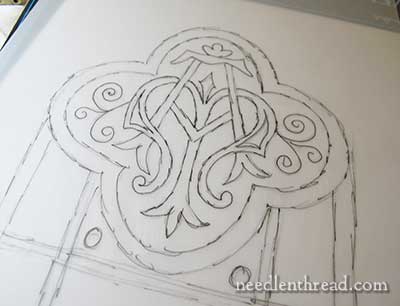
Before walking away from the piece, I made quick sketches of the various embroidered elements on it…
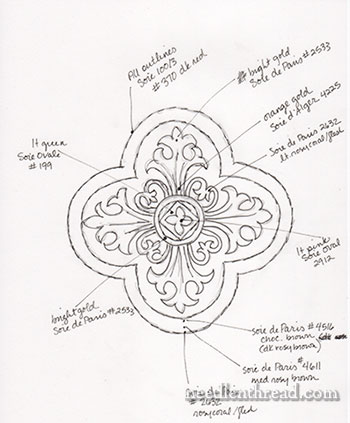
…to note what thread in what color goes where.
I’m looking forward to seeing the silk work underway!


It’s fascinating but I keep wondering how you manage to match the colors so well. Even the slightest difference will show up if you’re doing a moderately large patch with the new threads. If there are multiple repeated elements like those bright green leaves, will you have to replace/repair them all? Otherwise it might have a fresh looking leaf and the others may look dingy in comparison. I have trouble matching my old DMC cottons to the newer dye lots. LOL
Hi, Irene – good comment! All the embroidery (except on the figure) will be new, so no worries in that regard…
MC
Dear Mary
What a beautiful piece and what a lovely job you have. I watched a program last week on the BBC Fabric Britain showing Opus Anglicanum embroidery and how Britain was the fore runner of embroidery in the 14C l using the unique split stitch and underside couching it was so interesting and they showed pieces like the one above unfortunately because of the plague in the 14C which killed most of the embroiders and the later reformation of Henry VIII there are not many surviving pieces of Opus Anglicanum left but the ones that were shown were beautiful. I love pieces like this. Thanks for sharing this with us.
Regards Anita Simmance
Anita, I did find the program (programe) you mentioned. Unfortuneately it is only available in the UK. Hopefully the BBC will make it available to the US soon.
See http://www.bbc.co.uk/programmes/b03c2766
FABRIC OF BRITAIN: THE WONDER OF EMBROIDERY
Episode 3 of 3
DURATION: 1 HOUR
The Reformation in England witnessed the destruction of the most brilliant art of the medieval age. Church paintings and stained glass – even sculpture – were destroyed throughout England in the name of religion. And yet one art survived against the odds – the art of medieval embroidery.
Portable and easily squirrelled away, English embroidery was spirited out of the country in the 16th century and many brilliant examples survive today – if slightly unappreciated and forgotten in Italian churches and museums, even the Vatican. And yet it is an art form that rivalled the very finest in medieval painting or stained glass and for 200 years was the finest embroidery in the Western world. Known simply as Opus Anglicanum (English work), the work of English embroiders was desired by kings and popes throughout Christendom.
Dan Jones, Plantagenet expert and medievalist, goes in search of these fragile yet stunning survivors from the great age of embroidery – encountering a world of finery, bejewelled luxury and sacred beauty on an undreamt-of scale.
You can see the episode on YouTube. Just put in the full title. No telling if it will get yanked, so it would probably be best to watch it soon.
Thank you Sheryl, for the link to YouTube. I have just watched it, and would have loved to have seen it on a large screen, ie TV. As yet, the BBC have not seen fit to release it as a DVD but there is a book available at their shop.
It is a fascinating subject and Dan Jones’ coverage seems pretty good and quite thorough. All in all I think it is well worth watching the YouTube offering if nothing else is available.
What a wonderful study! Just looking at the pictures one can learn so much. Thank you for the closeups. Please post pictures as this work proceeds, or at least, the finished project.
Bravissima
Wonderful!
Mary,
You mentioned in this article that there was quite a bit of tambour work involved. Do you know of any good videos or instructions with photos that show how to do tambour work? I’ve got a hook and a frame but just haven’t been able to get the hang of it from the limited discussion I’ve been able to find, mostly in the older needlework books. I understand it’s supposed to be very easy once you get it.
Hi, Meg – if you look up Robert Haven tambour beading on YouTube, you’ll find some videos that are very good. They demonstrate beading techniques, but tambour work to produce regular chain stitch on top is the same technique, without feeding the beads or sequins up. While it’s “easy” once you get it, it takes practice to speed up, and to take turns nicely. I’ve found it’s one of those techniques that benefits from allotting practice time. If you can work on a semi transparent cloth when practicing – like a silk gauze (not the wiry stuff used for petit point, but the soft, flowy stuff sold as fabric by the yard) – that helps. While I’ve done tambour work and I understand the stitching technique, I’m not as fast and accurate with it as I would like to be, so for the past week, I’ve set aside 45 minutes a day for practicing to get up to speed. With dedicated practice, I’ve noticed a huge improvement in speed and in stitch consistency and quality. -MC
Mary,
Thanks so much!
Fascinating! But what about the fabric beneath the embroidery which is deteriorating? How does that get repaired?
Hi, Kay – the fabric is not being repaired. The only element from the original that is being re-used is the figure in the middle. Everything else will be new, including the ground fabrics, all the decorative embroidery, all the goldwork… -MC
A fascinating post today! The history geek in me has about a zillion questions, but I suspect most of them can no longer be answered. Like, when and where were the vestments made, and by who? Who were the clergymen who used them, and where were they located? What sort of parish did they serve? How did this come to be preserved and not the rest of the set? I’m inspired by pieces like this to try to picture them in context and imagine what life was like for the people interacting with it.
Such a grand opportunity for you! To have the chance to sit with and study this bit of history must have been exciting. I imagine you surrounded by your reels and hanks of silk, laying them out, sorting, comparing, evaluating, then finally making your careful selections. Exactly as the original needlewoman–or man–must have done so many years ago. What a lovely moment of connection with the past!
Hi Mary,
Thanks for such an interesting article. But could you please explain why you chose the different threads for each section? Why Soie d’Alger, Soie Paris, Soie 100/3, and so on? I’m sure it has to do with the twist and thickness, and maybe other factors, but it would help if you explain this as you go along. I’ve not done enough silk embroidery to understand the differences among all the threads. It’s going to be just beautiful!
PS. I just visited the Washington National Cathedral yesterday, and saw some lovely embroideries, mostly needlepoint, but some goldwork. I’ll post on my blog once I get the photo’s off hubby’s camera.
Looking very closely at the medallion which will be reproduced 36 times, I think it would look lovely with needle painting. I love these jobs you get, Mary. My imagination just runs riot!
How old is it? It’s gorgeous!
Dear Mary,
What a beautiful piece of embroidery. In future posts I hope you can tell us more about the stitch types and thread colours being used. The combination is really exquisite. Thank you Mary!
I do hope you will give us periodic updates about how this progresses. It would be nice if you could also get a few lessons on tambour work out of it. For that matter, I keep having great difficulty with the finishing or applique for embroidery done separate and then attached to vestments. Especially for small elements, like a cross on a stole, I find it difficult to hide all the fraying bits of the ground fabric–even with some goldwork outlining. In other words, I would love to see some lessons/posts on how to finish and attach separately embroidered elements.
Wow! What a magnificent creative adventure! Are the new vestments themselves going to be made something other than that white fabric the current main piece is now on? It looks to be very modern in comparison to the 19th c. work – in the photos at least, it just ‘does not go’ somehow.
Thanks for sharing the analysis ‘faux’ or nue technique. If considered on it’s own, the painting and embroidery combination does have its merits. Thanks for introducing this project…I hope we will get to see more of it, as it goes along.
I agree about the current white ground fabric–it does not compliment the embroidered elements. Even a white dupioni would be nice if more expensive ecclesiastical damasks are not in the budget. That said, the pattern Florence woven by M Perkins and Son (http://www.mperkins.com/products/03ydbrocades/florence.html) would, I think, go nicely with the scrolly floral patterns of the orphreys.
Fascinating – thanks 🙂
Mary, this will be a fabulous experience for all those taking part. I love the idea of combining paint with stitching and have been thinking about how to use it for a few weeks now. Great timing.
I have a question about the threads? My knowledge of AVAS apart from Soie d’Alger is a bit limited, but what I do know is that some of them are thicker than others. How do you deal with that? Personally it doesn’t usually bother me, but then I am not doing work like this; mine is much more ‘freestyle’ and the changes in thread/stitch density are all part of the finished product.
This is a simply splendid record of a fascinating piece as well as the process of its restoration. Thank you so much for posting. I really enjoyed it.
Do you do repair of an old tapestry. Some threads are loose in front of a Japanese small tapestry and I’d like to repair and frame it. Do you do that? Let me know. Many thanks.
Hi, Charlotte – no, I sure don’t. I think your best bet would be to contact a museum that has a textile arts curator. They could probably do the work, or recommend where it could be done.
Mary,
First I love your posts and videos. I don’t want to gush but for someone whose not even a needle-phile I’ve learned a lot by following your site. It’s my go to reference for materials properties and stitch techniques.
Best, JRJ