It’s been a while since I’ve worked on my Hungarian Redwork Runner, which was set up as a “grab and go” embroidery project exactly a year ago.
Well, fooling around with the tambour needle recently and practicing tambour embroidery led me to thinking about my poor neglected Hungarian runner. Since I haven’t had an opportunity to “grab and go” with it for quite some time, I haven’t made much progress on it.
But… I mused… couldn’t the tambour hook propel the Hungarian runner to a more rapid completion?
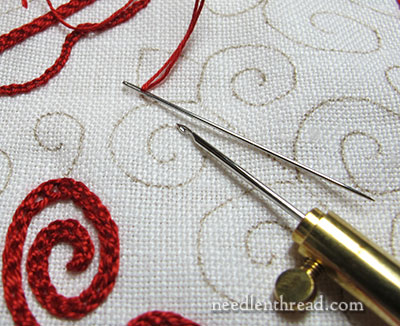
And so, a needle war! Would the tambour hook do what the crewel needle does – and do it with satisfactorily close enough results – so that I could accomplish the chain stitching on the redwork piece much more rapidly?
I set about to test the question. I started by spooling up some of the red coton a broder used on the Hungarian runner.
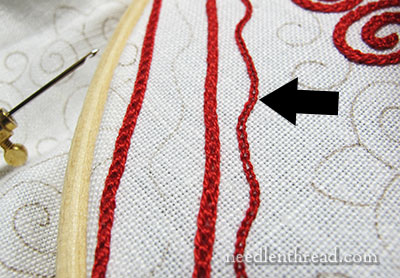
Then I hooped up the unfinished end of the runner, and set about tambouring a line. The arrow in the photo above points to the line.
The straight line just to the left of the tamboured line is worked in Hungarian braided chain stitch with a significantly heavier thread, so of course, it is a much bolder line than the chain stitch line done with the tambour hook.
But still…. the chain stitch worked with the tambour needle seemed somehow very fine and delicate – much finer than the other chain stitched lines worked with a crewel needle, if my memory served me correctly.
Was I right? Or was I imagining it? It’s been a while, after all, since I worked on this…
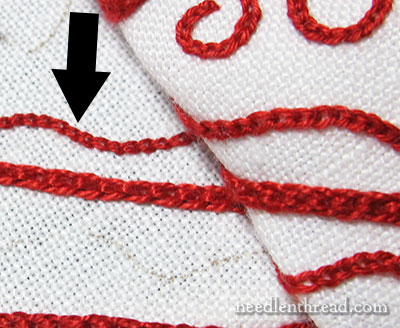
Let’s compare.
In the photo above, the arrow points to the tambour line. On the right side of the photo, past the fold of the fabric, is a line of chain stitches embroidered with the crewel needle. They are both stitched with the exact same thread.
Wow! I exclaimed to myself in my head… and out loud… with a choice word thrown in, expressing my disappointment.
Darn!
They are, you see, completely different. And that won’t do, on a project that’s over half finished.
Then I thought, Maybe it’s just the way I’ve got these particular lines lined up…
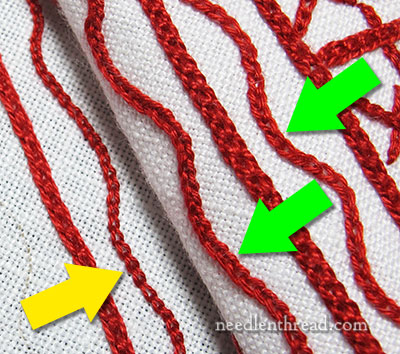
Deep down, I knew it wasn’t the case. Above, the yellow arrow points to the tambour line. The green arrows point to chain stitched lines embroidered with a crewel needle in the same thread.
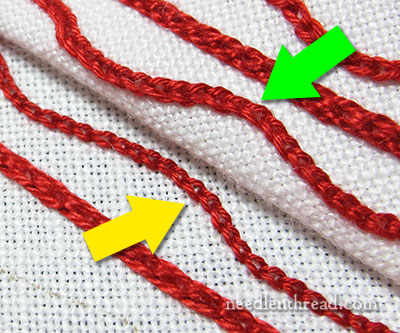
And just to convince myself, here they are again, a little closer.
The culprit, no doubt, is Tension, accompanied a little bit by Twist. When working with a tambour needle, the tension is automatically much tighter than when working with a regular crewel needle. The thread, in tambour embroidery, is always under tension, and, in fact, that tension is necessary in order for the needle to work properly.
Also, the twist on the thread stays a little tighter with the tambour hook – which makes a difference with this type of thread especially, as it has a softer twist than most embroidery threads.
But, mused I, ever hopeful, could I loosen up the tension just a little bit? And maybe if I spaced the stitches a little closer, that would also help.
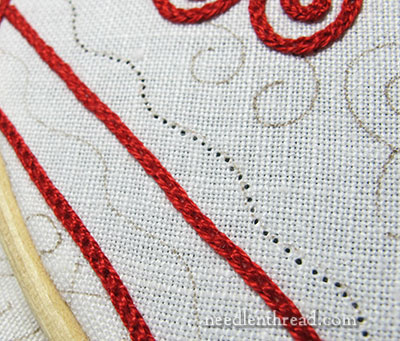
And so, I removed the tamboured line.
Now, you just cannot beat tambour work when it comes to easy removal. It takes 1/4 of a second to zip the line straight out, and there isn’t a speck of thread residue to contend with.
Considering it only took a couple minutes to stitch the line in the first place, and no time flat to rip it out with no mess, I really didn’t mind experimenting!
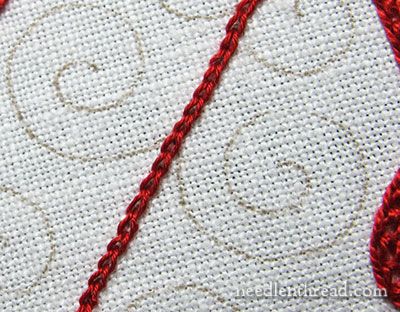
I stitched a short straight line with the tambour hook, being mindful of my tension, trying a little bit to loosen it up, without making it too loose that the tambour hook wouldn’t function the way it’s meant to.
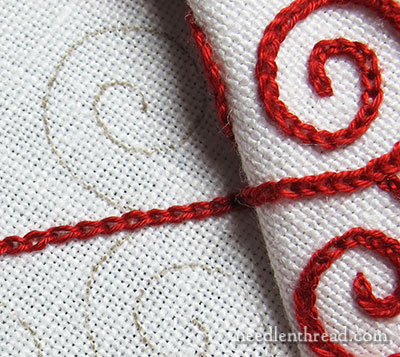
Tambour on the left, crewel on the right.
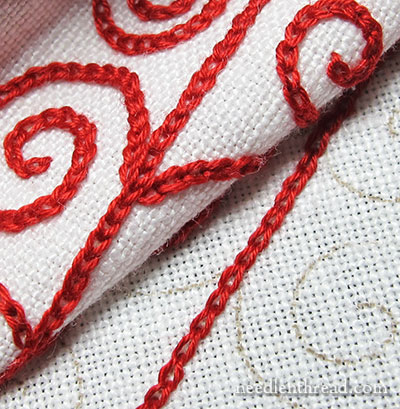
From a different angle….. it’s not as noticeable a difference, but there’s still a difference.
Time to shorten up the stitch length, loosen up the tension, and see if that fattens up the stitches.
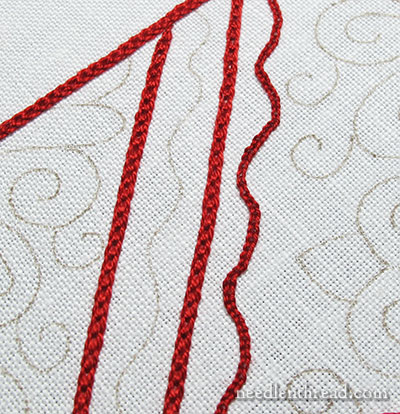
Ick. It’s the line on the right.
Working with a tambour needle is a lot like learning to type. Once you know how to type, you can speed up and up with practice and improve accuracy at the same time. But if you must go to a different sized keyboard altogether – especially one with a key here or there out of place – your typing skills suffer until they get used to the new situation.
Every analogy limps, but you get the idea.
Suddenly, I was changing the size of the stitch that would naturally be associated with the thread, fabric, and needle size I was using. I had to concentrate with all my effort on adjusting the tension of the thread with each stitch – keeping it looser than I naturally would.
And…. the line suffered for it. It is jerky, uneven, and just not quite The Desired Thing.
I’m not super skilled with the tambour needle, though. Undoubtedly, an experienced tambour embroiderer could change the approach on tensioning, stitch length, and so forth, and still achieve satisfactory results.
Though my results look a bit cruddy, do they create a line that is comparable in thickness and “look” to a line of chain stitches embroidered with a crewel needle?
To answer that question, I got out a crewel needle.
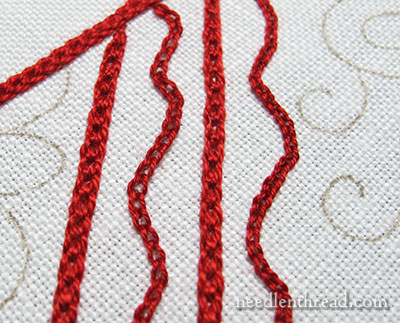
The wavy chain stitch line on the left is the crewel line. The wavy chain stitch line on the right is the tambour line.
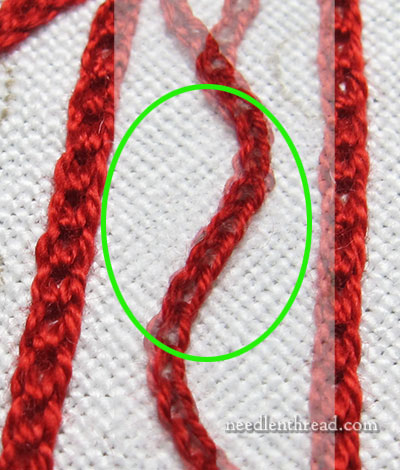
Using Photoshop, I superimposed the tambour line on top of the crewel line and faded the opacity, so that we could compare the thickness of the lines. Size-wise, they’re fairly comparable.
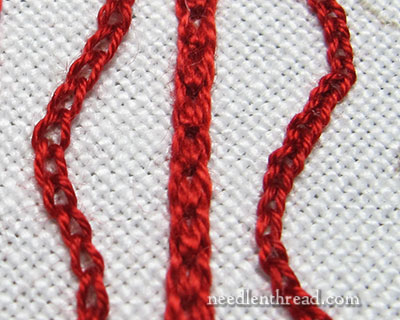
But look how much more compact the tambour stitches are on the right, compared to the crewel stitches on the left.
So, to achieve a comparable thickness in the line with the tambour hook, I’d have to work the stitches much closer together than I would normally do with the crewel needle. And this would change the overall look of the stitching – which would be a bad idea, halfway through the project.
Then again, it may just be a matter of practicing!
In any case, I think we can conclude that, when working with this type of thread, stitches of the same size worked with the tambour needle will normally end up finer than stitches of the same size worked with the crewel needle – unless, of course, the crewel stitches are worked with more tension on the thread than would normally be desired when embroidering.
I’ll keep playing with it and let you know if I ever even out the results!


Good Morning Mary! Did you find a satisfactory method to control your spool of tambour thread? In Greet’s Lier lace classes,
we pinned a mini-Dixie cup to the fabric at the end of the frame–the “mouthwash” ones. the cup dangles below the work, the spool simply rests inside & thread feeds easily. As to stitch size, there are various size tambour hooks. Would that make a difference as it does in crochet?
Hi, Suzette – I keep my spool on my spool holder on the table. I was using the largest of the three tambour hooks that comes in the standard hook / needle combo (I think it’s a 120, acc. to the description at Lacis). To go with a larger hook with this fabric would have been problematic, I think – it was pretty tough to get this hook into the fabric, but although it felt large to me, it worked better with the thread than the 90 (medium). But I may try a larger hook – I have a whole range of sizes, and I think at least one is larger than the one I was using. Worth a try, anyway! Just like with crochet, hook size makes a difference, but I think tension makes a bigger difference. ~MC
Hi Mary,
While the tambour needle definitely is difference from the crewel needle stitches, I have to say I prefer the tambour stitch. It is smaller no question, but I find each individual stitch neater and more defined. I think both needles would be of benefit, depending on what you are stitching. Thanks for the lesson. Regards, Colleen in Canada
Dear Mary
Oh what a shame I had visions of you tambouring away and quickly completing the runner. But as you say it’s trial and error and practising to achieve the right tension, I think I prefer the tambour to the crewel stitch as I like the more compact look of the tambour stitch. It looks like I will have a lot practising to do to learn tambour embroidery. I hope you are able to achieve and find the right tension on the runner, good luck keep us updated on your progress.
Regards Anita Simmance
Very informative and helpful! Thank you!
Hi Mary,
My first thought was the same as Suzette’s – a larger hook. I have never done tambour work, but have crocheted for years. A larger hook may be just the ticket.
Thank you for the time you took to work up the samples and photograph them. I learned a lot. 🙂
You could try doing the tambour stitch using 2 threads at a time. You may need to use a larger hook/needle but it helps bulk up the stitch without having to mess with the tension and spacing issue. The first time I tried it I was afraid the extra thread would cause issues, but it’s actually just as simple. I have also found the 2 thread method works wonders with metallic threads.
oh! i hadn’t thought of that!
i’m now very exited to work with 2 threads, perhaps a solid and a variegated?
Wow! What a great comparison! Thank you for doing that. I love the Hungarian redwork, and I think it would be great to mix in the tambour work with the other stitches. One would just need to be consistent (all the wavy lines, or whatever).
The tambour hook pulls the thread thru one hole and using a needle, it doesn’t always go thru the same exact hole, right?
I was thinking how much prettier the crewel stitch is and I read the other comments… beauty is in the eye of the beholder, I guess. It may take you longer, but I really prefer the bounciness (is that a word?) of the crewel stitches. They seem more lively somehow.
This runner is so pretty, I may try my hand at it myself!
I’m sorry your tambouring plans went awry, but that was a very interesting and very informative experiment. I think it is simply the mechanics of the stitching methods that give tambour work one look and hand-stitched chain another. Personally, I like the ‘real’ more than the very neat ‘reel’ version – there’s a human quality to hand-worked chain that comes from being able to tension the thread more on one side than the other when it helps the line flow – it is particularly noticeable on the wavy lines you’ve experimented with. In conjunction with the hand-stitched HBC, the chain on the runner needs to be somewhat more jolly and chubby than the tambour hook will comfortably permit. Thank you very much for showing us how you got on.
Your post is very interesting. I think that technique works, as long as you keep the same for the whole piece.
Hi Mary. Thanks for your thoughtful comparison. I just received the tambour needles and threads this past week and am anxious to start experimenting with them. In the meantime I am working on a Hapsburg lace sampler I purchased from Tanya Berlin. So many techniques, so little time but so much fun!! I appreciate your posts and look forward to reading them every day.
Regards,
Doreen
Fascinating reading – I felt the ups and downs and the “Ick” as you wrote it. Perserverance pays off but it can be a perplexing experience. I initially thought a thicker thread but if it was to work it could be hard to perfectly match the colour already used. Suzette’s larger hook idea has promise but I also like Claire’s comment – although I can understand your wish to complete the runner more quickly.
Hi Mary,
What a fabulous experiment. I have only tried the tambour needle once, great fun but it was easy to see it is one of those things that will take practice to master.
So glad I am not the only (geeky?) stitcher who can get complete excited over this kind of experimentation.
Anna
Hi Mary,
Great series on tambour and threaded-needle chain stitch. I’ve often wondered how the two would compare. As usual, your curiosity beat me to the experimental punch. 🙂
As an aside – I thought you’d be interested in seeing exactly how huge/dense you can go with traditional tambour technique. I just posted a bit about an entire rug done that way. Enjoy! http://string-or-nothing.com/2013/10/24/kashmiri-tambour-embroidered-carpet/
Kim
If it is any consolation I am also thinking of all the chain stitch I did recently and that tambour embroidery would have been just the thing. I like that tambour line better than the chain stitch and I not only did a huge amount of chain stitch but had to painstakingly unpick it ALL before starting with the correct colour so the ripping back would have been easier too. I haven’t done tambour work before but I just got one of the books you mentioned and it must be the embroidery technique I’ve seen on lots of clothes I’ve seen over the years. I’ve only just started a pattern in crochet that requires threading beads on before starting and at times there is a call to thread hundreds on before starting. I had wondered how many beadwork items I’ve seen were made and I think, having seen some of your posts, it must be tambour beadwork. It is exciting to have a new hobby in the making, reading the posts with great interest.
While I think the tambour hook is a great idea, I think that your real issue is consistency at this point. Trying to switch and recreate and equal look would be very difficult. Had you tried this earlier, it would have been gret, but now that your are 1/2 finished with the crewel needle it will be difficult to switch to another tool to replicate your stitching. I would go back to the crewel needle, finish the way I started knowing that on another day the tambour hook will work well.
Thank you for such an informative post! It really is interesting to see the differences in the stitching. I like them both, but I can see where the tambour stitching goes much more quickly. Since the loops seem to be a bit tighter, will it be harder to work interlacing over the tambour stitches? I guess the big lesson for now is to not switch techniques within a project.
Speaking of Hungarian Braid stitch, done it on the Jumbler for A1, and just love it! Thanks for introducing it to me.
The frustration must have been immense, Mary. I admire your patience enormously, the whole thing would have probably been on the other side of the room if it were I doing it (see, good English, bad embroidery).
I have never done any tambour work and probably never will. I have tried punch needle and was wondering if there is any similarity. I never could get the punch needle to work properly, which is why I have steered away from tambour.
I’ve been wondering if the Clover Katan needle would work the same/yield the same results as the tambour needle. Maybe it would offer another useful comparison. The hook is more like a tiny rug hook…I have one, but haven’t really practiced with it enough to be able to tell anything.
Dear Mary,
You have solved a mystery in my old sewing box amoung old needles and tools used for stitching and crocheting. The tools have been used by my grandmother, her sister and their mother. Among them is a tambour needle, I have not known what it was used for until now. Thankyou for this lovely, detailed post. Love/ Eva
Fascinating! I really enjoyed this comparison. Thank you Mary!
Mary,
I am also interested in learning the tambour technique, so on Friday I took a course on tambour beadwork taught by Robert Haven at the Creativ Festival in Toronto, Canada. This is not something that I could learn overnight, but agree with you that once mastered, this could allow you to fly through some of your projects. (I’m still waiting for that to happen!) Love your blog. Read it everyday.
Dear Mary,
I am also working that Redwork Runner – finished one end and half of second end.
I have the tambour hook set from Lacis. I have tried practicing on the same linen I used for the runner with coton broder 25. The thread keeps shredding. I tried perle cotton 12 with same result. I am using largest needle in the set. What am I doing wrong?
Elaine in New Mexico
hi Mary,
is the tambour needle a sturdy one?
i read in a review,that
“the metal part that holds the screw and is glued on to the wooden part fell off.”
Please reply
I haven’t had that problem with any of mine…
Thanks for the reply!
Sorry to disturb you Mary..
Is it compulsory to use a hoop with a stand for Tambour Work? I am asking this because there aren’t any Hoops with a stand, back in my country. I’ll have to order it Overseas, where shipping charges are high due to the weight!
I was not familiar with tambour embroidery, so I thought I’d check it out. Before even viewing the basic stitch instructions, I checked out this article. I crochet, so I recognized that this is what I do when I hook over a crocheted grid to create lines and designs with yarn. Now I have a name for it and know what I can do with those tiny hooks I have besides make intricate doilies! Can’t wait to learn more about this type of embroidery. Thanks.
hola! buenas noches
soy de la ciudad de México me gusta mucho este arte, me gustaría saber donde puedo adquirir o comprar las agujas
agradezco me informen
gracias
i know this is an old post, but as tambour needles come in different sizes (like kntting and crochet do) could you have rather changed the hook size for a loftier loop?
just learning this myself and had the thought
Are Tambor and Punch Needle similar and can eithr be used in conjunction with regular hand embroidery projects?
Ok. I am so freaking intrigued by all this!! The tambor stitches are muchcloser, but I wanna know **why**
Gotta get a tambour hook!! Any recommendations?
lacis.com in California carries them, with three needle sizes in one package.