I’m not as far along as I’d like to be on the Mission Rose, but there’s some progress, and some progress is always better than no progress, right?
Today I’ll show you a wee amount of progress on the Inner Frame, and tell you why I’m doing what I’m doing the way I’m doing it, and then discuss my misgivings about the thread choice.

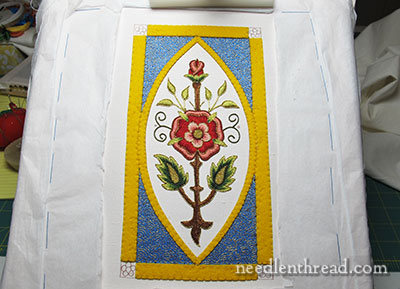
First off, here, stepping back slightly from the project in the frame, is the Mission Rose, with the corners finished in vermicelli goldwork over blue silk.
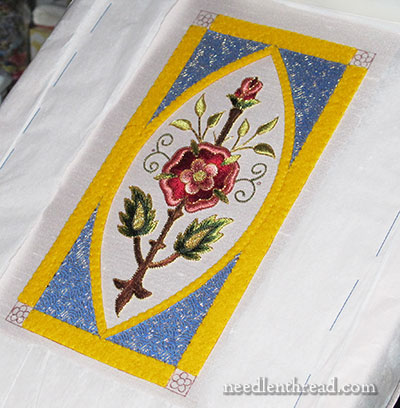
When taking direct photos inside, it’s difficult to get a sense of how the gold gleams and the silk shimmers on this piece.

This photo, which I took from across the room and cropped, might give you a better idea of the gold and silk catching the light.
Once the project is finished – or if I have the opportunity before then – I’ll take some photos outside in natural light on a slightly overcast day. I tend to get better photos of goldwork under those conditions.

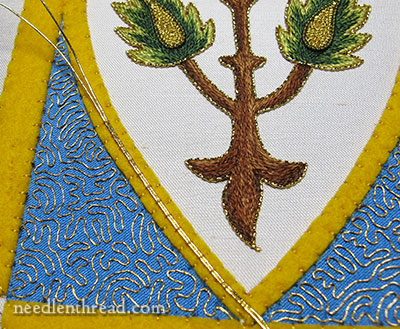
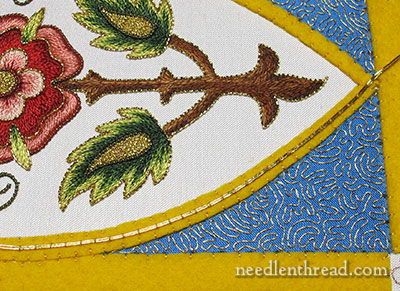
In any case, beginning on the inner frame, I’m using a #5 smooth passing thread in “dark” gold. It’s a very shiny thread and very…. hmmmmm…. what’s the word? Liquidy-looking?
You’ll notice that I started couching the pair of threads in the middle of the inner frame. It might seem a lot easier to start from one side and couch to the other, but there’s a reason for starting in the middle.
The inner frame is narrower at the tips and it bows a bit towards the middle sides – just slightly, but enough that the whole frame will certainly not be covered with an equal amount of gold thread pairs. There will be more pairs towards the middle sections of the sides.
Couching the pairs of threads from the middle out, you can accomplish a more even coverage of a space like this.
It’s not as easy to couch threads from the center out – you have to stay pretty close to the center for it to work out, and the center of the frame is not marked with a line or anything.
But if you sally forth slowly and carefully, eyeballing the center along the way, it should work.

At first, I had some misgivings about the thread choice, and they slowed me down a bit. I kept hesitating with every stitch: Do I quit now and take it out? Do I finish a whole round? But what a waste that would be! Maybe I should think about this!
My plan was that the inner frame would be somewhat glossy and smooth, and the outer frame would be somewhat mat (choosing less shiny golds for the outside), with a little more texture in it. Some contrast between the two frames is necessary, I think, just for the sake of interest.
But finally, long after the sun sank in the west and the world grew quiet and sleepy, as my head started nodding over my work… I made a decision. I would go forward with the shiny #5 passing, as planned.
And this weekend, that is precisely what I’m going to do.
And since Autumn has truly come to Kansas – since it’s rainy and shivery cold – what else could I possibly be doing this weekend, anyway?
Please don’t say laundry…
You can follow the Mission Rose project from start to finish and everywhere in between – in chronological order as the project developed – by visiting the Mission Rose project index.


Keep going, Mary! I think it really draws your eye in. I just love this piece!
For a rainy cold weekend, goldwork is much preferable to laundry! Or cleaning. OK, IMHO, no matter what the weather, needlework or sewing is preferable. If the eyes get tired of goldwork, perhaps another tambour project.
Laundry? But that’s for sunny days! Aren’t mod cons wonderful!? You can toss a load in the machines and stitch away the gloom, guilt free and doubly productive…now don’t get me started about folding and putting away – that’s where the whole system breaks down.
I do like the smooth inner frame idea. And thank you VERY much for the instruction about starting the threads in the center – it will look lovely, and I suspect the ‘bowing and swelling’ of the thread count will lend a certain visual three dimensionality to the frame itself. Or perhaps the ‘side pairs’ could be symmetrically different – either by a deeper color tone or size, from the center pairs for such an effect – sort of ‘needle painting’ with the gold. Probably a very bad idea, but I thought I’d toss it into the mix.
This has been such a controversial piece! The vermicelli WORKS! I’m starting to like it more. Happy weekend! ;D
The vermicelli looks fabulous. Look forward to seeing how the next step progresses.
Dear Mary
The project looks great and I like the photo catching the light it really shows up the goldwork and the vermicelli work. What a good idea to start the 5 passing gold from the inner frame and work outwards to equally balance both sides of the goldwork, I would never have thought of that. I like the contrast of the inner frame glossy and smooth and the outer frame mat and textured great combination. I hope you are able to work on the project over the w/e without disruption. Family commitments prevent me from achieving as much embroidery as I had hoped this w/e. No laundry but how about Tambour! have a great w/e.
Regards Anita Simmance
Hi Mary,
It’s been so interesting, not to mention informative, watching the progression of this project. The vermicelli goldwork looks gorgeous and really enhances the rest of your work. Thanks for sharing all of those little “trials and tribulations” that are part of the creative process, doing so gives the observer (at least me, anyway) a better appreciation of the finished piece. Enjoy the fall weekend–right now I’d pay for some rain and cooler temps!
G’day Mary,
Wet and cold…oohh how we wish it would rain inches on our fires down here. It’s only mid spring and the bad fires have started already in NSW. Our laundry is an inside drying job if we don’t want it smelling of bushfire smoke. Each to their seasons though, everyone has their turn eh.
This is looking magnificent Mary. The vermicelli sections look like sunlight glimmering on the sea. It’s beautiful.
Cheers, Kath
PS. Just checked your votes and you’re over 2000. Yippeeee! Wonderful. 12 days to go so here’s counting…
i have been waiting for an update…it is just too pretty for words. Your choices are always wonderful.
It’s looking beautiful Mary.
felicitari, minunat !
It’s lovely Mary ! Will you be keeping this one for yourself ?
It’s developing beautifully, Mary. I love your little touches about Kansas and your home – from hot winds and smoke from bushfires 400km away (and yes, it is only spring), rain and shivery cold sounds divine!
Why didn’t you mark the centre line? It will be covered, afterall.
🙂 well, drawing the line or stitching the line – it’s about the same for me, either way. I think I’d be better at stitching it than drawing it, because the stitching is much slower.
Plus, there’s the whole question of drawing on felt. To get a clear mark, you have to use a relatively wet, dark pen. And if the dark ink rubs on the couching thread, it may discolor the couching thread. I prefer to eyeball it, rather than risk that.
Another point, too – drawing on felt lifts the fuzzies…..
When you’re done, could you price this one out, too, as you sometimes do with your projects.
I am considering making it myself, but leery of the costs!
3 good reasons not to draw the midline. Thanks for explaining.
To damnation with the laundry, it does nothing for your soul. But this does, and more importantly imho, it does much more for our souls than your laundry ever could.
Keep going, I want to see it finished. Please.
This is such a beautiful piece Mary! I am always amazed with what you are doing with it. Needless to say, that your work has greatly inspired me to stick with my love for embroidery and see things from so many diverse directions. Thanks again for sharing your passion with us!
Vermicelli and blue silk look beautiful together.
Hi Mary, and thank you for more Mission Rose! I love your choice of threads, it is perfect. Can’t wait for the next instalment!
Susan