This whole Mission Rose project has me a little bit excited – I love seeing an embroidery project come together! I’m dying to get on to the goldwork around the frame of the piece!
But before I can move to the outside, I have to finish the inside. Isn’t that always the way of it? It’s another case of “dinner before dessert”…
After finishing the filling on the large leaves, the next step is doing all the outline work on the rest of the rose part of the design. So here it is – the goldwork outlines on the lower part of the rose stem and around the large leaves.
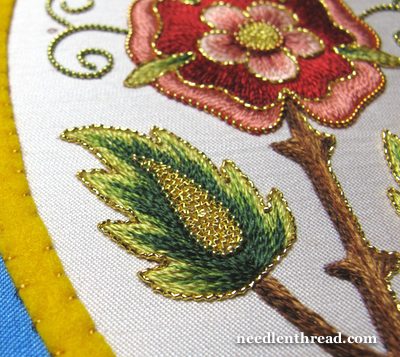
First, the goldwork outline around the leaves. This outline is worked in check thread, which is a wavy or crimped goldwork thread that is fairly flexible. I like it for couching outlines – the crimply-ness of it adds a nice sparkle.
To apply the outlines, I’m using a gold-colored fine silk thread that’s covered with beeswax (it protects the thread from the abrasive metal threads). The stitch is a simple couching stitch just over the thread. The couching stitches are worked perpendicular to the gold thread, and to end a line of the gold thread, the ends are plunged to the back of the embroidery, where they are sewn down with the couching thread.
You can read all about plunging the ends of gold threads in these earlier articles on Needle ‘n Thread:
Making a Plunging Lasso
How to End Couched Goldwork Threads
The large leaves have lots of little sharp tips to them, so when working the goldwork outline around these tips, a pair of tweezers for pinching the gold thread into a sharp bend is absolutely essential.
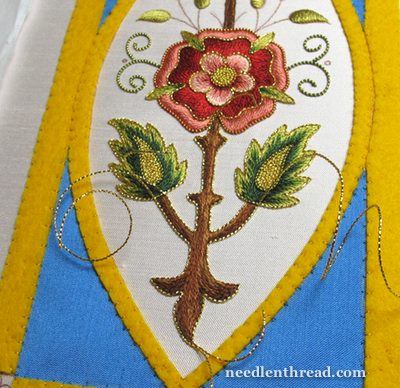
Once the large leaves were finished, it was time to work around the outline of the stem with the same check thread. In the photo above, you can see several of the threads waiting to be trimmed and plunged to the back of the embroidery.
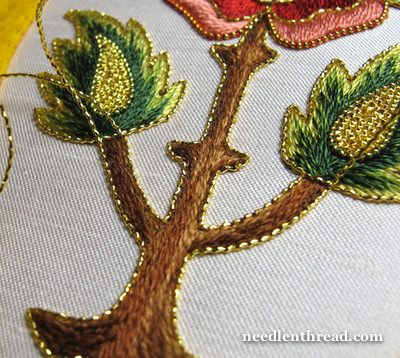
Here’s a little closer look at the stem area. I really love check thread for this kind of work, because it hugs up next to the embroidery very easily.
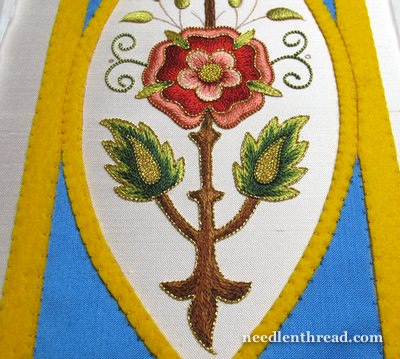
Stepping back a little way, you can see the whole lower part of the rose area, finished. The outline is noticeable, but it’s subtle – a little sparkle, a little definition, and that’s it.
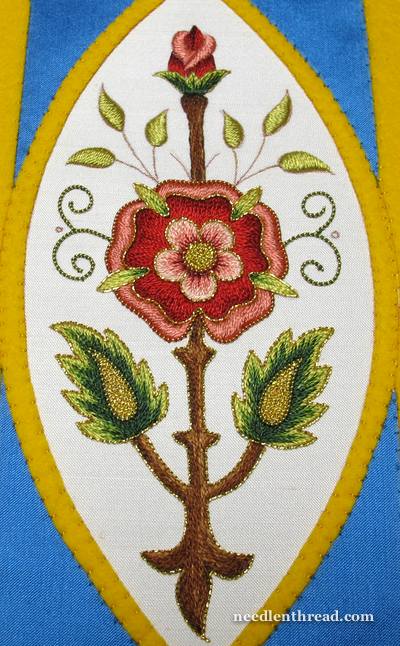
Stepping back a little farther, you can see the outline on the base of the design, but the top is not outlined yet (and the bud hasn’t been touched with gold yet). The outline thickens up the design a little bit, but not enough to make it bulky or bothersome.
So, that’s the Mission Rose so far! What do you think? Do you like the addition of the gold? Or did you like it better without? Have your say below!
If you’d like to follow the Mission Rose project from start to finish – including the backstory, what inspired the project, the pattern I’m using, and the whole sequence of stitching the project so far – feel free to visit the Mission Rose Project Index. You’ll find all the articles arranged in chronological order, from beginning to end!


Georgeous!!!
Its always exciting to see a project coming to completion. The closer I get the more exciting it is. This is looking good. I love the look of goldwork…I haven’t done any, but I love the look. Keep up the great work, it keeps me motivated.
Dear Mary,
I love your attention to detail and your instructions along the way. You make it really easy to follow along and you even make me feel like doing the exact same project you are working on. Thank you for such dedication and care in teaching about embroidery, especially on a beautiful piece as the Mission Rose.
God bless, Nick
Dear Mary,
I love the gold outline on the rose. I am not so crazy about the golden outline on the stem yet. I am sure that once your whole vision comes to fruition I’ll change my mind and I’ll be able to see what you see. I can’t wait until you start with the gold work over the felt. I am sure once that’s done everything will pull together and the whole design will look spectacular.
Have a wonderful day!
Viv
Looks like we are the holdouts Viv. I too am not fussy on the gold around the stem yet. But, like you said, Mary has amazing vision so I’m sure that the end result will be nothing less than amazing.
I’ve been watching your progress with this since the start (I only become aware of your website about the time you started) and I absolutely love it. The precision and neatness of the work is accentuated by the lovely goldwork. I’m a complete novice at embroidery – I’ve dabbled in all sorts for years but never had the staying power to do more than one or two projects in any particular style. I’m now very tempted to have a go at goldwork.
I’m very much looking forward to seeing the finished piece.
I love the gold! The piece is a pleasure to see and it is just developing magnificently. Well done.
It is Exceptional with the gold!
Mary — The gold adds such elegance. Beautiful work! Thanks so much for sharing your progress…LC
I love the addition of the gold!! Makes it look so regal. You are so inspirational.
Your work is simply exquisite…every single stitch!
I like all the gold outlining. What I’m not so sure about for some reason, is the gold centers of the leaves. Maybe once it’s all done it will tie in better.
I notice that you didn’t use gold felt on the leaf or rose centers. Besides not wanting to add too much thickness, is there another reason you didn’t add gold felt in those spots?
Hi, Gail – you’re right, that’s the reason. I didn’t want extra “lift” there. I wanted to keep them as flat as possible… MC
I think this project is really turning great !! I love the gold outlining.
Hi Mary!
When you say ‘check thread’, I’m assuming it’s something different from ‘bright check’ of the gold chip fame??
Hi, Elizabeth – yes, check thread and check purl are different. Check thread is a couchable thread like smooth passing thread, but it’s wavy, like rococo, though a little finer and more flexible. – MC
The gold threads add such elegance! Beautiful, as always.
Dear Mary
I think the check gold thread is a lovely thread and I really like the gold around the leaves and the stem, it matches the centre gold chip work. The whole design looks more finished and professional with the goldwork I love it, it’s really coming together now can’t wait to see what you do on the yellow felt.
Regards Anita Simmance
Hi Mary,
Would you elaborate a bit more on making the tips of the leaves and stems with nice points in the gold check? How would you make points if you were couching a cord?
Hi, Sharon – because cords are thicker and usually not very flexible (being made from several plies twisted together), they don’t take points too well. With a thread like this check thread (or a regular smooth passing thread, when making a sharp turn with the thread, whether coming to a point or turning a regular squared corner, if you pinch the thread together to create the sharp turn, then couch the thread right there on the pinch, you can maintain a sharper point with the thread. -MC
Mary,
Your check outline thread is very similar to rococco. At this scale, I can see why you chose the softer, more flexible one.
Kimberly
Hi, Kimberly – yes, you’re right, it is. But it is slightly different, in that it is a little finer, more flexible, and the waves are closer together, if that makes sense. If my college physics classes would kick in, I’d try to explain in terms of wave length and height….! But alas, the technical terminology has slipped the brain! -MC
Beautiful! The goldwork makes it more ethereal; keep it!
Hi Mary!
I love this project. It’s turning out so beautiful. Your detailed photos and tutorial are superb. This is my favorite newsletter!
Thank you!
Harper
I love the addition of the goldwork! It brings out thr beauty of each element but also ties them together. Can’t wait for the framing goldwork.
The gold is brilliant in every way! I thought that it would look nice but it went way beyond my expectations. This is so much fun to watch the progression.
Hi Mary, I like the way this embroidery is coming together. I think the subtle sparkle of the check thread is just right for the outline and draws the colours together nicely. I wasn’t sure about the brown silk thread before, but the addition of the gold makes it work. I also like the way you’ve couched the gold around the flower with pink thread and the tendrils with green. This slightly subdued gold outline balances the design beautifully. So … the frame? I’m looking forward to seeing what you do with that. Are we to expect more subtle shimmer or will you go for all-out-bling? Can’t wait! 🙂
The gold outline gives a spectacular finishing touch. I definitely approve!
I really love the way the gold work works as the outline. It makes the whole rose motif flow and makes the gold within the rose and leaves stand out better. I am still waiting to see if the blue will work with the rose as I am still on the fence about that color but I admit, it is starting to grow on me. Beautiful work!
I love the gold work and the rather unique shape to the flowers and leaves that makes them just a bit whimsical. If my stitches just laid so smoothly. This flower reminds me of illustrations from Dr. Suess books gone embroidery! O the places we go and things we can see!
Hi Mary,
Your Plunging Lasso was a very big help for me on my last project. It made the plunging go so much faster and I didn’t have to worry about a large needle eye leaving a large hole in the fabric. Thank you for teaching me that, as well as dozens and dozens of other things about embroidery!
Just gorgous I love it!!!!!!
I love the way the Mission Rose is turning out, every new post makes it look even more beautiful. Love the gold, makes everything spring out. All in all it’s gorgeous.
Hi Mary
The mission rose project is looking stunning!
What weight/thickness of check thread are you using for the outline ?
Keep up the good work
Dorothy
Wow! It’s really coming together. And the way you’re using the gold threads to outline everything… Love it!
I was inspired by this to try my hand with some silver thread in a project I was working on; I’m such a beginner, but the couching looks straightforward… I tried it, and it worked! It doesn’t look like yours, but it does look really cool. Thanks for all the fun ideas.
Outlining in gold is the same as backstitching the edges in cross stitch. It finishes the design and makes the whole pattern stand out more from the background. In other words it makes the entire project look better.
Enjoying your site Mary.
GLOVE STITCH. I would like to know the correct way to do this. Is it possible for you to display this stitch?
Thanks so much, Jen
Very beautiful.
You know, I was afraid that the gold on the stems would make them too heavy, but I was wrong! It looks great, and actually seems to make them lighter. I am starting to think that gold makes everything better, lol! I don’t know when I will have time to learn it, though, I already have so many projects queued up.
It’s looking fabulous so far, Mary!