Before I started to stitch on the Mission Rose project, I knew I’d want something over the project in the frame, to help minimize dirt and such from soiling the ground fabric.
Because the ground fabric is silk (backed with linen), and because the embroidery will be done with silk and metal threads, this isn’t the type of project that can be submerged in a nice boil of sudsy water when it’s all finished. Instead, every precaution has to be taken to keep the piece clean.
In addition to washing your hands well before each stitching session, there are other precautionary methods you can employ to help you keep your embroidery project clean during its creation. When I was working on the Medallion Project last year, I basted a piece of plain cotton muslin onto the fabric in the frame, as a built-in cover for the piece when I wasn’t working on it, as well as to protect the fabric during stitching, giving me something to rest my hands on.

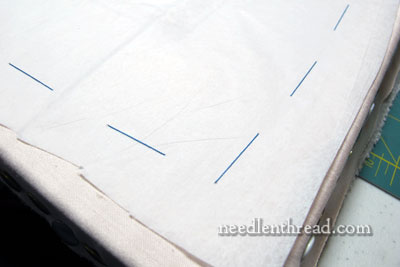
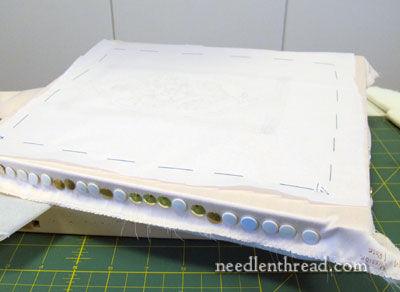
With the Mission Rose, I’ve pretty much done the same thing, except instead of using muslin, I’m using tissue paper. I cut a piece of tissue paper about the size of the whole framed piece and used long basting stitches to fix it to the fabric, working those stitches just along the inside of the frame.

You can see here the framed up project, with tissue paper tacked on top. I’ll slice open a window to work on the piece.
The tissue paper will protect especially the area just outside the design, where my hands are likely to either touch the fabric while holding the frame, or rest on the fabric when stitch.
Normally, I don’t lean on my fabric much when working on a very small frame like this, but occasionally, the side of the hand does come into contact with the ground fabric, and it’s a good idea to have something over the fabric to protect it from the natural oils in the skin (or anything else that might be inadvertently clinging to your hand!).
I’m not concerned about the very outside edges of the fabric that are tacked over the frame, because when the piece is done and ready to be mounted for display, this bit will most likely be cut off.
Now – Finally! – it’s time to stitch! I’m tackling the large leaves first. Next update on this project will be this coming Thursday. In the meantime, tomorrow I’m announcing the winner for the Carrickmacross Lace Sampler Kit and curved scissors. If you haven’t signed up, do! And Wednesday – a whole conglomeration of stitchery in all kinds of colors that looks like mass chaos. Yep. The lattice sampler update.
Until tomorrow!
If you’d like to read the backstory on the Mission Rose project and follow it along step-by-step as it develops, please visit the Mission Rose Project Index, where you’ll find all the articles relating to this project listed in chronological order.


I noticed you used a rather dark color for basting on the protective cover. And I’m sure the stitches are well outside the design area. But. . . . have you ever had any color residue left behind on the fabric when you were done? Whenever I baste things, I tend to use a very light color like cream or very pale colors because I’ve always worried that I’d have little dots on the fabric from the thread. Maybe I worry because I live in such a moist climate and think the dampness will cause the thread to bleed a bit. Probably foolish.
Hi, Irene – since it’s outside the design area, I don’t worry about it too much. Also, most good sewing threads don’t bleed. I’ve never had a problem with thread residue. If I were doing whitework or something, and if the thread were inside the design area, I’d probably use a lighter color, like tan, as long as I could still easily see it. -MC
Dear Mary
Well you all ready to stitch I like the idea of protecting the fabric while stitching especially if you can’t soak the fabric after stitching. Just out of curiosity why did you choose tissue paper and not muslin to protect the silk fabric? Can’t wait to see the development of the project.
Regards Anita Simmance
Hi. Anita – well, I didn’t have any muslin, but I did have tissue paper. 🙂 Either will work…MC
Hi there,
I use clear plastic (kitchen) wrap and cover my whole frame. I cut little slits and fold it back where I stitch and then cover the hole with more plastic wrap when I move on to another area. I like the plastic wrap because it is clear and I can see through it to see my design and it is readily available.
Question – the silk you are going to use, would 1 strand be the same as 50 weight sewing thread?
Hi, Linda – I think 50 wt sewing thread is a little finer, but more to the point, it is tightly twisted, and it won’t cover the same way this floss will. I’m not sure exactly how to explain it, but I think of sewing thread as “hard”, while embroidery floss is usually “soft”. Floss spreads out a little when you stitch with it, but sewing thread won’t. So instead of getting a fill that smoothly blends together, with a sewing thread, you’ll get a fill where each stitch and line of stitches is clearly discernible. I’m not sure if that makes clear sense, but I hope it helps a little! -MC
Hi Mary,
Can’t wait to see the project get under way, now that everything is set.
Thanks for the tip. I really have to to this extra step on the next project. There is one vintage piece that I’ve been studying at a museum. It is still in the frame as it was on the last day it was stitched. It has something that must be almost like a butcher paper covering the silk, with a cut out for the shape of the design. There is a light basting about 1/4″ away from the cut out edge.
It’s good to know other things can work besides muslin, and we can use something that might be on hand.
Happy stitching!
I’ve tried a few types of needlelace but am always ready to try ‘just one more’. And Carrickmacross has been on my list for a long time now, so hopefully its turn has come!
Hello Mary, Many great minds think alike, both you and I and many others through history. I like the idea of using a clear plastic to protect fabric and stitching. Did you see my posting? Stitch Like a Surgeon.
stitchingidyllic.blogspot.ca I just posted it a week or so ago!
Enjoy your project. It looks to be a very interesting one. Am eager to see how you go about the stitching.
All the best, Ann B.