


Today’s Stitch Fun is a bit challenging – but, oh! the satisfaction of conquering a challenging stitch! True, this isn’t the Most Challenging Stitch Combination in the world, but it is challenging enough that many stitchers simply don’t bother to tackle it, even though it creates a beautiful, intricately laced border or band.
Tomorrow, I’ll have a Stitch Printable available for you. This is a new idea – we’ll see how it goes over. The Printable will take you step by step through the whole process of creating the interlaced herringbone, not only for the simple band shown below, but also on corners, complete frames, and circles. More on this at the end of today’s article!
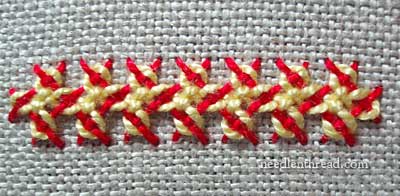
This stitch combination is the interlaced herringbone. It consists of a row of double herringbone stitch, interlaced in two passes. To create the stitch correctly, it is essential to work the double herringbone stitch correctly. And – sigh – this is where some of the frustration can come into the picture. Unfortunately, there are a few stitch dictionaries that present the double herringbone stitch incorrectly.
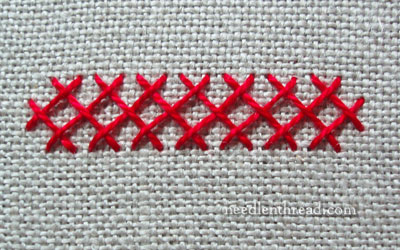
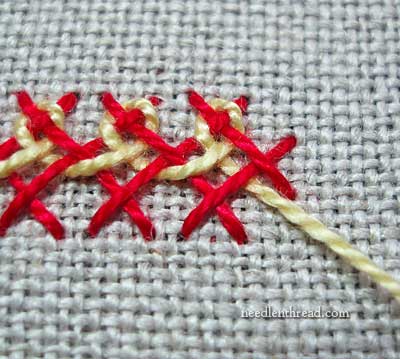
To start with, you must work the double herringbone stitch, and it has to come out looking like the band of double herringbone pictured above.
To help you get the double herringbone foundation correct, you might want to watch the double herringbone stitch video here on Needle ‘n Thread. Getting the movement of the stitch down is important. It’s doubly important to realize that double herringbone is not simply two rows of herringbone stitch worked on top of each other. Instead, there are certain “over-under” passes that must be made correctly for the stitch to interlock.
It is easier for beginners to work the double herringbone band shown in the photo above on even-weave fabric. If you use a relatively low-count linen (say, 25 threads per inch), you can easily create the double herringbone band shown above by counting the threads of the fabric.
For this tutorial, I’m using #5 perle cotton and a 26 count even weave linen called Montrose 1750, by Legacy. This is a nice “chunky” linen that works really well for all kinds of historical samplers (especially the counted variety), as well as for these surface embroidery stitch samples, and any surface work that involves using a heavier thread.
To make getting the foundation layout easier for you, here’s a diagram:
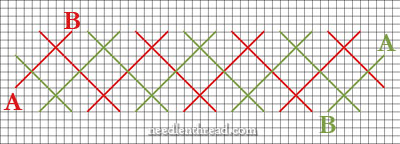
This diagram shows you the band on a graph, so that you can clearly see how the shape of the band should be laid out. The red lines indicate the first pass with the herringbone stitch, moving from A to B in red and continuing down the line (check the double herringbone stitch video for the movement of the stitch and the over-under sequences), and the green line represents the return pass, starting at A and moving to B and back down the line. So, if you want to count the fabric threads to get the layout precise, that diagram will help you. Then, once you’ve gotten the hang of the layout of the foundation, you can move on to working it without counting threads.
Or you can just work it without counting threads! They key is to lay out the band of double herringbone according to that general shape.
Once you get your double herringbone band worked out, it’s time to lace it.
Two points before you begin:
1. Use a contrasting color as you practice – it will make it much easier to see what you are doing.
2. Change to a tapestry needle for the lacing. In this photo tutorial, I’m using #5 perle cotton with a #20 tapestry needle for the lacing.

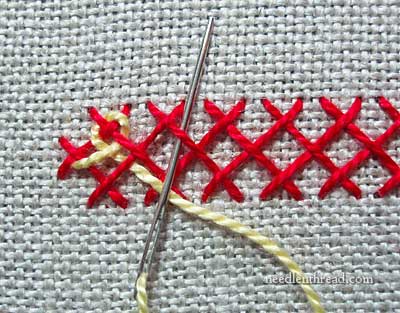
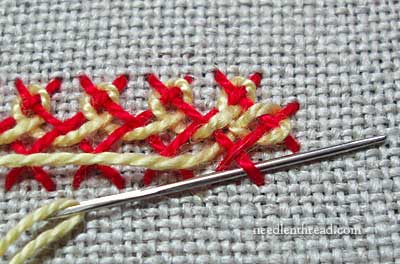
To begin the first lacing pass, bring the needle up in the fabric in the middle “elbow” on the left end of the double herringbone band, right where the stitches cross each other.
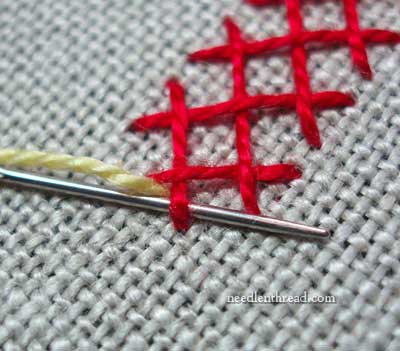
Immediately pass your needle underneath the lower “arm” of the elbow, so that the needle is passing under the stitch, towards you.
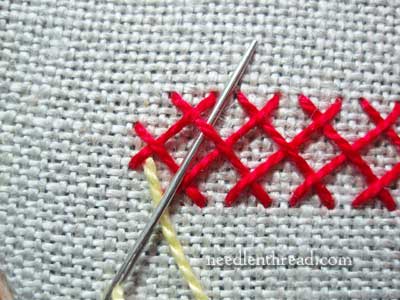
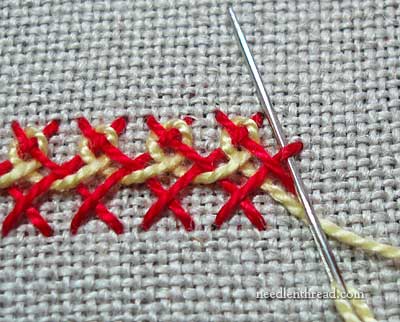
Whenever you are lacing in an upwards direction (away from you), the overs and unders always alternate, so that you are never passing under two threads in a row. This is very important. As I’m moving upwards away from me on this part of the stitch, notice that I’m going over and then under the foundation threads.
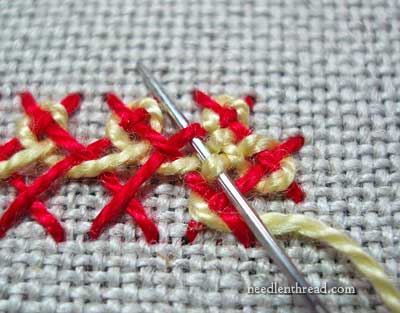
As I pass across the top of the foundation, I’m still working over and under, alternating the over-under.
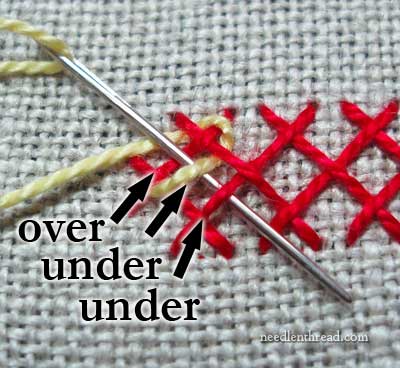
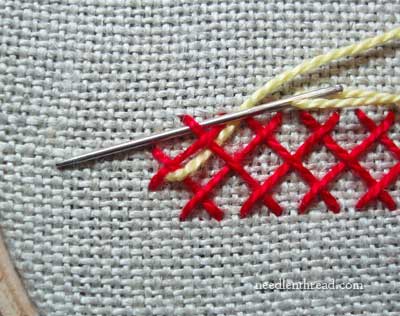
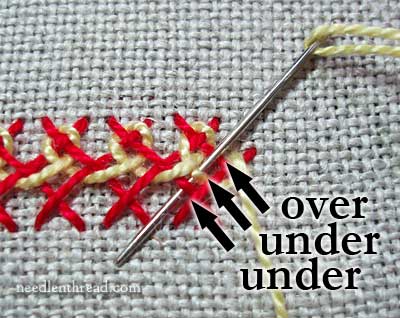
Now, I’m going to pass down towards me. And this is where things change a bit. When I pass down while doing the lacing, the sequence is over-under-under. I pass over the first foundation thread, then under the lacing thread and then under the foundation thread. Remember: over-under-under when coming down towards you.
When you reach the center in the foundation band, you move back up, repeating the whole process so far, until you reach the end of the band.
Remember, when you turn to go back up, the sequence is again over-under.
When you arrive at the right end of the foundation, you’ve just come down, completing an over-under-under sequence.
Go around the end by passing over and under.
Now, your needle will head down again, and it will pass over-under-under. Remember: down is over-under-under.
Passing around the lower tips of the foundation, the sequence is again over-under.
Passing upwards, you now have an extra lacing thread in the middle. Because you’re going up, you know that the sequence is over-under-over-under, alternating the over-unders.
Repeat the process all the way back to the beginning of the foundation band.
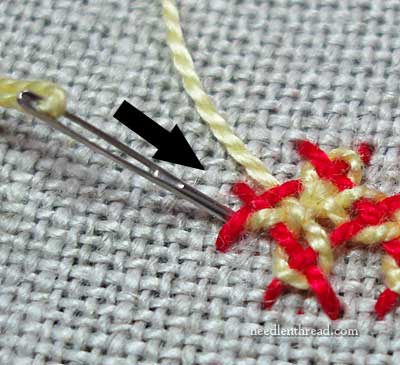
After completing the upward over-under-over-under sequence at the end of the band, you pass over the top arm on the left side of the foundation, and take your needle down in the same hole where you began the lacing adventure!
You have successfully laced the double herringbone band!
Stitch Printable
To give you a portable, thorough reference guide and help you work the interlaced herringbone on a complete frame and in a circle, I’ve created a Stitch Printable for the Interlaced Herringbone. The printable includes 37 pages of step-by-step photo, diagrams, charts and instruction, along with myriad tips and tricks for working the stitch, including tutorials on starting and ending threads, materials lists, resources, and so forth. You can find a thorough description of the Stitch Printable here, and you can go straight to my online shop to purchase your own digital copy!
Amei esse ponto, pensei como seria complexo realizá-lo, mas depois de ver as explicações fiquei surpreendida com sua simplicidade. Obrigado por deixar tão claro esse lindo ponto. Bjs, Márcia
I LOVE the idea of a detailed printable for one stitch. To be able to fill out a collection of stitch books with the individual stitches missing from them would be invaluable. Thanks very much for this idea!
hi mary,
i have just been introduced to your website and enjoy it immensely as i kove embroidery.the idea of a printable is great, where and how can i buy it ?
best regards – haya.
I look forward to yourblog/instruction everyday! I would like to be able to print off what I am interested in so I can begin my own personalized stich bible.
You make everything so easy to understand and it makes me WANT to embroider again!
Thank you so much I am glad I found your site!
I really like the printable idea because it’s so portable. I don’t always have a computer near me when I’m stitching so I end up making copious notes from your videos. This will save me a lot of time.
Hi Mary,
Love the stitch combination! And a question for left-handed stitchers – so, in your diagram above (From left – A/B and then from right A/B) would left handers just turn the diagram upside down to make sure we embroider the stitch correctly? Thank you.
-Sharon in France
Hi, Sharon – No, this is one of those stitches that it doesn’t matter if you’re left or right handed. You’d just do it as written, because either way, whether you’re doing the first pass on the foundation or the lacing, or the return pass on the foundation or the lacing, you would have to adjust the way you use your hands. Once you get the hang of the stitch, you can turn your hoop whatever way accommodates your working hand the best, but if you start turning your hoop before you’ve understood the whole workings of the stitch, it can get confusing. If you’re working on a frame, just work the stitch as written – you’ll have to switch hands or turn the frame, anyway.
~MC
I appreciate your explaining this in detail, Mary! Now I can “proceed with confidence”. – Sharon
Thanks so much for this. I’m on dial-up so the videos are just not feasible for me.
Hi Mary,
I think the printables is a very, very good idea. The quality of your instruction is so incredible…I would buy them and keep them in a handy folder for sure!
Thanks for your amazing work.
xo Allie
I need 1 more picture on the last step of going down from the top of the last pictured step.It left me confused.I am one of these people that needs to see it done to be able to get it into my head.
Thanks MJ
Okay, that’s it, forget going back to work…school starts next week and I have been in my classroom getting ready for the arrival of students, but this settles it. I’m going to let them teach themselves and I’m going to sit around with a needle in my hand for the rest of my days.
Who needs an income, anyway?!
wow, so beautiful and neat,thanx for sharing this step by step tutorial
Dear Mary
I Would love a stitch play printable photo tutorial from you. I love this series and you are so thorough in your instruction and photo tutorials I would definitely invest in these would be worth every penny, nickel, dime, etc.
Regards Anita Simmance
Oh yes !!!! I love to play with stitches. So much fun to come.
Hello Mary, You have a super idea with the printable stitches. I am purchasing a tablet so that I can take my favorite site with me and your instructions are sooo good to follow that I will put everything on my tablet, this way I wont fight for the computor with my husband
Thank you.
I like the idea of printable…I just need extra help with some stitches. This one for instance! Also the palestrina, coral and a couple of others. Thanks for offering them. This way I can watch the video and look at the printable…it will help get the job done
Sounds great! Waiting to try it.
I for one would love for you to publish a book of these stitches. Your instructions are the best I have ever seen.
Bring ’em on, Sister Stitcher … your pics are always so clear, your instructions are as well.
I’d love for you to also offer a (hopefully discounted) subscription option for those of us who do not want to miss one and are sometimes lax on keeping up with our emails.
Well done. I love the idea! xo karen
I am in the process of creating a crazy quilt pattern and would like to know if I can recommend your blog for stitch know how or can I print stitch information off your website to include in my pattern. Thank you. You have a wonderful site with lots of useful knowledge.
I love the idea. I have a book I started with how to of embroidery stitches which I use all the time. Your stitch instructions are very good,clear and easy to follow even on the most complex stitches. The more complex stitches are the ones I would like to see you publish similar to the interlaced herringbone. The basic embriodery stitches are easy to find good instructions for. Thank you for doing this.
Happy Stitching!
Susan
The printable Stitch guides sounds like a great idea. I am trying to do crazy stitches on some of my wool projects and this would be very helpful. Looking forward to receiving the first one.
I think the combo of tutorials on computer and a print out are what I need to learn a new stitch.
Hi Mary
i think this is a fantastic idea but i also think your tips and techniques should show their way to printable too because they have lots of good information.
Good Luck.
I think your idea of creating printables is a great one. Handwork is often done away from home so printed instructions would be helpful. I like your videos, but I don’t always have access to a computer so carry along instructions would be ideal.
I also think you shouldn’t limit yourself to only the complicated patterns. I would like to see printables for the basic stitches as well.
Oh, this is an idea whose time has come! I would like this very much ~ glad to have a resource that I could print out and keep in a notebook. I look forward to further developments!!
I love the idea of printables. Over time I could put together a very handy stitch ‘bible’!
I am amazed at how simple this is, and yet it looks so complicated when I look at it. I have discovered that to practice these new stitches, using plastic canvas I can make the stitches very big to see the progression and then move to something tiny and intricate once I figure them out. That way I don’t have to worry about a hoop or ruining fabric, if I make a mistake too big to fix. This will be fun to do with red and green yarns for Christmas or lavender and greens for Easter. I can hardly wait for the printable and then I can add it to my stitch collection booklet. Great idea and gift.
Dear Mary,
Whatever is needed to learn better and more, I support. Of course the printable diagrams are important…!!!!! I would like to register for the booklet… if ready. I understand very well that task takes technical costs. As soon as it is ready, let us know the price. Thanks a lot.
Once again you have taken a complicated stitch and made it look easy. Thank you!! I’d definitely be interested in paying for downloads for the stitches I need help with – ah the dreaded French Knot especially!
A printed/downloadable format for different stitch techniques is a really great idea. I can never remember how to do a stitch once I’ve seen it. I’m going to start a binder, like I do for the “New Stitch A Day” that comes to me each day for knitting and crocheting. That way It will be hand handy to use. Even for a fee it is a great idea. Thanks Mary
Sounds good to me. Can’t wait for the first one.
Hi Mary.
Is perfect the new idea. Thanks for the help.
Hi Mary
The printable sheets sounds like a great idea and will look forward to hearing more about this and how to get them.
Best wishes as always
Eleanor
I think the Printables are a Great Idea! Hopefully the format is such that it could be stored on a Kindle or iPad so the directions would be easy to carry along. I’m really enjoy your website & all the wonderful info.
Mary in NM
Sounds like a fabulous idea. Can’t wait.
Thank you Mary. I’m looking forward to the full print version and hope you make many more books available. Your directions are so easy to follow. I’m learning so much from you.
Blessings,
Sharon
Hi Mary,
Your indexing and related search system increase the already great value of your website. The organization of material and search ability help me to feel relaxed and confident that I can return to a topic in the future when I wish to do so. I am looking forward to the printables and to the continuation of your search ability with them as well. Thank you for inspiring us.
Molly
Hi Mary,
I like this idea a lot. Perhaps you have thought of this already, but I would love the Printables to include some images where the stitch has been used. For example, if a particular stitch is heavily used in a specific ethnic or historical embroidery, might you include some photos showing that? Stitch dictionaries are wonderful, but seeing actual applications really gets the creative juices flowing.
Mary,
This is a really great idea! Good job!
Sheila
What a good idea.
I would like printouts of some of the early ones, Or buy your book.
Your instructions and diagrams are wonderful.
Thanks, Sharon Barrea
Mary, this is a fantastic idea & I would definitely be one to purchase printable instructions from you online.
Someday I hope you will also be able to offer your “Tips & Techniques” in a printable format.
Cheers,
Linda A
Ontario, Canada
I follow yor Blogs with avid interest and have gained an enormous amount of knowledge from them. I think this is a brilliant idea and would love to see more.
On a different note. – what programme do you use to do your line drawings. Is it Illustrator? A step by step brief on how you do it would be really helpful, especially to me as I struggle with neat line drawings.
Keep up the good work,
Liz
Great idea. The printable sounds VERY worth it, and I like the idea of your “monetizing” somewhat — we want you to be successful and stick around! Thanks!
Helly Mary,
I would use the printables, I often get in trouble with complexe stitches. I small fee for a print is a good idea. No books to buy,just the pages we need to learn a stitch.
Thank you in advance and I hope you will make this project permanent.
Louise
That is a beautiful stitch, and so perfectly detailed how to. I can’t wait to have a project to use it on. Thank you so much.
Thank you for such a great tutorial booklet! Wonderful stuff!
HI,
this is what we call Sindhi kadai here in India!!Is a beautiful interlacing stitch used in various purposes.
I love the silk embroidery with goldwork the best. the shimmer of silk and gold just looks so rich. I have never done whitework before, although redwork I have done. I’m relatively new at embroidery so to have a site like yours to learn from is just amazing. Thanks so much!
Very nice
Hi Mary,
I am ordering this one now! I am loving your e-books! Highly recommend all your e-books, everyone should order them.
I have finished one project and I am going to use the this stitch for my next one. Can I send them to you for review? (In order for you to tell me what I am doing wrong? ) ;0-)
Christi
P.S. I am having a lot of fun!!!!
very interesting
Just purchased your herringbone stitch book but can see it has gone through on Facebook but have not received the book to download.
Thank you.
Hi, Jan – Thanks for your comment. I will email you! Most likely, the file delivery email was filtered as spam by your email service provider. I’ll send you a different download link. Incidentally, I don’t have anything with my shopping cart hooked up to Facebook, so I’m not sure what you mean by “it has gone through on Facebook”? Email coming right up!