Grecian Twist is a four-ply metal thread made out of two types of gold – one is smooth and bright and shiny, and the other is somewhat matte and “old gold” looking, compared to the other. It’s a thick cord, about 1/8″ or slightly less, and it is perfect for outlining and neatening an edge. Because Grecian Twist is not a fine (size-wise) goldwork thread, it is dealt with a little differently than many standard types of metal thread.
Today, I’ll show you how to attach Grecian Twist to a goldwork project. I’m afraid I didn’t take the best step-by-step photos of this process, so instead of a thorough photo tutorial, you’ll have to read the text for a bit of explanation, too.
By the way, Grecian Twist is quite easy to sew on, so don’t be intimidated by the beauty of the thread (I think it’s a particularly beautiful thread!), thinking that such a beautiful thread would require some fancy-schmancy approach to embroidery or stitching!
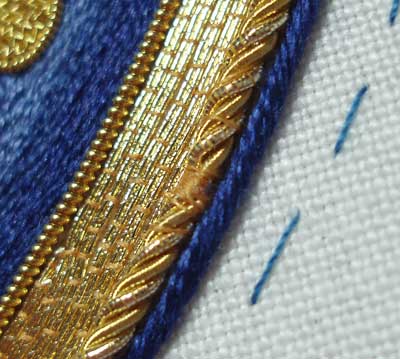
Here’s the join in the Grecian Twist. It doesn’t look too pretty in this photo, but keep in mind that you are looking at this Very Close Up. You can see a little area of the twist that has been completely oversewn with gold-colored silk thread. To couch Grecian Twist, you should use a medium weight silk thread that has been waxed. To wax the thread, run it through a cake of beeswax a few times, and then through your fingers a few times to work in the wax and remove the excess.
To start sewing on the twist, I took a single couching stitch a little way away from the start of the thread (you can see that single stitch over the cord, below the “clump” of silk thread), just to hold the twist in place. Then, working at the very end of the twist, I sewed over the twist several times (probably about six or eight times) until the very end of the twist was well covered with the silk couching thread.
You see, unlike many goldwork threads that are couched and then plunged to the back of the work where they are secured, plunging Grecian Twist to the back isn’t really a good option. That’s not to say it can’t be done with enough determination, but whether or not it should be done is another question. If nothing else, you’d need to bore a good sized hole into the ground fabric, just to get the stuff through. The size of the hole and the size of the twist, plus the bulk on the back, would not be discreet. So instead of plunging Grecian Twist, the ends are finished on the top by oversewing them thoroughly with a thread that blends with the gold as much as possible.
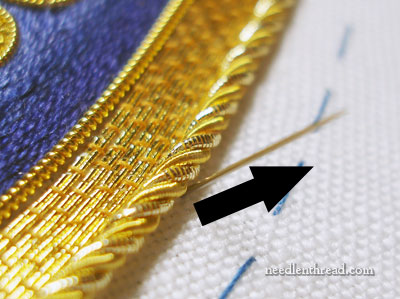
Now, to keep the couching invisible on the twist, the key is to make your couching stitches conform to the shape of the twists of the cord. Bring your needle up in the fabric to the outside of the twist, at an angle, so that you are entering the fabric more or less right below the twist, on your design line. You can nudge the twist up or out of the way slightly, to see where you want to come up, if you need to.
Pull the needle and thread through.
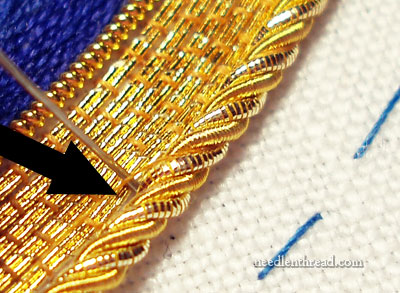
Then, moving down the cord, take your needle down into the fabric on the inside, slanting the needle underneath the twist. When seeking the place to take your needle to the back of the fabric, try to follow the curves of the twist, so that your couching thread sinks in between the plies of the twist. In the photo above, you can just barely see the thread resting between the twists to the right and slightly above the needle.
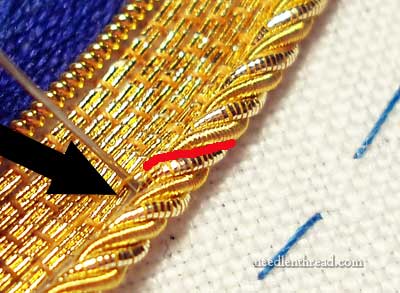
The red line in this photo clarifies where the thread is.
When you pull your couching thread through and tighten the stitch, the thread will disappear between the plies of the twist.
Work all the way down the length of the cord, taking a stitch after about every four twists in the cord.
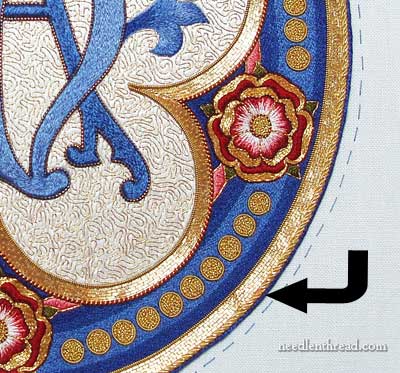
When you finally make it back to your starting point (if you’re working in a circle) or when you come to your ending point along a line, you’ll end the twist the same way you began it, by oversewing very securely with many stitches the very end of the twist. In the photo above, the arrow points to where the join is on the twist. You can see it, but it doesn’t distract – it isn’t noticeable enough to take away from the cord. Chances are, unless you knew what to look for and were really studying the piece closely, you’d never notice it.
That, then, is how Grecian Twist is sewn down. It’s really quite easy and it goes very quickly. So if you want to make a bold statement with a beautiful finished edge, try some Grecian Twist! You can find Grecian Twist through Tanja Berlin.
If you’d like access to all the tips and techniques discussed in the Medallion Project, including complete step-by-step coverage of the Tudor-Style Rose, conveniently collected in one document, interlinked, referenced, and indexed, why not add the Marian Medallion Project e-book to your library? It’s packed full of all kinds of embroidery tips for undertaking a project like this, all in a convenient electronic format for easy searching.


It takes a very skilled, brave needlewoman to show such a close up of their work. I am in awe you can make a join look this good. I struggle with cording on pillows!
Deb
Thank you so much for showing this. I have read about this in the A to Z Goldwork book, but seeing it here, with such a detailed explanation makes really clarifies how to handle this beautiful thread. The look is so nice as a finished edge. I think I will be using this for my next project!
Thank you! I now see and understand how you did it, but as far as I’m concerned it’s still Mary Magic!
Once again, I say, you are one of the best teachers I have met. You make that look so easy to do. That is a gift. The goldwork is awesome. Thank you for sharing your gift of teaching through embroidery.
Thanks for the tip! I thought that every strand of the cord would have to be plunged separately, but could not figure out how to keep the join so smooth. I was using metalic craft cord, but I imagine the concept is the same for the real metal cords?
Dear Mary
Thanks so much for showing us how to stitch the Grecian Twist I must buy some it looks so beautiful and thanks for the information on where to buy the gold.
I hope you are having a well earned rest and putting your feet up with a nice cup of tea/coffee or wind even!
Regards Anita Simmance
This is lovely. As I am preparing to stitch down some large Grecian Twist as an outline, I do have two questions:
Do you have any advice for keeping the ends from untwisting? My initial thought is to stitch it down with the close stitches you have shown and then cut off the end. It seems this would work on the first end, but may be more difficult to get the tail end to mate up smoothly with the extra bit lining up and extending to exactly the same space the start point is already stitched down. How did you control the unravel?
My second question involves darkening and tarnishing. The idea that the outline will darken and provide a deeper colour is one of the reasons it appeals to me. Assuming it will be tarnished for more of the life of the embroidery than it will be new, should a more antique colour thread be used to prevent having a bright gold join becoming obvious in the future?
Hi, Sarah – if you’re using beeswax to coat your thread, it will likely darken, too. You probably won’t notice the darkening / tarnishing very quickly – it really takes a bit of time for that to happen, unless you leave the goldwork exposed to the air (especially with a bit of humidity) and in the sunlight. But you could select a gold that’s somewhere in between – maybe an “old gold” rather than a bright gold.
You can wrap the end as mentioned – that’s how I did it. Wrap before trimming!