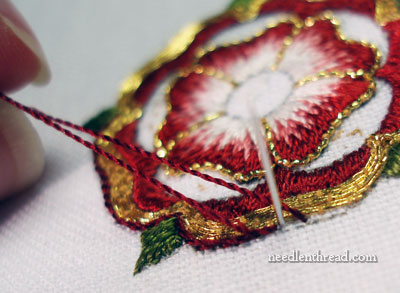
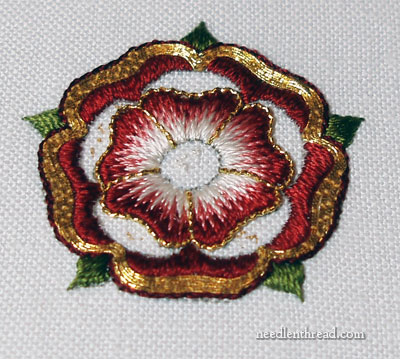
When last we visited the Goldwork & Silk Tudor-Style Rose series, we outlined the inner petals with gold check thread. It would make sense at this point to fill the rest of the inner petals with gold, but that wasn’t actually my next step! Instead, I moved to the outside of the rose and outlined the gold petals on the outer layer with a stem stitch outline, using a dark red Soie Gobelins (#2546).
As simple as stem stitch outlining may seem, there are a few aspects of working with this thread that can make it frustrating, so I’ll see if I can help dispel some of that frustration. Here are a few tips on how to go about outlining the outer petals.

First, a little about the thread: Soie Gobelins is a thread made from filament silk. It’s quite a fine thread, but not as fine as Soie 100/3. Incidentally, you don’t have to use Gobelins here – you can use the 100/3 (color #518) that I used on the inner petals, which we’ll see a bit later. But I used the Gobelins, because I like the thread, and I wanted the outline on the outside petals to be slightly heavier than the outline on the inside petals.
Soie Gobelins is a tightly twisted silk – compared to the Soie de Paris used for the filling on the rose, the Gobelins is more like a very fine cord, rather than a softly twisted floss. But just like the Soie de Paris and Soie 100/3 (and, to my knowledge, all twisted filament silks), Soie Gobelins is a Z-twisted embroidery thread.
What does this mean for the stitcher? Well, if you look at the photo above, you will see that I’m holding the working thread above my needle while working the stem stitch outline around the rose. In fact, I’m stitching the outline as if it is outline stitch, but the result looks like stem stitch. So, when you stitch with any of these particular silks, make sure that if you want a stem stitch outline, you work the stitch with the working thread above the needle. (For more information on this point, you can read my pictorial explanation of the difference between z-twisted & s-twisted embroidery threads.)

To stitch the outline, pick any valley between the outer petals at the base of a leaf as your starting point, and stitch just around the outside of the gold, as close to the gold as possible. Because of the “boingy” nature of this type of twisted silk thread, you might find it less frustrating to use a laying tool as you stitch, holding the working thread straight as it makes its way into the fabric. If you hold that working thread a little taut with the laying tool, the stitch will move into the fabric without twisting up.
So that’s that – the outline is finished, and next, we’ll move onto the gold filling on the inner petals!
You’ll find a list of all the previous lessons in this series on the Goldwork & Silk Tudor-Style Rose listed on the Tips & Techniques page.


Thanks for this Mary. I can’t think of anywhere else I would learn about things like Z twist and all the little particulars that make one’s stitching a cut above. You’re blog is the next best thing to learning from a live person. In my world there are no others who do fine embroidery…no shops for 50 miles or so.
QUE TRABAJO TAN LINDO, SOLO QUE ACA NO SE ENCUENTRAN ESTOS HILOS.PERO LO VOY A HACER COMO SEA,GRACIAS.
Because there are so many, could you possibly include a list of materials? I’m looking forward to making the rose, but I’m going to have to go through the tutorials and pick out mentions of the various ‘ingredients’ :-).
Best
Hi, All – Thanks for your comments!
The “ingredients” list can be found in part one of this project, right here: https://needlenthread.wpengine.com/2011/07/goldwork-silk-tudor-rose-stitching-instructions-part-i.html
Hope that helps!
MC
Oh well, don’t I feel like a dumbo now!
Thanks for telling me 🙂