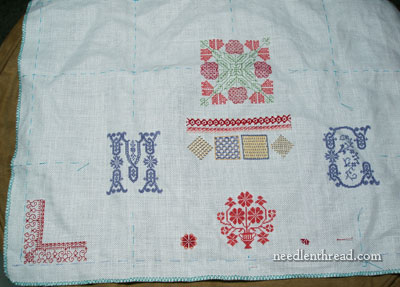
This is where I’ll collect all the posts on developing an embroidered spot sampler, so that you have easy access to each post, and so that they can be viewed in order. You’ll find a link to this post (the index for the spot sampler project) under Tips & Techniques, too. If you haven’t visited my Tips & Techniques page, you might want to check it out. That’s where I list articles on Needle ‘n Thread that either teach a specific technique, or that index various series of articles on a whole project.

Posts in the Developing a Spot Sampler Series
- Selecting and Preparing Fabric for a Spot Sampler
- Selecting Threads and Colors for a Spot Sampler
- First Stitches – Adding Initials to the Sampler in Counted Cross Stitch (includes some tips on counted cross stitch, as well as resources for decorative initials)
- Adding a Quaker Motif – includes a set of eight Quaker motifs to choose from
- Adding a Bit of Blackwork
Designs for the Spot Sampler: These are pages that have different collections of designs that I’m using on my spot sampler. They’re available for you to use for free, if you want to add them to yours.
Further resources & posts that are related to the Spot Sampler:
- How-To Videos here on Needle ‘n Thread – videos for figuring out stitches.
- Stitch Dictionaries – I’ve got several reviews under Books & Links. It’s very handy to have one or two good ones for reference while stitching this type of sampler.
- Embroidery Stitch Journal pages
If you’d like to post pictures of your projects as they progress, you’re welcome to post photos in the Needle ‘n Thread Group on Flickr, or to include a link to your own website, blog, or photo-sharing site in the comments section. I don’t check in on Flickr as much as I would like, so if you do post something, feel free to leave a comment to let us know!
For questions, comments, and suggestions on spot sampler development, feel free to use the comment forms on any of the spot sampler posts or to drop me an e-mail!


So how are the students going, and are they enjoying it?
Hi, Yvette & Elza…. Funny you should ask! I’m noticing a couple interesting things, and I’ll probably share some of them a bit later. They do seem to be enjoying the class a LOT (maybe too much – wow. I find myself saying things like, “More stitching, less talking” too often…. or…. “If you’re using your hands to chat, then guess what your needle’s doing?….. Right…… Nothing.“) But really, it’s a good group and we’re having fun! There is quite a range of abilities, and I’ve learned some interesting things that I have not necessarily seen in teaching academic courses. But more on that later. As for pictures, I’ve been taking photos of different elements of their work as they progress. So yes, you’ll probably see some as time goes on! Oh, and my greatest lesson so far: Deadlines are Invaluable. 🙂
Dear Mary, I am following your Sampler series with interest. So I was just wondering whether, when your students’ samplers are finished, you are going to show us some photos of their work? Love Elza from Cape Town. xxx
You have just answered what I was going to ask 🙂
I thought the flickr group was “dead” since the long and short stitch lessons ended…so I’ve added a couple of photos of my lastest work
Sounds like the teacher and the taught are having a blast. I would love to see the pictures…
Hi again Mary, Well it seems that you and your students have a lot of fun. Enjoy . Looking forward to the photos . O yes I am so exited, only 12 days and I will be arriving in your wonderful country. I am so excited!! 🙂 xxx
You are a great person to put your time into teaching and putting all your lessons, tips and techniques on line for free. Most people charge for less information then you are giving us for free. Thank you you have helped me and I am sure other people very much.
I just found out about an exhibit at the Weisman Art Gallery at the University of Minnesota. It made me think of your class because it includes embroidery based on graffiti tags, and I thought it may be an interesting aside for your class to see a modern approach, and see embroidery featured in a gallery. There is only one photo online, but perhaps when I visit I can share more. The link is: http://www.weisman.umn.edu/exhibits/OrdinarilyHere/home.html
Bonjour Mary
Votre site est vraiment super et un des plus beaux que j’ai visité.
Ton mail d’aujourd’hui est le plus magnifique que j’ai vu.
Bravo et bonne continuation, c’est un vrai plaisir pour les yeux et pour apprendre de nouveaux trucs.
Merci à toi.
Rayne
tell me the name of thread which u have used here plzzzzzzzzzzzzzz rep
Hi, Ghadeer – I used regular DMC stranded cotton floss on this project, for the majority of it. There are a few little bits where I used floche, but not many! ~MC
Hi, What is the best fabric to use for teaching kids simple embroidery stitches. On your videos what is the fabric that is being used and where can I purchase them.
Hi, Natasha – in the videos, I use different fabrics. Lately, I’ve been using two types of linen, one from Italy, and the other is imported from Belgium. I wouldn’t use them to teach children, personally. If you’re planning on teaching surface embroidery stitches (not cross stitch, for example, but chain stitch, running stitch, daisy stitch, etc.) I’d use a good muslin. You can also use felt – wool felt is sturdier than acrylic craft felt, but the acrylic craft felt would work ok. Another option is purchasing some “better” flour sack towels (not the gauzy ones, but ones that are more tightly woven) and using something like that. Hope that helps! ~MC
Thanks so much Mary. Your tutorials are simply superb. Thanks for putting so much effort into it. I love it!!.
Hi Mary, I have always wanted to do a stitch book or journal of stitches on linen. For reference stitches and it eventually turns out to be a keepsake/masterpiece containing stitches I have used.
Have you put together anything like that before?
I assume you would start out with 10 x 10 or 12 x 12 piece of line, leaving room for attaching interfacing and backing with a 1/2 hem. Then you sew together as a book.
Thank you for any advice or information you can give!
Sometimes I spend too much time thinking about it when I just need to do it!
Hi, Deborah – I haven’t made one myself, but I have seen that others have done this. I think it sounds like you’re on the right track, but you could use smaller fabric, if you wanted to make a more compact book. !0x12 seems pretty large to me. But still, why not? Whatever size you make it, it should work as you’ve planned it!
Your website is absolutely amazing. thanks so much for all the tips and tutorials.