When picking my way through an embroidery design, there comes a point when I like to move on from one area and all it “finished” for now. Returning to it later, I may have a fresher perspective, and I may change some things (or not, depending on how the rest of the design comes together). A bit down the road, I’ll pick out the dark red satin stitching on the large middle feather of my crewel rooster project, and re-embroider it. But for now, I’m calling the tail finished, so I can move on to other parts of the design.
I’ve been mentioning for a while while working on this crewel project that the lower tail feather would be removed. I didn’t like the abrupt shade changing on that feather, which you can see in yesterday’s post on adding the first blue feather. But I did like the use of the pink, believe it or not. I like the shade of the middle tone of pink.
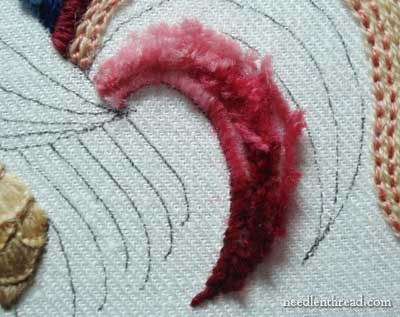
The first task – to get rid of the previous stitching. When I cut out an area of stitching like this, using either a very sharp seam ripper or my smallest embroidery scissors, I put the cutting blade (whichever one it is) parallel to the fabric, and run it right underneath the stitches, slicing them open and being careful not to jab the fabric. I do this on the front and on the back, and then I pick the stitches out with tweezers.
Once the stitches were out, this is what I put in. Now, don’t cringe.
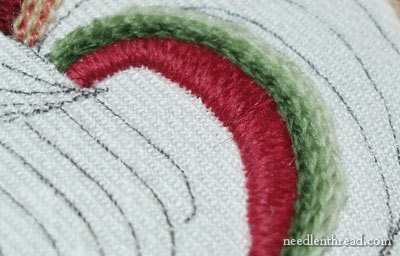
I satin stitched the lower half in the mid-tone pink (which is Heathway wool) and then chain stitched in three shades of Heathway green on top of that, from dark to light. Heathway and satin stitching…. More on that later, but just briefly, it’s a thread that works so nicely for satin stitching. It’s really smooth!
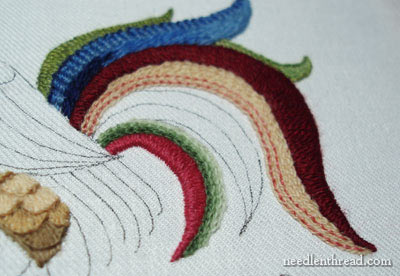
So here’s the tail so far. Now it’s a matter of that one remaining feather, which I worked in blues.
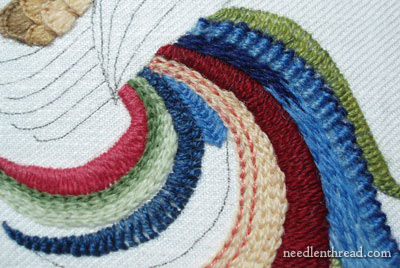
The lower part is worked in basket stitch, the upper part in fly stitch.
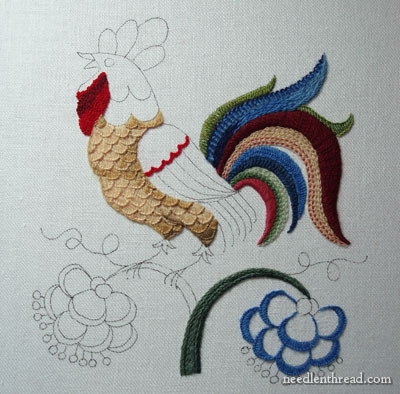
(Ignore the red scallops on the wing! They came out already!)
For now, I’m calling the tail done. I will likely go back to it and address two things: the middle dark red satin stitching, which I’m pretty sure is going to go completely, and there is a chance that the pink is going to come out again. I don’t mind it a lot – it’s not as bad as it was – but I’m not 100% satisfied with it. I’ve got a couple different ideas bubbling about in my brain.
But for now, I need to move away from the tail! Any comments, questions, suggestions are always welcome!
For further posts on this project, feel free to visit the following links:
Free Hand Embroidery Pattern for The Crewel Rooster
Setting up The Crewel Rooster Project
Choosing Threads for The Crewel Rooster – and the first flower
Crewel Design Books
Stem Stitch Filling on Flower Stems
Scalloped Feathers on the Rooster’s Body
The Beginnings of the Rooster’s Tail
French Knots on the Wattle
Adding the First Blue Feather using a Raised Backstitch


I LOVE IT!
🙂 It looks amazing. Can't wait to see what you decide to change with the red and pink – I think the colours work well, is it a texture thing??
Really enjoying following this project.
Wonderful 🙂 I love how it looks 🙂
You asked for opinions and, since I never hesitate to have one (right or wrong!), from looking at the picture on my screen – the darker red looks amazing with the tail as a whole, but for some reason the pink jumps out at me and doesn't seem to belong. Just MHO, of course!
I agree with you regarding the tail. The dark pink does not fit that much. I would use maybe the light salmon as above.
But I am sure that you will have the right idea !
I agree with Maggie, I think the deep red looks great, not a fan of the pink. What about a bright gold in it somewhere?
I like the color flow from green to blue to reds and through again. I kind of like the med. pink for the finish at the underside of the tail. Ties in well with the large center feather.
As for the big red, I like the colors but wonder if the direction of the stitches is what bothers me. The satin stitches go across rather than with the flow. It's such a large area. . . . just wondering.
Still love that upper blue feather.
I love the way tail has been worked so far. The whole effect is amazing.
I love everything about this project! As far as the dark red feather you could add a line of backstitch in the pink to break it up a bit. When I looked at the first photo with the stitches of the bottom feather being removed, I liked the fluffiness and thought you were going to do some turkey work or a 3-d stitch!
Oh, don't you dare lose that big red center feather! Pink would just make him look…ew. Besides that pink stands out nicely as a highlight, which it won't do if you change Big Red.
Try the stitch direction change on it first, please??
I love the tail and so much better now that you took out the striped pink section. I really love the blue sections of the tail.
Here's a humble suggestion for the comb – ghiordes knots – in reds like the wattle. I found it in A-Z of Crewel Embroidery last night as I was thumbing through.
Happy Day!
This design is beautiful! I have to admit though, there's just something about the pink and red in the tail that just doesn't blend well with the blue and green. Of course, it will look different when the rest is finished and the colours might go together better then.
I'm in love with the blue feathers 🙂 , very nice shade of blue ! I do like the med. pink but if it must be replace ,then, perhaps a bright red ?
For some reason the deep red (burgundy) look a bit dark, to me, compared to the other colors and the salmon/beige tail feather, to me, looks a bit too light (since all the chest area is already light).
What about embroidering on top of the deep red and on top of the light feather with contrasting colors in an open type/kind of stitch ?
Have you consider a nice bright med. yellow for one of the tail feathers ?
Just have fun , the end result will be beautiful !
I'm sure !
I love the dark red but think I have an idea about why the pink isn't working for you. If you look over the other parts of the tail, you've worked sympathetic colors: blue with blue, green with green, and red with a peachy color.
The pink on the bottom is paired with green, it's opposite. Visually, it clashes more than the others and breaks the pattern of sympathetic colors used for the rest.
Still amazing work! I'm enjoying watching the rooster come to life. And, did you notice that the blue flower looks wonderful under that tail?
I actually like the pink — I think it livens things up — but not on the bottom feather. If you're going to use it as an accent color, maybe it should be placed more toward the middle?
Maybe one color needs to more obviously serve as the dominant color? I remember reading something about a 5-3-1 color ratio but can't recall the details.
I think there needs to be more of a rhythm to the color placement, but I don't have any useful suggestions on how to achieve that, unfortunately.
Do you have a way to play with the colors on a computer version of the image first?
It's fun and interesting seeing your experiments with the different stitches and colors.
Hi Mary,
I am just marveling (marvelling?)at this whole project. I'm a little embarassed at having even left a suggestion at one point. I know so little, and you are so creative and experienced. I'm just grateful that you are photographing and documenting as you go, and then sharing on this blog.
WendyBee
I love, LOVE the way you have used these different stitches to such great effect. As a beginner, I am lapping up every variation of this rooster with great detail (although I won’t ever be working with wool).
I have laughed and cried with you along with this amazing Rooster.. I love it.. thank you so much for your pattern and your amazing personality ( and mum it does not look like a pillow) hugs