Picking out a palette for the flowers on my crewel rooster project wasn’t so easy. I wanted colors that coordinated with the rooster at least a little bit, and that had enough shade options to keep the flowers from being too flat. This is where I dropped my original intention to just use threads from my present stash (at the time I started the rooster). Last week, when I received that order from Hedgehog that had all that luscious floche in it, I also received a small range of colors of Renaissance Dyeing Wool, so I dug into those for the flowers.
I like the Renaissance Dyeing wools, and they embroider really well. So I have duly justified the alteration in my original stash-only intention! At first, though, I thought perhaps these colors would not work for the flowers, especially once I started stitching. But I have resolved that they WILL work. My plan is to use the same colors on both flowers, but I’ll stitch them in different locations on the flowers, so that the flowers aren’t identical.
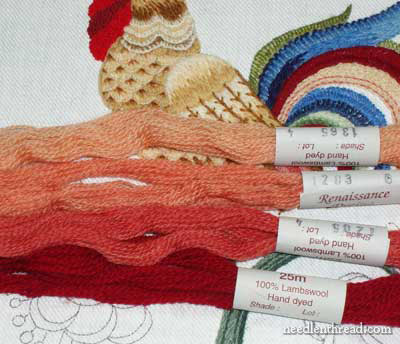
These are the shades – a deeper red (the same used in the tail of the rooster) to a lighter salmon. I think they’ll work well together?
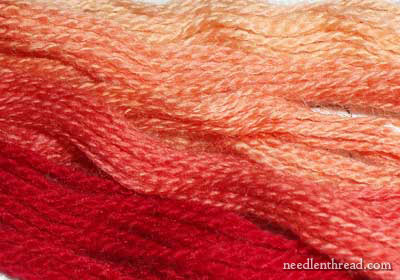
They’re beautiful – like a gorgeous Kansas sunset. (Really – we have stellar sunsets in Kansas!)
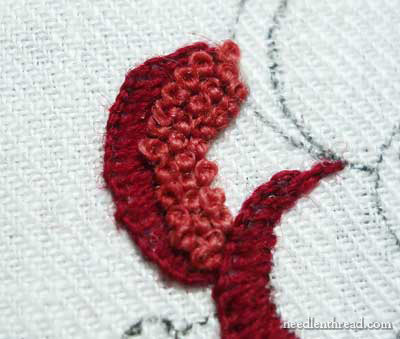
I’m going back to the buttonhole scallops around the outside of the petals, and then filling the inside with French knots.
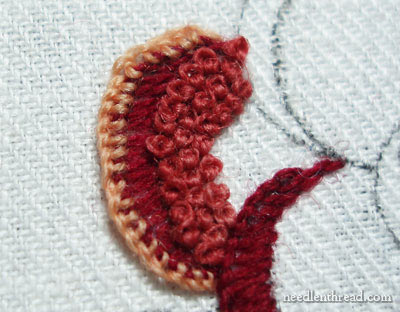
Around the outside of the darker petals, I’m working a row of detached buttonhole stitches in the loops of the previous stitches.
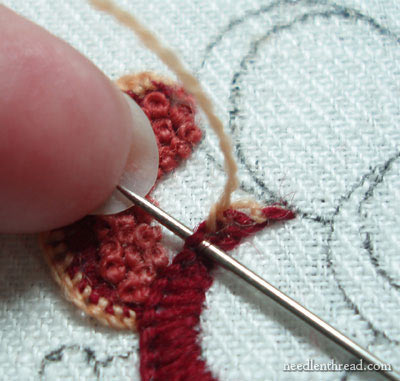
I didn’t think out the order of stitching before I began. It’s true that I want the detached buttonhole edges to rest over the petals beneath – which means they have to fit over those French knots – but I think it makes more sense to stitch the detached edges first. Since I didn’t do that, I had to work the buttonhole over the French knots in the first petal I worked. To transport the needle without catching the knots, I find the fingernail on my little finger to be the perfect transport tool. If you do this carefully, it works great! Just slide your needle onto the tip of your fingernail, which is covering the stitches underneath, then transport the tip of the needle on your fingernail beyond the stitches, so that the needle doesn’t catch. Now, if you don’t do this carefully, you’re in for a shocker. Needles sliding under the nail and into the skin are not pleasant. So if you stitch this way, be careful. (I do this all the time….)
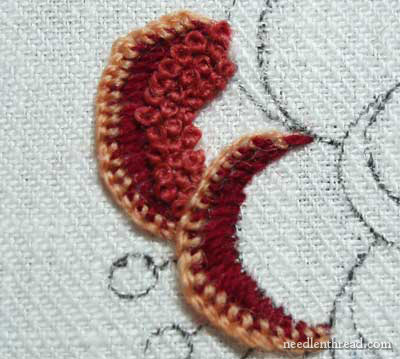
I think I’m going to like the flowers!
Oh, trust me. I AM going to like the flowers, because there’s no more picking out from this point on. It’s time to finish this guy! And I can’t wait to see the flower complete, so hopefully, today I’ll make some headway on that.
For further posts on this project, feel free to visit the following links:
Free Hand Embroidery Pattern for The Crewel Rooster
Setting up The Crewel Rooster Project
Choosing Threads for The Crewel Rooster – and the first flower
Crewel Design Books
Stem Stitch Filling on Flower Stems
Scalloped Feathers on the Rooster’s Body
The Beginnings of the Rooster’s Tail
French Knots on the Wattle
Adding the First Blue Feather using a Raised Backstitch
The Rooster Tail, Finished for Now
The Wing – Three Attempts
Adjusting the Tail Feathers One More Time
The Rooster’s Head, Neck, and Comb
The First Flower Attempt Comes Out


Hi Mary:
I have been following your crewel postings very closely and I'm really enjoying this series. Thanks for the close up photos; they're just gorgeous. It's lovely to see the lustre of the fibers with that kind of shot.
Can you comment for us on the comfort of working with wool threads? For those of us with an allergy to wool, will this be a problem? I'm also wondering if there are silk crewel threads, and, if they work well with linen twill? Thanks ~Betsy
Hi Mary, I've been reading your blog for months, but I believe this is my very first comment. I just want to say that this rooster project is amazing! I love the way you're sharing the design process with us, and the results are truly beautiful. I get all excited whenever I see that you've posted another installment – I think I'll almost be sorry when it's done 🙂 Thank you!
Mary, thanks so much for the pictures and details on how you're doing the rooster's embellishments. I'm especially interested because I'm following right behind you, using the stitches you're demonstrating, to do a 19th Century, Victorian, "God Bless Our Home" piece to hang on the wall, complete with crewel, stumpwork, goldwork, and all the various stitches that you've been offering this year. I keep your website on my homepage so I can click on it every day. I'm plodding my way through, complete with errors, and that's why I was interested in what technique(s) you use to erase/hide the places where memories of old yarn are lingering, after the yarn has been ripped out (and) not covered over by new work. Thanks again for always keeping things interesting and informative…love your site…Judy in Pittsburgh
Hi, all! Thanks for your comments! I'm glad you're enjoying the series on the rooster. I am, too – well, most of the time!
Betsy, if you're allergic to wool, I wouldn't stitch with wool threads at all. You'll have to substitute with cotton or silk. As for specific "crewel" silk, no, there isn't – although silk was introduced into crewel work long ago, silk itself is not typical of "crewel work" proper, because "crewel work" is specifically embroidery with crewel weight wool.
However, given the variety of threads available today, stitchers have, with good effect, used other threads on designs that are typically seen as "crewel" designs (like tree of life designs, etc.) So you don't have to use wool threads!
Hope that helps!
MC
The flower looks lovely.
Mary,
It does look nice, even though I lament the loss of that gorgeous blue.
"Stellar sunsets"–ha! That's a great phrase!
Best,
Carol
The flower looks so lovely especially the detached buttonhole edging to the petals. For mr especially, I find your notes on wool and textures particularly interesting as we dont get the crewel wool here in India and I am now going to get them through some source online.
Nice blog. I am amazed to see beautiful flower embroidery. It was nice going through your blog.
G'day Mary,
Love the texture coming up in this flower. Is complementing the wattle too.
Pity that blue had to go but these final colours and stitches are beaut.
The idea of same colours in different locations on the flowers sound wonderful.
Hope you are really well now.
Cheers Kath.
I like the different stitches for the new flowers. The paler wool for the detached buttonhole edge really adds to it.
Looking forward to more of your stitching and like Leannich will miss your rooster when completed.
Thanks for sharing the comparison of threads too.
Thank you for the nice comment on my blog.
I like to read about this lovely crewel rooster and I'm glad you let use see every step in the making of it. I also wanted to ask the same question as Betsy (I have an allergy for wool too), but I read your answer already. That helps me a lot!
Mary, I think this piece is a huge success, and your blogging about it a stroke of brilliance. I feel that I've learned a lot. You continue to amaze and inspire!
WendyBee
Thank-you so much for the heart o flowers. It is lovely and I am inspired by your "rooster" blow to try something new! It was amazing to watch your creative process at work. Thanks for the peek.
Laura
Do you remember what the color name was for the dark red? Looks great.
Hi, Rebecca – They’re from the Elizabethan range by Renaissance Dyeing – whatever reds / pinky reds they have in that color set. Off the top of my head, though, I can’t remember the name, and I don’t have anymore of that thread to double check, I’m afraid! Hope that helps a little bit! ~MC
Thank you, Mary! That is really helpful. I am going to place my first order with Hedgehog tomorrow and will be trying some reds from that group. Floche and Broder are on my list, too 🙂
Hello Mary!
I have a question about Renaissance Dyeing crewel wools, which you have recommend so much – and made me very enthuastic to try them!
I sent a question to the company but it’s been a week and they haven’t replied… And I so much would love to already place my order!
I would be so happy if you could help me – my only concern is, are the colors waterproof? I’m planning to do petit point with them, and I need to be able to stretch the piece (with the aid of water) to it’s correct shape at the end.
Thanks a lot for your time, I love your blog!
Hi, Florentine – I hope they answer you. In fact, I have not recommended them for a while. Although I haven’t altered my older articles on these threads, I am not so keen to recommend them as a company. I do like the threads, but I am disappointed in the service from the company. Besides a bad experience (and relatively costly one) of my own, I’ve heard other complaints about not receiving replies. If you want to try the Renaissance Dyeing wools, they are also sold in the States at Hedgehog Handworks. You’ll get better service from there, if you’re really keen to try the threads. I just have a hard time recommending the threads now, since I had a bad experience with the company. I figure if a company can’t honor their word, then I’m certainly not going to bother promoting their goods. ~MC
Thank you for the quick reply, Mary!
It seems I have been reading only your old posts… Sorry. But what a bummer! Though I have to say I was already feeling bit uncomfortable as they haven’t replied me yet – and I was so eager to hand them my money! I live in Europe, so it would make no sense to order from USA.
Thanks for telling your experiences. I think I will try Appleton instead.
Dear Mary,
Found your website whilst researching for a church project of mine. What a fabulous resource you have. Thank you very much. Signed up for your e letters. Kansas is quite a way from New Zealand…..isn’t the internet a wonderful window to the world!