After speaking with Joey about Luzine’s Schwalm Whitework embroidery project I’m getting ready to start, I decided to try out a different method of transferring a design: using watercolor color pencils to trace. Now, we already know about regular dressmaker pencils that have “water soluble” blue chalk in them – but what I’m looking at today is not found in the sewing notions section of your local store. You’ll find watercolor pencils in the art section of hobby stores or art stores. In this little test piece, I went a little overboard (actually, I went a lot overboard!) with Faber Castell watercolor pencils – but I learned something at the same time.
Watercolor pencils are normally used to mimic the effects of watercolor painting, by drawing or coloring first with the pencil, then dabbing it with water to blend the pencil marks into a watercolor finish. They’re fun to play with, on the art side, and they’re equally as fun to play with on the embroidery side…
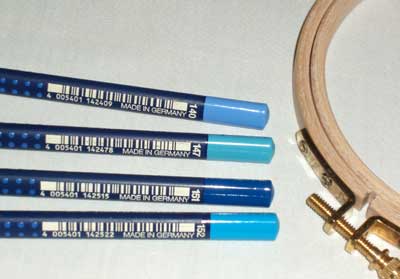
For this article, I used Faber Castell watercolor pencils. Other brands exist: Prismacolor, Caran d’Ache, Derwent, etc., and I intend to test Derwent and Prismacolor as well (eventually). I selected four colors of blue. Since I’m working a whitework project, blue is a good color for a design transfer. White “absorbs” blue, so even if there is a little residue, it generally only makes the white look a bit whiter (unless there’s a lot of residue… then it looks… well. Blue.) I tried all four colors on the little piece I worked.
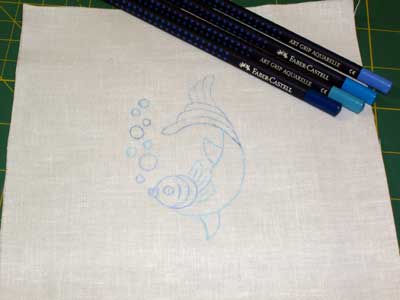
In fact, I went a bit overboard on the color – I drew the design darker than it needed to be. After all… I was testing to see if it would disappear, so why not go dark – because then we would really know, right?
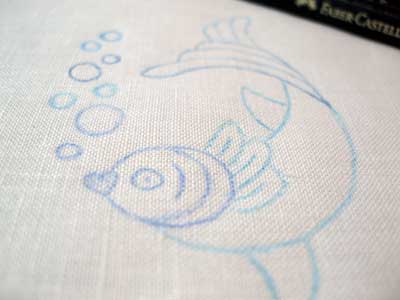
You can see the four colors here on my fishy friend, and you can see that they are all pretty clearly drawn on the linen. No problem seeing the lines, that’s for sure!
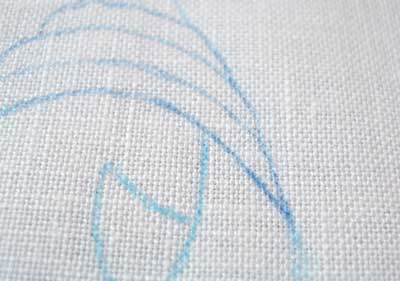
On the front part of the swashy tail, I used the darkest pencil. I drew with a heavy hand. (I know you’re waiting with Baited – oh, no pun intended! – Breath to see if this has a happy ending!)
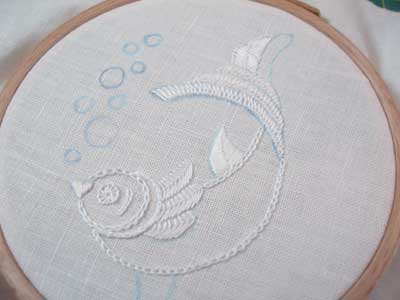
I stitched the fish in white coton a broder, size 25, using a variety of stitches – pretty much anything that popped into my head.
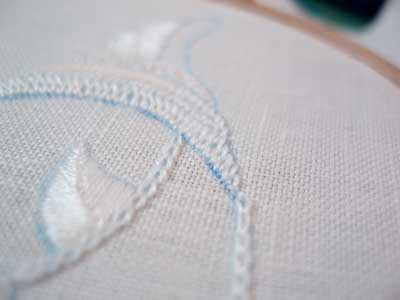
You can definitely see the blue lines on the front of the swashy tail.
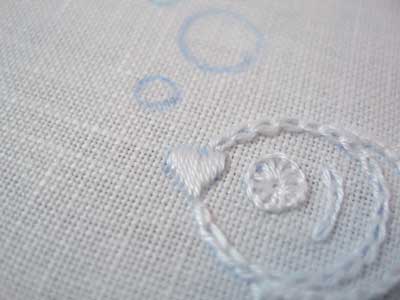
And, in fact, you can see blue on the head, too.
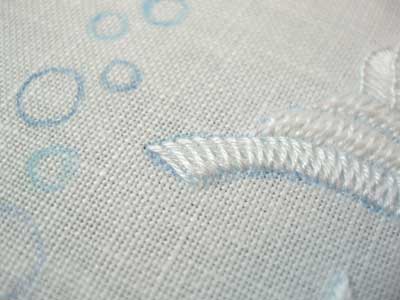
I wasn’t sure if I had drawn quite enough blue, so I penciled in a little more, for good measure.
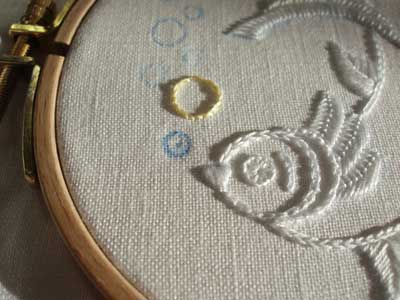
Then I decided that testing with white threads only was a little restrictive – so I started adding some colored bubbles. And I drew some Very Dark Circles for the bubbles. (Well, why not? This is a test, this is only a test…) Since yellow and pink would definitely turn if blue soaked in, I chose yellow…
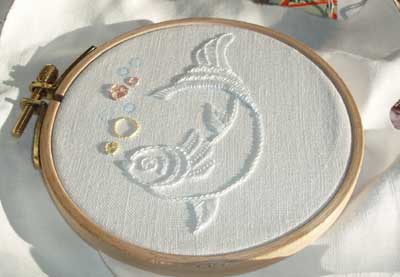
… and a wee bit of pink. I also left a few bubbles blank – it would be interesting to see if traces of them were left on the fabric.
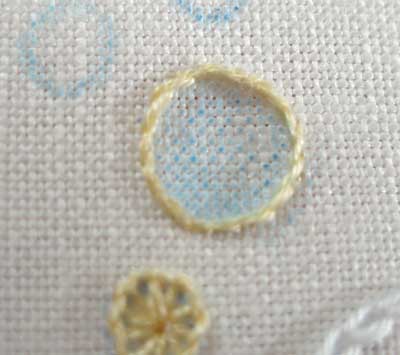
I decided there wasn’t quite enough blue around the yellow, so I colored in a bubble.
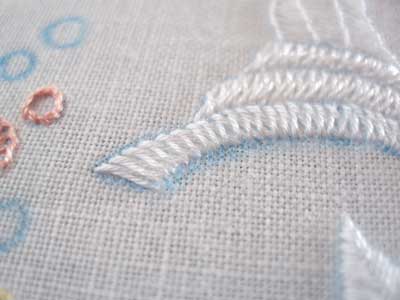
Then, on a whim, I went back to the swashy tail because I couldn’t leave well enough alone. I added more blue around the tail.
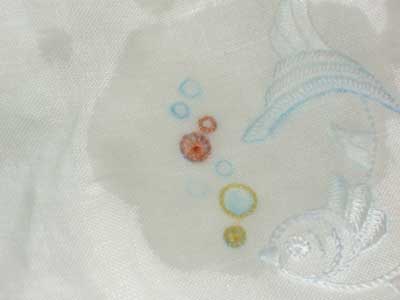
Then, the fish was introduced to water. I dribbled a bit on at first, just to see what would happen. Would the blue run? Noooo. It didn’t really do much of anything. So I soaked the thing. And soaked it. And soaked it a bit longer. (In fact, I got busy doing something else, forgot about it, and came back to it the next day!)
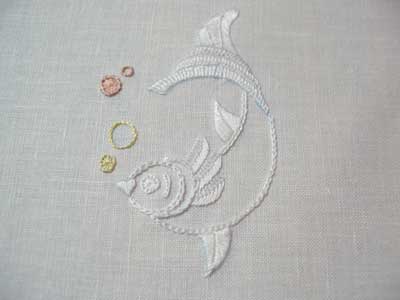
I removed the fish from the water and committed a Grave Error – but one I felt necessary for the sake of photographing the thing – and I ironed it before all the transfer color was removed. Actually, I figured if the color weren’t gone after 16 hours of neglected soaking, would it really ever leave?
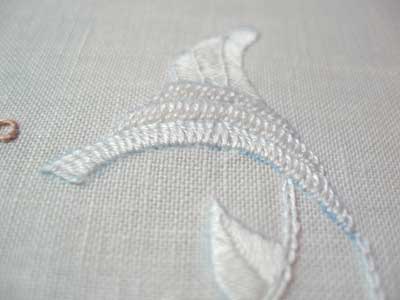
Much of the blue did indeed leave – but not all. Considering the heavy dose around the tail, this actually isn’t that bad when it comes to residue. Still, it’s more than I’d want on a finished piece of whitework.
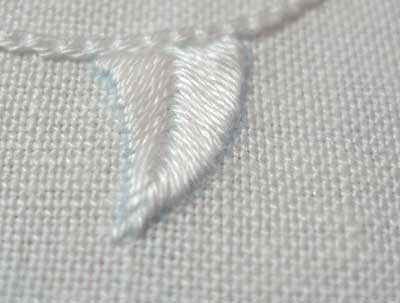
There’s a faint bit of blue around the fishbone fish fins. From farther away, this is, in fact, not too noticeable.
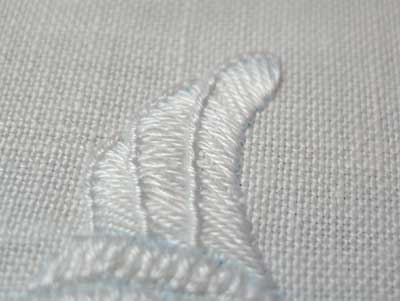
The buttonhole back of the swashy tail actually came out terrific – nary a hint of blue, or if there is, it is ever-so-faint.
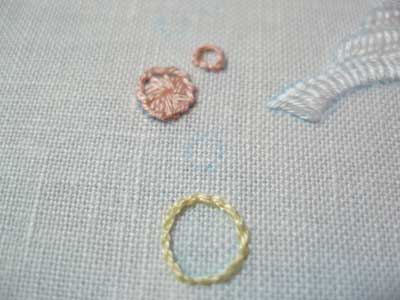
The bubbles are a bit of a different story. I drew them with all four blues at first, but then I went back over them (in my frenzy to add Enough Blue) with the darkest blue. I don’t really like the removal results here. The unstitched bubbles are still quite visible, as is t
he blue inside the yellow bubble, and faint circles of blue around all the rest of the bubbles.
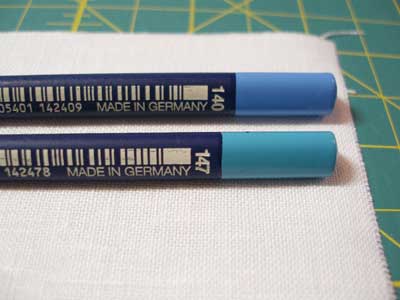
The lighter of the four blues – 140 & 147 of the Faber Castell pencils – worked best as far as removal went. Would I use these again? Well, yes. In fact, I did – to transfer my Schwalm design.
I would not use the two darker blues again, even with a light hand.
My conclusions on the Faber Castell watercolor pencils: the lighter ones work ok, but go easy in applying the marks.
You may wonder why I would try the watercolor pencils at all, when “water soluble” dressmaker pencils are widely available. The fact is, I’ve never had good luck getting ALL the blue out, after using a dressmaker’s transfer pencil. I am hoping to find the “perfect” tool for tracing an embroidery design – the pencil that leaves No Trace Behind!
I’ll be trying Prismacolor watercolor pencils next, as soon as I have a chance. Joey has used Prismacolors with very good results. The Faber Castell pencils (which are called Albrecht Durer watercolor pencils) have the highest amount of pigment in them, according to the description. There may be a significant difference between the two types of pencils, so I’m looking forward to giving the Prismacolors a try.
Incidentally, I didn’t wait to buy a Prismacolor watercolor pencil before transferring the Schwalm design…
Perhaps I should have!


I love this little fish. I think the blue givews the fish a little highlight, cuz it is a fish that belongs in water…lol that how id rationalize it and leave it alone. 😀 This i sucha cute little project. Is it possible to post the stiches you used for the fish. I love doing small progects but am the worst when it comes to thinking up what stiches to use.
Hi, Jules – isn't it a cute little fish? I like your reasoning for the blue!
Sure, I'll post the stitches. The one on the tail is kind of interesting – it's "basketweave stitch" – maybe I'll work up a tutorial for that one!
Thanks!
MC
Mary, I use the Dritz Fine Point Mark-B-Gone Pen for all of my cross stitch fabric griding which I embroider on linen, I've never had it fail to just disappear with the slightest hint of water. Even a drop of water from a sweaty glass will make the line disappear from the spot where it lands. I did a google search and found that although I use a blue it is available in a variety of colors. Hope that this helps.
DebbyP
Hi Mary,
Sorry. This is something related to the long and short stitch tutorial. I have a question for you.
Will the kind of thread we use for long and short shading make a big difference on the output? For example, is there any difference in using DMC or Anchor threads for long and short shading. I think DMC threads have more sheen and look like silk threads, don't they? Could you please let me know which thread is best for long and short shading?
Hope I will get an answer to my question.
I love watercolor pencils. I use them when making embroidery "art"-I stitch a design on a stretched canvas, and fill in the areas with the pencil and a bit of water. It adds a small wash of color and makes the stitching pop.
Hi, Flora –
No, it doesn't matter if you use Anchor or DMC. They're both mercerized stranded cotton. The only real difference I ever notice between the two are the color palettes. Anchor seems to have a deeper, earthier palette, compared to DMC. I like stitching with both equally, and in fact, if I'm using black stranded cotton, I prefer to use Anchor (DMC seems to pill a lot in black). But other than the black, I've not noticed that much of a difference between the two.
Hope that helps!
Mary
There are 'disappearing' pencils for sewing patterns, and they do disappear – rather too quickly if you had a complicated pattern with a lot that had to be transferred. But for rather simple outlines, which could be basted or back-stitched immediately, they would work well.
Thanks for the tutorial. 🙂
Thank Mary. Your answer really helps.
Thanks you so much!
Flora
I wonder if the Crayola brand pencils would be washable….I use their washable markers all the time for marking appliqué, quilting, embroidery. I try to avoid the red pens, but have used all the other colors, and they have washed out well, very well.
But now I can try these, thank you!
I would have never thought to try watercolor pencils for tracing designs. I have Prismacolor watercolor pencils and will be trying them on my next project. Thanks for the test!
Crayola has a line of washable colored pencils (to respond to musing by Vicky~ stichr ~) and I have some, so maybe I will try them to see how washable they are.
Harrump! This the spelling cop speaking: It's BATED breath, not "baited". Bated meaning "suspended". Over.
Oh I love all these color pencil brand names, they remind me of my youth! Faber Castell, Prismacolor, Caran d'Ache! They were my best chuildhood friends.
And what a great idea to use the light blue ones for tracing. Like you I haven't solved the problem yet, and do not like the iron-on solution after I failed in my first attempts.
Brigitte
Hi, Brigitte! I'm laughing pretty heartily – thanks for being the spelling police! Ok, so the pun was intended!!!
I just received an e-mail from a reader, suggesting the use of a Papermate Flair Ultra-Fine green colored marker. She said she uses them and they come out all the way, after running under water for a few minutes, then soaking for about 30 minutes. I'm going to test them. The Papermate Flair Ultra-fine markers are ultra-fine – which is something I'd love to see in a transfer tool. They have ultra-fine transfer pens in the sewing section (they're water-soluble) but the lines are not as visible as I would like, unless I really lather the ink on. So I'm going to test the Papermate markers. She said the green is the only one that works really well for this – but perhaps I'll test the green and the blue.
Thanks again!
MC
MARY!!!! your the best. I was using the pictures and comments you posted for this little fish to figure out the stitches you used for it. ive become a little apt at recognizing some stiches from sight but that was a new one. I look forward to the stitch list to compare how accurate i am as well as that tutorial.
Im in the middle of creating a large linen piece with differnt motifs on it. I was thinking of using it for a book cover but dont know how about doing that.. have you ever done anything like that? would you have any tips on how? any help is always appriciated….:D
maybe ill just wait for you to post that fishy stich list.. lol. I dont wanna mess up, i hate messing up…… 😀
Hi, Jules –
Oh, yeah. I forgot about that list! I'll have to get to that! For the book cover, I've made a few, but here's one that's on the website:
Hand Embroidered Prayer Book Cover
It's not really a tutorial on how to finish the cover, but there is a bit of commentary in there on how I did it.
Hope that helps!
Will get to the list soon!
MC
Hi Mary
I am sure you drew this fish freehand, so you have a lot of talent. Did you post the picture and stitches. Can’t find anything on it.
Hi, Nora – Actually, it’s a design from the old Anchor surface embroidery book. It’s a little orange-ish yellow square book, not the “new” Anchor surface embroidery book. It’s a cute little fish, isn’t it? I traced it straight from the book! The stitches for the most part are pretty basic – chain stitch, buttonhole – the only different stitch I used was on the tail. It’s a “basketweave” stitch, I believe. Hope that helps! ~MC
The idea of using watercolor pencils is intriguing to me. 🙂
I wonder about the pigments in the particular watercolor pencils you used. I paint in watercolors and there are staining pigments and non-staining pigments. If you used a pencil that was comprised of non-staining pigments I wonder if it would wash away more cleanly than the staining pigment colors? It would be interesting to me to know which colors were used to know if they were staining or not. 🙂
You can see some staining / non-staining pigments here:
http://www.watercolorpainting.com/pigments.htm#staining
But, I’ve also read that even the non-staining pigments can leave a stain due to paint additives they use nowdays, so it would be best to test anyway.
Love your site!
Thanks, April – I’ll have to look into the non-staining pigment question! ~MC
I have had exactly the same problem with water colour pencils. I also thought they would wash out completely as they are…water soluble.
HOWEVER I have stumbled across the absolutely guaranteed answer. These are probably all over the world by now the Pilot Pen Frixion Ball. They are ink pens with very strong colour and a small eraser at the end like a pencil. The colour vanishes like they say due to the heat from rubbing the paper. So I tried a very cool iron on some linen and….. the problem has been solved for all time. Furthermore with these modern wonders the ink from the pen does not “bleed” on fabric but just stays as a neat line.
Good Morning!
I’m new at embroidery with using pencils to color in the patterns. I would appreciate any advice. Everything I read does not really answer my questions.
1. Do you have to use the Dewent Intense pencils to be sure when a quilt or item is washed, that the coloring stays. I have plethora of other colored pencils thanks to my beautiful granddaughters, but afraid to use something that will not be permanent. Can you advise please?
2. What do you do to permanently set the colored areas and what process do you use please?
3. Do you feel you should embroidery outline first, or after you color. Seems to me that embroidery first would help keep in the proper areas, but what do I know. LOL
I got your name from an embroidery shop (Timeless Stitches) in Tecumseh, Mi. I am so sorry for so many questions but I spent days trying to get answers I needed and really didn’t get them. I am making little baby quilts for “future” great grandchildren. My grandchildren are one 7, 10 and 15, but want to do this while I can LOL . And I want them to be as perfect as possible!
PS. I would love to see some work like this that you have done if you could share some samples.
Thank you Sincerely!
Penny Simmons
Hi, Penny,
It sounds to me like you’re thinking more about color-tinting your fabric, using pencils or crayons. In that technique, you color in the element with your chosen medium (crayola crayons, certain types of colored pencils, etc), and then cover the colored area with scrap fabric and iron it to heat set the color and remove excess wax or residue that absorbs into the scrap fabric. Then, you embroidery the outline of the design.
I’ve seen this done with quilting and other projects. I’ve not actually done it myself, as I normally rely on the embroidery to add color to whatever I’m stitching.
In this article, I’m simply using watercolor pencils to draw my embroidery line which I then stitch over. My goal is to leave the fabric with no mark visible at all, except the embroidery itself. So it’s not quite the same thing.
I very quickly googled the technique that I think you’re talking about, and there are a lot of resources out there about it. Here’s an article and tutorial on color tinting embroidery from The Spruce that might be helpful.
Hope that helps!