The other day, I mentioned that one of the most annoying things to me when embroidering is turning my work over after a nice, diligent embroidery session, and finding, in the middle of an expanse of stitching, a sneaky little slip knot. For some reason, they really irritate me! But they aren’t that difficult to repair – I’ll show you how I do it.
Slip knots generally form on the back of needlework when the working thread has become over-twisted during stitching. One way to help avoid slip knots is to drop your needle and thread straight down towards the floor every now and then, allowing the thread to hang until it untwists itself. Still, even if you do this fairly regularly, you are bound to encounter the slip knot at some point in your stitching career. We all do. It’s inevitable.
To remain sane despite these irritating little intruders, the trick is to know how to deal with them.
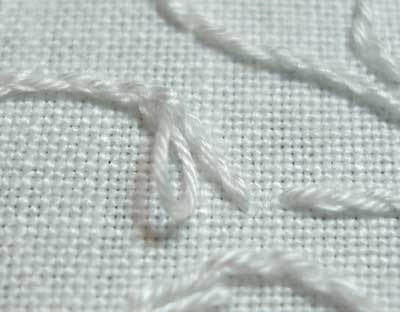
Here’s the slip knot in all its sneaky little glory. Right smack in the middle of a whole length of stitching, it quietly meandered in and took hold.
In some types of embroidery, a tiny slip knot here and there may not be a big cause for concern – especially in framed pieces that won’t be handled much, as long as the slip knot has not caused an unsightly bulge, it can probably just be left there. Without regular jostling, laundering, and so forth, it is unlikely that it will loosen and cause any problems.
But on this particular piece, there is the danger of the slip knot loosening in laundering and regular handling. Also, because the embroidery will be stretched tight over a thin piece of mat board, it is likely that, over time, as the fabric becomes softer with use and washing, the knot may be visible from the front. Under these circumstances, I think it’s important to go through the effort to get rid of it.
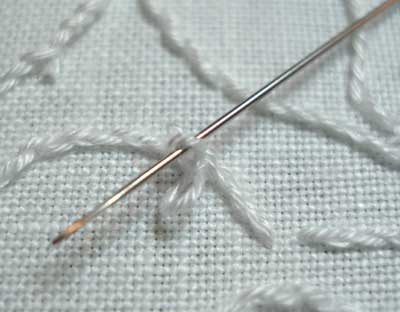
The first thing I did was insert my needle eye-first into the base of the knot, to loosen it and undo it. A slip knot will just “slip” back over the loop and undo itself, most of the time.
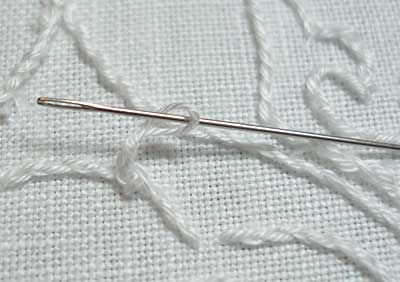
Then, using the needle, I pulled the loop out as far as I could from the fabric, to see how much thread was available. This is when I discovered that part of the knot had actually been stitched through, so I couldn’t really just “slip” it off.
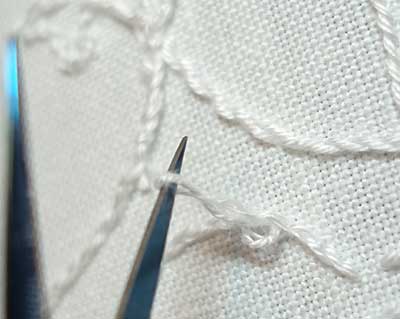
It was obvious that I would definitely have to cut the thread. I pulled the loop as far out from the fabric as the thread would allow, and cut the farthest distance away, so that I would have as much thread as possible on each side of the cut.
Now, had the knot just slipped over the loop, I wouldn’t have cut the thread – I would have have simply continued on to anchoring the loose thread, without cutting.
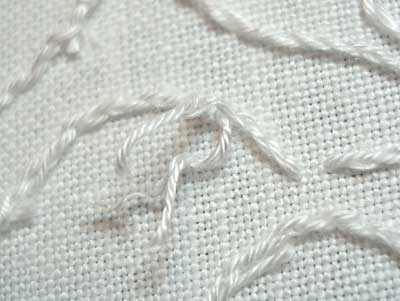
Once the thread was cut, though, I could dislodge the stitched part of the knot. I was left with two tails of thread – short tails that could not be conveniently re-woven.
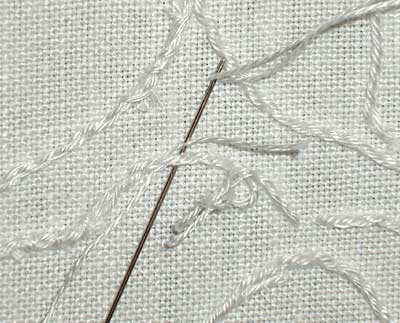
As much as I possible, I want to keep the bulk down on the back of this piece. So I threaded a needle with one strand of regular DMC floss, which I used to secure the tails. The single strand of DMC floss is much finer than the #20 coton a broder that I’m working with.
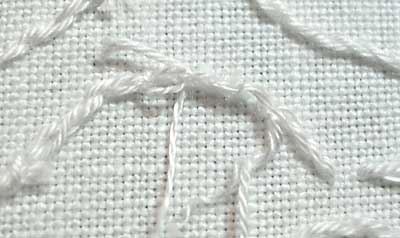
Folding the first tail on the left back to the left on top of the stitching already there, I whipped over it with the smaller thread.
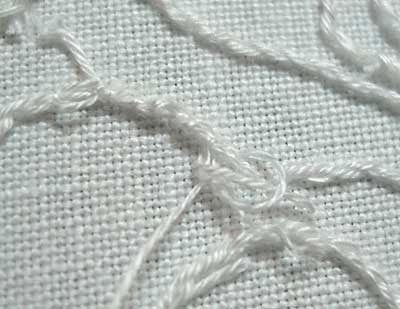
Continuing along the line of stitches, I whipped over the other tail on the right, which I folded to the right on top of the stitches. The whole bit is looking a little messy at this point!
Then, I wove the smaller thread (the one strand of DMC) back under the stitches, pulling snuggly to tighten up the line on the back and pull all the stray bulk in.
There! The line is much neater, the knot is gone – I don’t have to worry about the tails coming loose or about any little bump becoming visible on the front over time! And it really took very little time or trouble to accomplish the clean-up job. In fact, it took me a lot longer to explain how I fixed it than to actually do it!
If you notice that a slip knot has formed on the back of your work and you’re still within a stitch or two of it, just take out the stitches and remove the knot! You’ll be glad you did, even if it is a pain in the neck at the time. Another big problem with slip knots is that the loop of thread can get caught up in other threads as you work, causing an unsightly mess on the back of your work! So, if one sneaks in and you are still relatively close to it while working with the same thread, backtrack and remove it!
To avoid slip knots as you stitch, pay attention to your thread. If you pull through and you notice that your previous stitch doesn’t show any sign of tension, chances are your thread is caught up on the back. Also, the more you stitch, the more aware you are of your thread length. If your thread seems suddenly to be much shorter, chances are you’ve got a knot!
How do you deal with these types of knots, discovered after you’ve finished a bunch of stitching? Do you just leave them there? Do you whip over them with another thread, leaving the knot in place (I do that, if the thread I’m stitching with is very fine!)? In short, how do you deal with unsuspected knots on the back of your work? Do share your tips and tricks with the rest of us!


Well, first I scream, really really loudly…the dogs sit up and the cats run, but I feel better. 🙂
I spend a lot of time unpicking those little buggers; around here, they're complicated by critter fuzz, so are even worse.
I'd BEEN doing the 'snip and restart' technique but I like yours so SO much better… Thanks!
Oh Mary, your back is so clean. I am so very messy at times. Thank you for this tip, I am so new to this that I had not really thought of the wipping around the row for cleaning up a slip. I am a bit lazy. I will ALWAYS use this method from now on.
BJ
This is absolutely brilliant! Up until now I'd been one of 'those' people that just left them there (mainly because I crazy quilt and the back is covered anyway). This is so simple.
Thread Heaven! Every thread, every time! I love the stuff! (Of course, I have never done gold work, but I can imagine that it wouldn't go really well with metallic threads…)
Great embroidery tip! Thanks for sharing. 🙂
I have a similar method to the one you describe in your post, Mary. The difference for me is that I don't cut the thread, if possible. I undo the knot then spread out the extra thread along the area where I will be tacking it down. This might be an issue with thicker threads, but I haven't found it to be a problem as of yet. I would say it works best with a knot that isn't using a lot of thread (a 'short' knot). I have used this 'no cut' method on longer knots as well, but, as you say, you usually know when you have a long knot so you can deal with them as they occur (hopefully!). It's the short ones that get me every so often. 🙂
What I do with knots is highly dependent upon where they occur and what kind of project I'm working on. If the back is going to be seen I take care of these little darlings by ripping them out, neatly tacking them down, or tucking them under other threads (and sewing them into place), etc. If the back isn't going to be seen I don't worry about them too much although I will probably tack down noticeably loose threads.
Ripping out stitching is my least favourite solution. I will do almost anything to avoid doing that!
Pretty new to serious embroidery, but I've always tacked the loop and whipped it, leaving the knot intact. It's similar to what you do, but no cutting, the thread is stretched enough to hold the loop in place and then cleaned up.
Your method looks nicer though, so I'll probably be changing…
Hi –
I haven't done your method – I think I'll start as it's much neater. I usually remove the knot, but don't cut the thread. Then I put a regular sewing thread thru the loop, and thread a needle with both ends of the sewing thread and use that to pull the loop thru the stitches, like you would do when ending stitching normally. If it's something that may get a lot of handling, I weave the sewing thread back and forth a couple of times. If it's not clear, I could take some photos and put them …. somewhere (no blog and I have't yet gotten around to using a photo sharing site – might be time to???)
JustGail
This is VERY helpful Mary — my solution has always been to weep wail and gnash teeth, then try to ignore the elephant in the corner. Clearly, this is a far superior method! Many thanks. SF
Did you wait until you'd done the whipping on the front first? Does it matter? Thanks so much for the description and the technique. I'm learning so much.
I avoid ever getting slip knots — because I've noticed that there's a very definite pattern to the twist I add to the thread or yarn I am working with.
I seem to add about one half-twist with each stitch, always (I'm working from memory here, so bear with me; I have a problem remembering which hand is left and which is right, LOL) clockwise. As soon as I notice that my thread is beginning to twist on itself as I work (usually every five or six stitches), I untwist the thread by rolling it counterclockwise.
This is so much easier to do than dropping the needle to let the thread untwist that I do it more often. Because I do it more often, I get fewer knots, but more importantly, I notice there is significantly less wear and tear on the thread, so longer pieces still result in less fuzzing.
I had this problem doing hand quilting. Traditionally Hawaiian quilts are not lined so the stitching appears on the reverse. It was during my first few quilts that I found, too late, that there were one or two slipknots in the back and not knowing better all I could do was to line these quilts.
I learned from my lesson and from then on I keep a hawk's eye on my thread. As soon as I see it twists on itself I bring my needle to the base of the thread against the fabric on the right side and undo the twist by running the thread 3 or 4 times between index finger and thumb while giving a bit of pressure.
Sometimes I get a knot anyway but I notice it right away and most of the time am able to pull it off with a little careful force, i.e. without breaking the thread. What a relief when this all it takes to get rid of it!
Brigitte
I’ve always just pulled the knot tighter and then caught the loop with another thread and secured it to the other back stitches. I’ll be correcting the loops this way forevermore! Thanks!!!
I usually just grab the loop, lay it along the stitching and catch it down with a couple of stitches …. but I hadn’t thought about whether it cause slump on the front of the work! Thank you for another useful tip.
I am new at embroidery. Could you please describe what you mean by “whip” in this example and also how you secured the ends of the smaller DMC floss?
Whip stitching is passing under a series of stitches in the same direction, so that the thread whips around the stitches. I’m not sure what you mean the smaller DMC floss?
Thank you for your explanation regarding what “whip” stitching means. What I meant by the smaller DMC floss was the DMC thread you used to do the whip stitching in your example. Could you please explain how you secured the ends of that?
It’s also whipped around the back of the stitches already there – if necessary, it can be hitched around them by passing through the thread loop and pulling it tight.
I slip each stitch between my fingers on the back of the hoop so I feel the knot as it happens. Much easier to catch and no undoing of stitches
Thanks so much for this generous and helpful hint! I will use this with the towel sets I just purchased from you.
Very casual embroiderer here, a bit of a “punk” crafter generally (which means I get to pretend that not using the right materials or techniques is a cool rebel move)
Honestly, if something funky happens on the back of my embroidery I either 1) just clip it and then if I worry about the stitches not being secured stitch a little securing stitch or something of that nature. Or 2) I just cut the error out and tie a knot if there is enough thread. I know knots are a bit controversial (and now that I am doing more complicated denser stuff I get it) but it’s the easiest way to get back to work. If I hate it later I’ll see if I ended up stitching over that area enough I could probably safely cut the knot out.
I like decorative mending and the fact that you don’t really tie any knots when you darn has made me start doing weaving in much more in general. I don’t think I trusted it until then.