I think I mentioned in my carrot post that, among my present line-up of needlework projects, I’ve got a small goldwork project I’m working on as a wedding present for my niece.
I can safely mention the wedding present thing, by the way, because no one in that branch of the family would ever even think of looking at my website….! So don’t worry that I’m giving away a surprise!
Back to the project…
As I mentioned before, I’m not able to blog about the whole goldwork project right now, or even show you complete pictures. But I wanted to show you a technique that I’ve never used before, that I learned while working on this particular project. I think the resulting look is really beautiful – perhaps you’d like to try the technique, too.
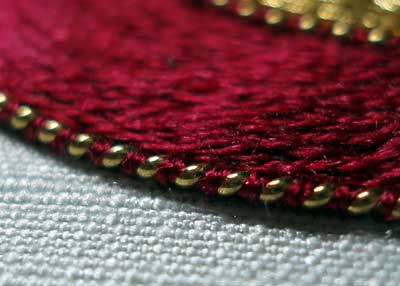
See the edge on the embroidered area there? Nice, isn’t it? This is a “non-traditional” goldwork technique. I’ve seen it before, but never used it, and didn’t really know what it was all about. But it’s simple, and I think it’s ever-so-pretty – but then, I’m a sucker for gold and for anything that looks like a twist!
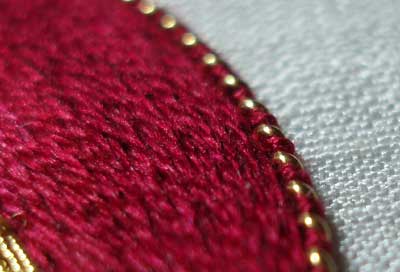
Incidentally, I was already working on this project when the A-Z of Goldwork arrived. They describe this technique in detail in the book, and some variations on how to work it. I’m just going to cover one here.
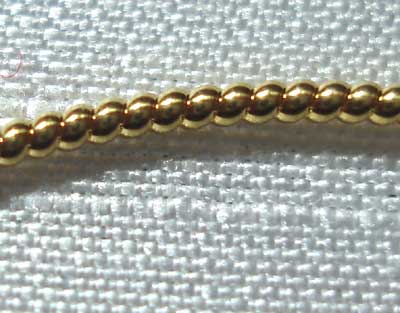
You start with a piece of pearl purl – this is a hard metal thread wound in a tight spring. Usually, when you couch it, you couch with gold-colored couching thread, slipping the thread between the coils in the spring. Pearl purl makes a beaded-looking outline, and it’s very pretty. It’s also very stiff and very hard, so make sure you’re using scissors assigned only to cutting metal threads! This is pearl purl #1.
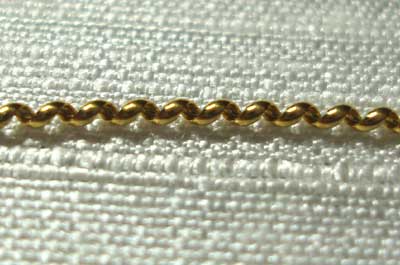
Stretch the pearl purl to about twice its length. Now, pearl purl won’t return to its original twist once its stretched – you can’t un-stretch it. To stretch it, grasp the two outermost beads on the cut of pearl purl you’re stretching, and pull with an even tension.
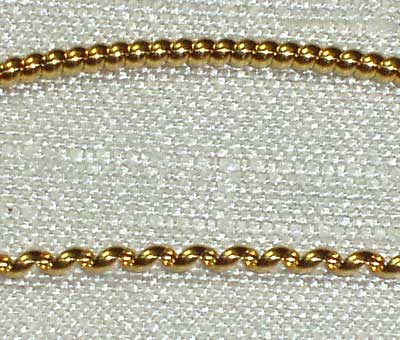
Here, you can see the two pieces next to each other – the original pearl purl on top, and the stretched pearl purl below it.
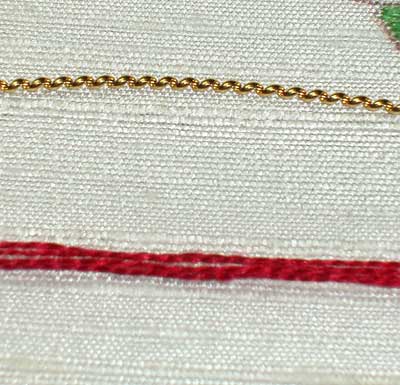
Then, take your floss. Here, I’m using four strands of Au Ver a Soie’s Soie d’Alger. Strip the floss in the normal method and put it back together.
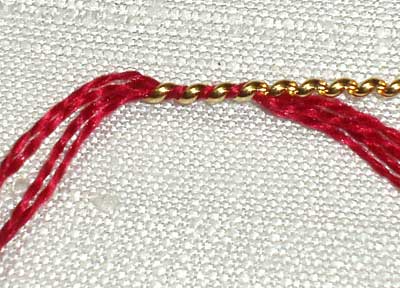
Leaving a length (about an inch) of floss hanging off the end, wind the floss around the stretched pearl purl, so that it tucks in between the gold. This part’s actually really easy – it just slips right into where it belongs as you turn the thread.
It may be tempting to just hold the pearl purl in your finger and roll it, allowing the thread to work into the grooves of the twist, but I noticed this twists up the thread quite a bit. It looks better if you do the twisting with the actual thread, not with the gold.
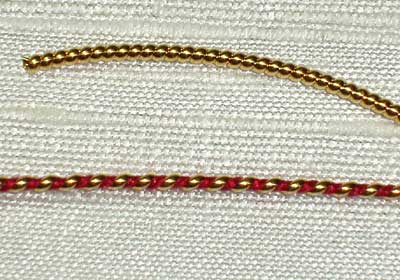
Continue wrapping the thread around the gold until the whole piece of wire is wrapped, and leave a tail of your floss at the end. I actually just left the whole length of floss at the end. It gave me something to hold onto while couching, so I didn’t have to touch the gold much.
Couch the pearl purl / floss combo onto your project using the same thread used to wrap the coils. Use one strand. I couched at each wrap, so that the thickness and look of the wraps was even all around.
Alternately, you could use the large bundle of thread as your couching thread (or one piece of perle silk or cotton), and couch between each stretched wrap on the pearl purl. But I tried that, just for kicks. It’s easy enough, but it seemed easier to me to get full coverage – a complete “look” – around the pearl purl by wrapping it first.
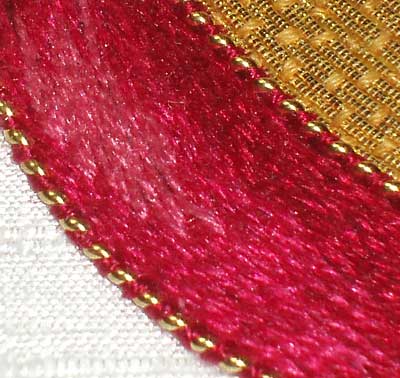
So – there’s an easy and really pretty edge treatment for your future goldwork projects. I’m sure lots of embroiderers out there into goldwork already knew about it, but, for those that didn’t – like me, you can delight in a new technique!
Check out the complete and framed Golden Pomegranate goldwork project here, with close ups of the whole piece.


Hi Mary,
For some unknown reason I didn’t receive your e-mail newsletter this morning, so went looking on your website and I’m so very glad I did! Don’t know about e-mail these days, what the glitch was.
What a marvelous technique! It looks extraordinary and you make it sound so easy to do! If this is described in the A-Z book, I guess I’m gonna’ have to get hold of it! Since I’ve been subscribed to your list, my needlework book library is growing by leaps and bounds. And they’re all great books, too! Thanks very much.
Marilyn
Always learning new things with you! It’s a real pleasure to read you, Mary! Thanks
Hi, Marilyn!
Thanks for your comment! I’m sorry there was a glitch in the newsletter – it’ll probably come later today? As soon as I can afford to, I’m going to subscribe to a full-service newsletter service, so there won’t be glitches, and so I can offer extra articles to subscribers. But that’s in the future…!
In the meantime, the way the newsletter works is that you receive the post for the day before, the day you get your newsletter. So in today’s mail, you would get yesterday’s post (I posted two articles yesterday) and in tomorrow’s mail, you’ll get today’s post, which is this post on goldwork.
I’m so glad you are enjoying your needlework library. It’s amazing how quickly one’s library expands! I have to say, though, I have very few books in my library that I don’t use, so I LOVE my books!
Nice technique, isn’t it? I think it’s going to become a favorite with me – I can already think of a dozen applications in upcoming projects!
Best,
Mary
So pretty!…Wish I could peek around the corner of your pictures! 🙂
-Jeannine
Great tip! Thanks.
I don’t think I’ve told you that I’ve nominated your blog for an award. See my blog. http://www.jowynn.wordpress.com.
No strings attached!
Thanks Mary for a great post.
Hi Mary
This is a very pretty edging and I can see where this could be used in a lot of ways. I do have a question. I have never worked with the gold threads and I wonder how you would finish this when it meets as in a circular section. Would you just butt the metal ends and take the floss thru the fabric? Maybe you could explain how you would finish this.
Thanks again for all the hints and good advice you give us/
Hugs
FredaB
Oh, this one is lovely! I absolutely have to try it!
I saved one of your shots to my “embroidery pictures” file on my computer to remind me to try it on my next sampler. . . do you mind? I always rename pics to include the name of the embroideress, if I know who worked it.
Christiana
Hi Mary, For some reason, I am not getting the daily newsletters, not since Wednesday. Should I re register? Just wondering. Mary Carlson
Hi, Mary!
Thanks for letting me know. I’ve contacted Google to have some work done (moving the feed accounts and so forth), so I wonder if that has something to do with it? But in the meantime, please do go ahead and re-register.
I’m looking into another newsletter service (a paid one that I have more control over, and that glitches less), so hopefully, in the near-ish future, that will be put in place…!
Thanks for letting me know.
Best,
Mary
Hi, Freda –
I just wanted to reply to your question about finishing a full circle with pearl purl. Normally, you do just butt the ends together, but it’s best if the cut on both ends is at the bottom of the thread, so a full “pearl” is on top of the threads. So sometimes you have to turn the metal thread a little to manipulate the way they meet. With this technique, though, since you have the thread wrapped in between, you’d want either one end or the other to be a “pearl” and the other end to be the thread, to keep the pattern of the twist. I didn’t work this in a circle, so I’m not sure how easy it would be, but I suspect it would actually be easier than working plain pearl purl into a circle. You could sink the wrapping thread, but I think you’d have to take them right behind the pearl to do it – not to the side, if you can picture that. I didn’t sink the wrapping threads on the piece here – I merely wrapped them with the couching thread, to hold them, and cut them flush with the pearl. It worked fine – no stray threads or anything.
Thanks for the question!
Best,
MC
Hi Mary
Thank you for your reply. This did make sense to me. I knew you couldn’t sink both ends of thread in same place or you would have a double hunk. I never thought of the couching thread just to tie it in. will have to buy some pearl and play with it.
Hugs
FredaB
Mary, you are teasing us with this project! 🙂
Wrapping the stretched pearl purl with floss is what hooked me on goldwork and it’s absolutely one of my favourite techniques.
hi Mary,
i must say you are a genius.i am learning lots of beautifull and lovely thing from u that i always wanted to do in my life.thank you.
Oh Mary, What a beautiful idea, the gold purl threaded with silk looks awesome. Thank the lord I found your site. You have given me so much inspiration I just can’t tell you.
Thank you x 6
Joy
Although I’m late in reading this article it should come in handy as I attempt to
finish the last stages of stitching a chuppa I embroidered for
my daughter’s wedding a few years ago. (It was 90 % complete and looked fine.) It has a large ring of flowers and I got tired of coming up with ideas for different looks. The wrapped pearl purl will be
an interesting addition. So, a belated thank you for this enlightening piece.
Buenas tardes, muchas felicitaciones por hermosos temas. Lo ùnico se me dificulta es el idioma, ojala pudieran hacerlo con traducciòn al español. Dios los siga bendiciendo