Despite wear and tear, this is a gorgeous piece of ecclesiastical needlework. In fact, most of the wear and tear, from a distance, isn’t noticeable – but when you look closely at the piece, you realize that there are parts that really need attention if it is to continue in use.
Christiana has undertaken the formidable task of repairing this cope hood so that it can be used again. I thought I’d show you some photos she sent along. I never tire of studying this type of work up close – the details always amaze me!
So this is a hand-embroidered element mounted on the back of the hood of a cope, which is a garment (like a cape) used in liturgical ceremonies. The image on the back of the cope is a representation of the Trinity – God the Father, the Holy Ghost (the Dove), and God the Son (the Lamb of God, or Agnus Dei).

Here’s a view of the whole piece of embroidery.
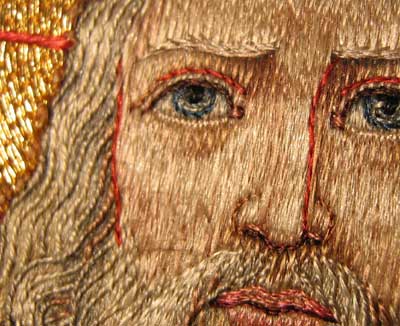
This is a close up on the face. I love examining faces. Look at the difference between the face from far away (in the first photo above) and the face close up. Who would’ve ever guessed there was a red line down the side of the nose and above the eyes?
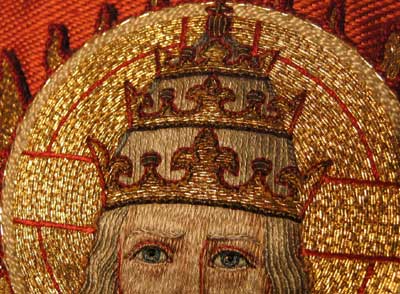
Here’s a close-up on the crown and nimbus. It looks like the goldwork here is in very good repair, as you can see in the photo below:
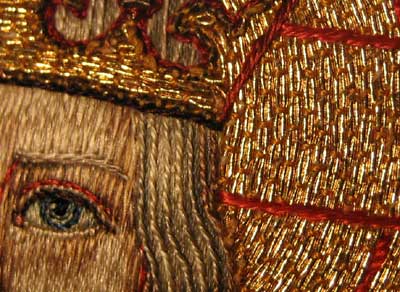
But as you travel downwards in the design, the need of repair becomes more obvious, as seen below:
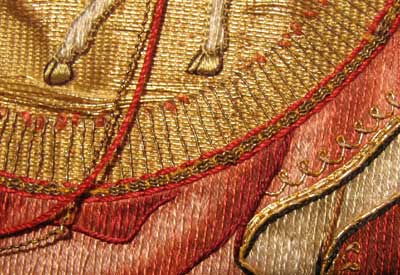
You can see the loose gold threads around the feet of the lamb, and the red cording hanging down (visible in the first picture above as well). You can also see in this photo – if you look in the colored folds of the garment – that some of the line stitching is loose there.
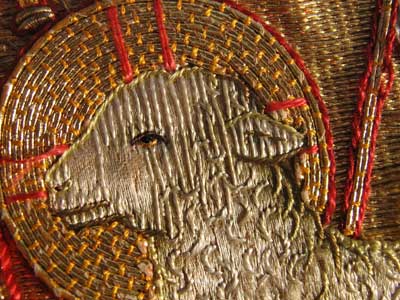
Here’s the face of the lamb up close. I have to agree with Christiana – I love the way they did the wool! You can see on the left side of the nimbus (halo) one of the threads tweaking off.
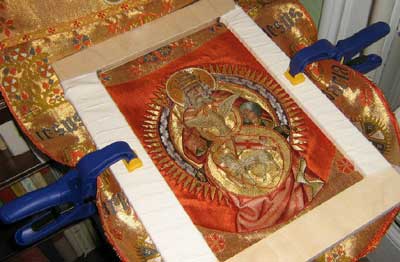
And I think this is great! This is Christiana’s set-up for repairing the cope hood. First, she had to separate the hood from the lining, picking out by hand all the little stitches in the fabric around the hood (which is cloth of gold – not an easy task!). Then she had to contrive a way to mount the piece so that she had both hands free to work, without mounting it in anything that would damage the fabric or the embroidered piece. She’s using a frame her dad made for her, which she’s wrapped in fabric to protect the cope hood and also, I imagine, it provides a bit of friction to keep the work in place. She clamped the sides of the frame together to hold the piece while she works, keeping an even tension on the piece, but not so tight that it’s pulling anything that’s already stitched.
By the way – yep, she’s stitching through the cloth of gold on which the piece is mounted. Talk about sore fingers!!
Keep up the good work, Christiana! I can’t wait to see the finished product! (I wish I could see it in person!)


This is just a fabulous piece of embroidery to study. How lucky is Christiana! I too would love to see it up close. Where is it right now? Thanks to you both for sharing it!
Hi Mary, thank you for showing how repairs are done. Now I have a question about a repair of an old silk shawl.
My maternal Grandfather won the shawl in a fundraising raffle in late 1930’s early 1940’s. It once belong to a vaudeville actress who donated it to the hospital where Grandad worked. he gave it to my mother, who was the only girl in the family.
The silk is old and heavily embroidered, much like the flowers illustrated on the website of Helen Stevens that you showed us yesterday. Sadly, the embroidery is too heavy for the silk and the silk is showing signs of are in that the woven silk threads are parting company. It has been like this for sometime (Mum wore it often in the 1970’s when she went out).
I spoke to a conservator a couple of years ago at a free assessment clinic set up at the beginning of his tenure at our Museum and we sorted out a plan that I could do, but not sure of the specific items I should use. He is too expensive to consult now.
We thought about using another piece of silk, of a similar weight, and tacking the shawl to it through the edges of the flowers and then sewing the lining silk to the shawl around the edges of the shawl, but I feel that some kind of fusible tape (such as hemming tape) could (should?) be used for extra strength, but is fusible hemming tape acid free??
Do you have any other suggestions??
Thanks in anticipation
Mary, you went on to say exactly what I was thinking as I was looking at the photos.
It’s been a fascinating thing for me to me to discover, through your entries here on Needle’nThread, that what you see in a piece like this from a distance, (the point of view that most will see it from) is often so different than what you will see when you’re up as close as the person who crafted the piece needed to be, or in this case, as close as Christiana will need to be to work her repairs.
I’m in awe of those who are able to figure this all out to begin with!
Thanks so much to both of you for sharing the progress of this project. It’s exciting to see! Good luck with your work, Christiana!
-Jeannine
Thank you and Christiana for sharing this, Mary. It’s a lovely piece of embroidery.
Quick question, though. Do you know when it was originally made, and where? It’s gorgeous, and I’m curious. 🙂
What’s the approximate date on this piece?