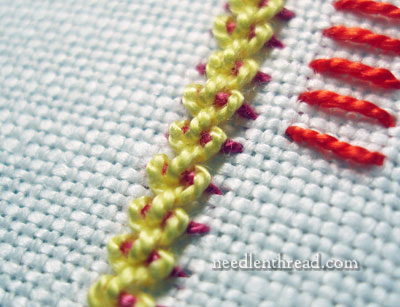
The raised chain stitch band is a composite hand embroidery stitch, made up of two steps: first, you create a line of foundation stitches, which are just parallel straight stitches, and then you work the chain stitch over that line of foundation stitches to create a textured line of embroidery.

In the video demonstration, I’m working the raised chain stitch band with perle cotton, which works really well with this stitch. Heavier threads look best – really fine threads kind of get lost in the stitch. So wool, perle cotton, buttonhole silk, and stranded floss in bunches of three strands or more look terrific when worked up. Single strands of floss, unless you’re stitching something teeny tiny, isn’t as effective.
You can work raised chain stitch over wider foundation stitches, and work more than one line of chain stitch down the foundations, too. So if you wanted to create a ladder effect, for example, you could work wider foundation stitches, and then work the chain stitch down each side of the foundation stitches, leaving a length of the straight foundation stitches visible between the two lines of chain stitch.
When deciding how to use this stitch in your embroidery endeavors, thing in terms of heavy outlines, heavy vines and branches, anywhere you want a bold, textured line.
Here’s the video for the raised chain stitch band:
If you’d like to explore other hand embroidery stitches, feel free to check out my collection of hand embroidery how-to videos here on Needle ‘n Thread!
Looking for inspiration & information on hand embroidery?
There are all kinds of reasons to sign up for the Needle ‘n Thread daily newsletter! Check them out and sign up today!
If you like what you see on Needle ’n Thread, if you want to be a part of keeping the website thriving (and free of annoying network advertising), why not become a patron on Patreon? Check out my Patreon page here, where I’ll occasionally add special needlework bonuses for patrons.
If you shop on Amazon, you can support Needle ’n Thread without any extra expense to you by visiting my Amazon Recommendations page here, where you’ll find books and sundries for the needleworker available on Amazon.


oooo… I can see myself using that one in my Sampler. They did chain stitch in Elizabethan times so I’m going to assume they did all the variations as well.
Very nice work on that raised chain band video. I worked with that stitch earlier in the year and love its texture.
Elizabeth
This is lovely and will look wonderful on my quilt. What fabric are you using? I didn’t hear any crackling on the video. Thanks for the video tut.
Hi, Judymarie – it’s a scrap of evenweave linen I had left over!
Glad you like the tutorial. I think this is a great stitch!
Best,
Mary
hi,
I loved this stitch. i am going to add this to my collection. very beautiful stitch and i did not know about this one.
thank you very much for this stitch.
Gauri
thnx fr such a nice stitch…bt i wud luv to know the other stitches which are visible on the side of ur vedio…
Your site is amazing. I belong to the Embroiders Guild of Canada. I am involved in the Quinte Needlearts Guild in Belleville. I just used your sit for a project we are working on. Your video site is clear with enough repetition and being able to re play the stitch was amazing. I’ll be sharing this site with our members.
Thanks for all your work putting this together.
Sharon
thanks for this video. It really helped. I could not get the stitch down just from some photos I was trying to use on another site. I love this stitch.
I so appreciate your website and all the information. I have just taken up freeform embroidery after doing a crewel workshop more than 12 years ago. I feel so lucky having chanced unto your Facebook page today as I had just started on a project that I have had in mind for more then a year using my handspun wool that we dyed with natural dyes in a workshop last year
Mary.. I love this stitch and having used it before had a bit of trouble searching for it again as I couldn’t remember it’s name. Your video is fantastic and I had to keep replaying it,stop, repeat etc to get it right. I tried to write down instructions to remember but was quite difficult so now I can only begin to understand what a lot of time you must spend providing such detailed and accurate instructions. I hope you might put up written instructions for this stitch that could be printed out for reference as we stitch (I did search through all the.pdf booklets I’ve purchased but couldn’t find eg stitch fun etc)
You can laugh at my attempt to write my own instructions:
“Over the front of ladder and up under to the right of the upright previous stich and over front of ladder, over top of the working thread, then hold down and make a chain shape below with working thread across to the left. Over the front of ladder and aim thread beneath ladder on the left of the upright previous chain stitch then over top of chain. Take down to next ladder and repeat, starting from the right over front of ladder, angle needle to left and bring out over working thread, making chain shape as before etc.”
Again, thank you for ALL you do.
Carol