It’s a busy time of year for hand embroiderers, as many work on preparing Christmas gifts and decorations – along with all the other holiday prep that goes on between now and Christmas (3 weeks from today, I might add!)
Sharon Bogan has a couple posts on her site about Christmas preparations – specifically card making and ornament making. And in fact, these are the things that I’ve been mulling over lately – specifically, embroidered Christmas cards. I’ve got some scraps of card-making supplies around, and I even have a handy-dandy pricker for fine holes in paper stock. I’m pretty sure my stash includes some metallics that will do for the embroidery. I should be able to drum up some Christmas cards before the season is completely over!
And speaking of over, the weekend is exactly that. Unfortunately, for me, it was an off-schedule sort of weekend. We had to take a road trip, so, with a six hour ride in front of me early Saturday morning, it occurred to me that I should be able to take something productive along. Stitching in the car is generally out of the question for me – I practically always have to stitch on a frame, and my projects generally require good light and exceptional precision, not to mention the use of gold for couching and all that stuff. Not exactly the kind of stuff you can open up and spread out in the car!
But as the prospect of the drive overcame me on Saturday, I figured I could manage something – so I foraged through the scrap bin and came up with a long strip of red wool felt.
I grabbed my “class bag,” which contains a good stash of disorganized thread that I use specifically for embroidery class.
And we set out.
The first thing I did with my wool felt was block out four panels on it, using a greeting card envelope. Between the four (with two on each side) I left about a one-inch strip. Think book cover. The one inch strip would be the spine.
Then I pulled a micro marker out of my bag, and scrolled off a bit of a basic design, just to get the thing going.
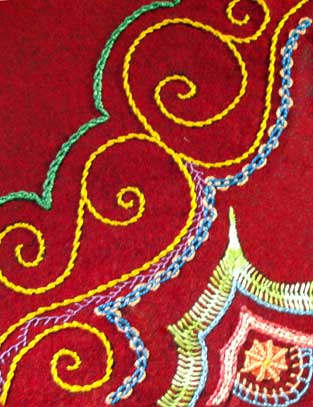
Then I stitched! My method was really simple: reach into the bag, pull out some thread. Using whatever stitch that comes to mind, stitch! And so that’s what I did.
I didn’t get that far – I figured with a six hour drive I should’ve been able to finish the front of a panel – but things never happen the way we expect. The finished product will have two panels stitched, and then I’ll fold the outside panels under the embroidered ones, put a light cardboard insert between them and stitch them closed, and then add an inside felt page, with flanel squares – to make an extra-large needlebook.
There’s quite a ways to go on the embellishment on the front. It’s a bit too standard right now to be “interesting,” and I’d like to play a bit with texture and shading here and there on it.
I’ll let you know how it goes! and I’ll give you a run-down on the stitches used once I finish the front. Here’s the progress so far:


what a pretty design! and i can’t believe you stitched this in a moving vehicle–your stitches are so even.
You are so creative!!! I can’t wait to see when the whole front is completed. Good Job!
Wow I can’t even read in the car because I get sick but I wish that I could embroider in the car, it would make use of a lot of time! 🙂
I just found you! I think through a link on a Quilting post on Facebook. I love your handwork. My favorite (so far) is your Road Trip Needle Book. Holy cow! It is eye candy! Have you finished it and may I see a photo? That is fun, creative thread-play.
Hi, Leeanna – welcome aboard! Glad you found me! The finished needlebook is here: https://needlenthread.wpengine.com/2008/10/needle-book-finish-at-long-last.html Sorry for the poor photos – it was early days!
The photos are wonderful and the piece is “smashing!!” Thanks for the quick response. You’ve stirred up that creative stuff again — thinking about quilt labels for starters. I’ve sent your link off to my sis-in-law who is very good at embroidery and you give such clear and concise information on tools and threads as well as the stitching process. You are the best! L