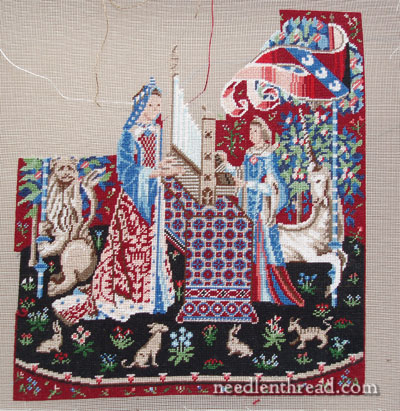
Here’s a little update on my current miniature stitchery project, a mini rendition of the “Sense of Hearing” Lady & Unicorn tapestry found in the Cluny museum in Paris.
When I set this project up at the beginning of this semester of school, my intention was to keep it on hand for those brief moments throughout the day when I could do a bit of stitching, but not a whole lot. That way, I’d have something to stitch on during busy times, and I’d be making progress on a project even if I couldn’t devote hours at a time to needlework. A little project like this one serves as motivation for me – if I do what I need to do throughout the day (and do it efficiently), then the reward is an extra few moments to stitch here and there. I like rewards like that!
So, over the past four months, approaching the project in bits and pieces, it’s come along quite far. The finish line is still far away, but at least at this point, it’s visible!

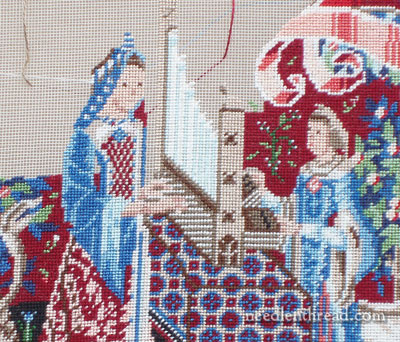
And look what’s happened! The Lady finally showed up! This part was a little fiddly to stitch – lots of color changes in little bits, which slows down progress – and I’m also having to compensate in here for the counting error I made right at the beginning of the project. This is where the mistake shows up.

The organ pipes will show up a bit better, once the background is in. Notice the eyes on the two gals. On the Lady (the larger figure on the left), I decided to use a full cross stitch for the eyes, because the half cross stitch left little slanted slits that looked a bit odd. In fact, in the instructions, it might say something about using a full cross stitch – I don’t remember. But it seemed a pretty good choice, and I definitely like her tiny eyes better than I do the handmaid’s (on the right side). I may go back to the little gal on the right and cross her eyes for her, too.

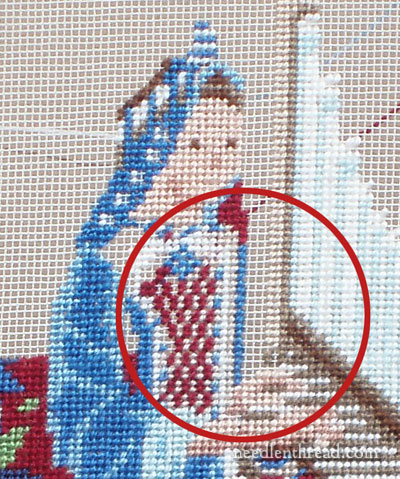
Here’s the problem spot. When I first started on this piece, I made a three stitch counting error on the left side of the very base of the organ, in the space between the organ base and the lady’s dress. The only place this is really going to be noticeable (besides the left edge of the piece, which I’ve already taken care of) is right here, where the Lady meets the Organ. Technically, she’s supposed to be butted up against the organ there, so that the organ cuts off her left side. I think once the background’s in, she’ll look ok. I was going to sketch her out in blue – just a little bulge where her left arm would be, but in fact, it looks bizarre, no matter how I try to map that out, because of the way she’s turned. So I’ve decided to go on ahead with her as she is, and just stitch in some background there. Next time, you’ll see if I’ve made a good decision or a bad one, I suppose!
If you’d like more information on this project, or you’d like to see the progress of it, you can check out the following links:
Beginning of the project & 15 Minute Stitching Philosophy
Update 2 on Miniature Stitching – finishing the base of the design
Update 3 on Miniature Stitching – the lion is in, and compensating for a mistake!
Update 4 on Miniature Stitching – base of the organ and compensating for a counting mistake
Update 5 on Miniature Stitching – the problems of compensating on the top of the organ
Update 6 on Miniature Stitching – starting the second figure
Update 7 on Miniature Stitching – the Unicorn goes in
Update 8 on Miniature Stitching – moving up to the next panel, with the first flag
Update 9 on Miniature Stitching – background around the flag
Update 10 on Miniature Stitching – the handmaid is in, plus a size comparison with a pencil
I’d like to tie up a few loose ends this week – on the website and in my projects – and see if I can finish this piece (might be a bit of a stretch! A big bit of a stretch!) and also finish the Modern Jacobean embroidery project by Tanja Berlin that I’ve got going. Possible? Hm. We’ll see. In addition, I’m working on some website projects, trying to clean up some loose threads on the site, and hopefully get everything here situated for the last long haul of the school year. Well, it’s always nice to see the light at the end of the tunnel – whether it’s with an embroidery project or with an academic year!
Well, I’m off to spend time with my needle & thread – I hope you’re getting lots of pleasure out of yours these days, too!


It’s coming along so well! I have to say, though, that it seems you’ve spent so much time compensating for that little mistake – it might’ve been easier just to pick out the mistake when you made it! What a difference one stitch can make in these things, eh?
Good point! However, I didn’t realize I’d made the mistake until I had the whole base finished, and was working on the fourth chart page! So though I’ve fiddled a bit here and there to compensate, I would’ve had to pick out at least two chart pages’ worth of stitching to fix it. Rrrrrrrrgh. Well, I’ll be much more careful next time I stitch something like this. Another thing I’ll definitely do is start from the top of the pattern and work down, instead of from the base, up. In the scheme of things, this probably doesn’t make much of a difference – I just find I stitch faster when stitching from the top down, for some reason!! ~MC
I vote for filling out a small triangle to look like her other sleeve at the crook of her elbow, with the pale blue creases. The remainder above for the background. (From the solid red area down to the brown band within that circle) – ?
Hmm, you made me think (again) Mary. I think that I generally approach projects from the bottom up…. I wonder why!
Mistake or not it’s coming along beautifully!
And now the lady has a face … I like the idea
of the cross stitch for the eyes.
Every time I see this pretty project, I’m getting inspired starting something like it.
But like you, I have so many loose ends to work on and life always gets in the way just setting one up … well maybe sometime soon.
Can hardly wait to see your’s finished 🙂
I just love this project (I know, I’ve probably already mentioned it). The faces look adorable, and I especially love the lion. But is this considered needlepoint or cross stitch?
Ah Mary, if only you knew how encouraging it is to know that even you can make a mistake! And this little project is beautiful. And so small! I dread to think how many mistakes there would have been if I was attempting it.
I have noticed that you always seem to have some long threads across the back or front of your work in several of the pictures for this project. Are these to *start* the thread or to *park* the thread until you want to stitch more with that color.
I find that when there are a lot of color changings in a piece like this that it gets somewhat tedious to stop and start threads all the time but I haven’t really thought of any creative way to do it differently.
What are your feelings on the subject? Any suggestions.
Hi, Marque – those are parked threads, for when I pick up the color again. If the same color is close by (within, say, 1/2″ – 1″ away, I’ll park the thread and wait until the majority of the stitching around the last area of that color is finished, then run the parked thread through the stitches on the back, to pick up in the next spot. This eliminates lots of starts and stops, and I figure I’d end up with at least that much of a starting / ending tail, anyway, so why not? It keeps things a bit neater on the back, too, because there are fewer cut ends that pop out here and there for trimming. ~MC
Mary, Stunning fix girl! Nobody would know that you have done a fix on your lady. Good job girl!!!!!!!! It is really going to be lovely when it’s finished. You go girl!
Mary, naive? – no way, hopeful? well, yes, I’d say so, in spades. Not a bad way to be though, all in all.
As far as your glitch goes, would one more row of the light blue down her left arm help, with then 2 rows of background. Booboos like this give me the screaming willies, but it seems that most of us make them some time or other.
Keep it going, whenever it’s done it will be stunning.