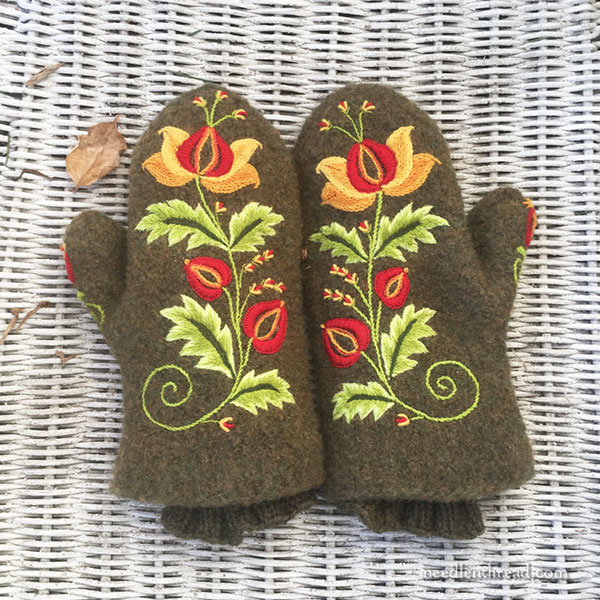
Well, I finished my wool felted mittens. They are duly embroidered!
It was a fun test project, and I’m looking forward to trying again on another pair, using different threads and techniques. All in the interest of experimenting, you know.
For those who want to try something similar, I’ve recapped a few points below, including how I transferred the design for the secon mitten. I’ve also listed all the articles in this short project series, so that you can easily find the whole project under Tips & Techniques in the main menu on Needle ‘n Thread.

My sister suggested I take a photo with them on. I’m not exactly sure how she wanted me to accomplish that.
I promise you, though, these felted wool mittens are perfectly wearable, nice and toasty, and rather rugged. There’s no reason why they can’t be worn. They were made, after all, to be worn, despite being embellished. So if you go forward with your own pair of embroidered mittens, don’t hesitate to wear them. That’s what they’re for!
Incidentally, you can scratch any fine motor skill activities off your list while wearing them. You can drive a car in them, ride a horse, pack a snowball. But don’t expect to be able to answer your smart phone with them or to manage a camera! Guess how I know?
Design Transfer for the Second Mitten
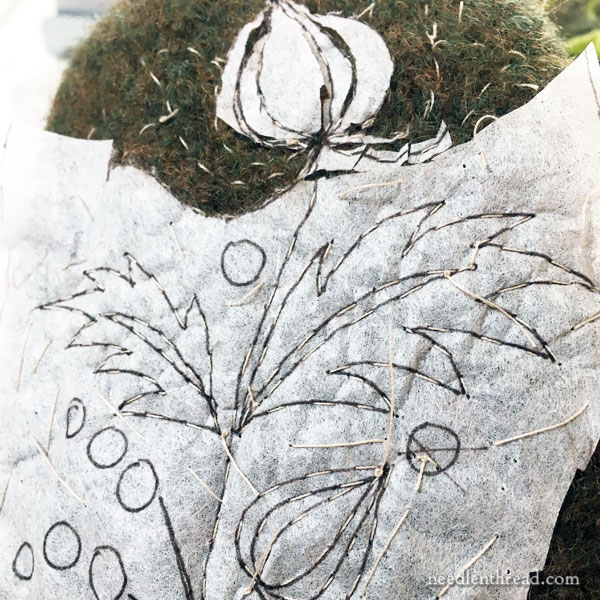
For the second mitten, instead of using the tracing or tissue type paper I used on the first mitten, I followed the same technique, but instead, I used a product called Swedish Pattern Tracing Paper, which is available here through Wooly Thread.
The stuff is much easier to use, when it comes to stitching an accurate transfer line on something like these mittens. It does not tear while you’re stitching through it, and that’s nice!

But it was much more difficult to remove, after stitching the line. I had to slice through every little line area with tiny scissors, being very (very) careful not to cut the running stitches, and then pick it out bit by bit with tweezers.
Still, the design transfer was much more accurate, it was a lot easier to work the tacking stitches without dealing with finicky tissue paper that tears when bending the mitten to scoop the stitches, and the transfer went a lot faster, initially. You lose a little time in picking the stuff out, though.
Project Recaps
You can find all the previous articles related to this project listed below, in chronological order:
Embroidery on Felted Wool Mittens – Introduction – design transfer, materials I used, and where to find the knitting pattern for the mittens
Embroidered Mitten Progress – including stitching tips
One Finished Mitten – including more stitching tips
Filed Under Tips & Techniques
You’ll find this project filed under Tips & Techniques in the main menu on Needle ‘n Thread, in case you want to refer to it later.
In fact, if you’re aching to explore project ideas, you can find lots of step-by-step embroidery projects (some very detailed!) available in Tips & Techniques on Needle ‘n Thread, under Hand Embroidery Lessons & Step-by-Step Projects. Feel free to check them out for your weekend reading!
Next week, thread talk (I love thread), Party in Provence, and a few other little tidbits to keep the creative juices flowing and to help you along on your embroidery journey!
Have a Wonderful Weekend!


Gorgeous! Mary, come out of your shell and post an honest photo of you wearing these mittens! You can always pair it up with a Victorian cape & hood or even a 19th century lap quilt! We love you and would all enjoy seeing you wearing these!
Ah, I would have, if I had had someone else around to take a photo after the finish! The best I could do was one hand at a time. So I finally plopped them into the wicker chair and said, “This will have to do!” I even tried the snowman approach – you know, on the end of sticks, but it looked sort of silly!
Haha! Ok at least you gave it the ol’ college try! Thanks for thinking of us and for all your wonderful postings!
Just lovely, I would be so, so proud of them. They look beautifully toasty.
I love these so much! I think it’s probably too late in the year for me to make them for this year, but I’ll definitely be using these for inspiration next winter.
Dear Mary
They are beautiful and the stitching is perfect and I’m sure will look lovely on and so different from normal gloves they will certainly stand out. Thanks for sharing the completed mittens with us and for all the links and tips and techniques to embroidering the mittens. I hope you have a lovely weekend and look forward to next weeks thread talk.
Regards Anita Simmance
I have used tracing paper to transfer a design before, but I skipped the basing part. I started the embroidery right on top, stitching through the paper and fabric. The small stitches were more than sufficient to perforate the paper so that tearing the pieces out was easy. Some of the smaller pieces I needed a pair of tweezers to remove, but scissors were not necessary. My Mom still has that piece framed and on her wall (she liked it so well that she stole it from me).
Could you use watersoluble stabilizer to trace the design? This stabilizer doesn’t tear while stitching through it and it simply dissolves in water. ( It shouldn’t be a problem to trow them in the water to remove the stabilizer.)
Hi, Gerda, yes, I think you could, if it is a nice, flexible stabilizer. Anything that has any stiffness to it will make it harder to stitch, since you have to scoop the Stitches, and you really need to feel the felted wool, to make sure you’re deep enough into it with each stitch, but not so deep that you’re catching the other side of the mitten. I just used what I had on hand. Next time, I plan to use something slightly different…
You don’t have a timer on your camera? That is what we used for selfies before selfie-sticks were invented (and probably before the word selfie was invented). I suddenly feel old…
The mittens look cool, I bet you’ll get lots of comments when wearing them.
I do! But my tripod is not out and I was too lazy to get it out! 🙂
The Swedish tracing paper looks just like tearaway that is used as a temporary stabilizer in the garment industry! It comes in a few weights, and some are easier to remove than others. It can be sewn through, but the beauty of tearaway is that it will “tear away” w/o breaking your stitching.
Hi, Ann – the Swedish stuff doesn’t actually tear too easily. It’s made to sew up test patterns and the like, but it really doesn’t tear as easily as the typical tear-away stuff. I found that trying to tear it distorted the running Stitches. But since I had it on hand, I thought it worth trying, and I definitely preferred it over the paper.
Bravo! Just delightful. And I love Laura’s notion of a cape…a matching cape…all foral and scrolly…might have to go with purchased wool though , unless the sister wants to knit a humongous cape to be felted down…tee hee.,
Linda
G’day Mary,
And to boot with phones and cameras etc while wearing these. The thrill (not the chill) is in the wearing. Love everything about them.
Cheers, Kath
Hi,Kath – well, I tried to handle my camera with the mittens on, but in the end, I decided prudence was the better part of valor (does that even make sense?), and the cost of a smashed camera would certainly outweigh any satisfaction in getting the shot I wanted.
Just beautiful in every way!
Beautiful 🙂 Cold weather now has a silver lining!
Mary, I’ve been following this project closely as I’ve been wanting to make a pair for myself. I tried the “shrink a sweater” thing, but that was mostly a fail, as the sweater I tried had a mix of wool & acrylic (unbeknownst to me) and is just a prickly, felty disaster. I just felted a length of pure wool, emerald green fabric in the washer as you directed and while not as thick as yours, the resulting felt will definitely be easy to embroider. I’m looking forward to your next embroidered mitten project and tips. Thanks!
Oh – Wow !
Truly Beautiful !
I felt wool all the time, and made some lovely things for my daughter when she was young with felted wool sweaters. One thought is to make fingerless gloves so you would still be able to use them while doing projects. Your mittens are absolutely gorgeous! I have some images saved on my computer from a Japanese woman that I loved so this idea is haunting me…
Simply beautiful
I can’t wait to get started
I love every minute of this !
I’ing to try to embroider