Gotta love these last minute, I-put-it-off-too-long embroidery projects! If nothing else, the finish is always a relief!
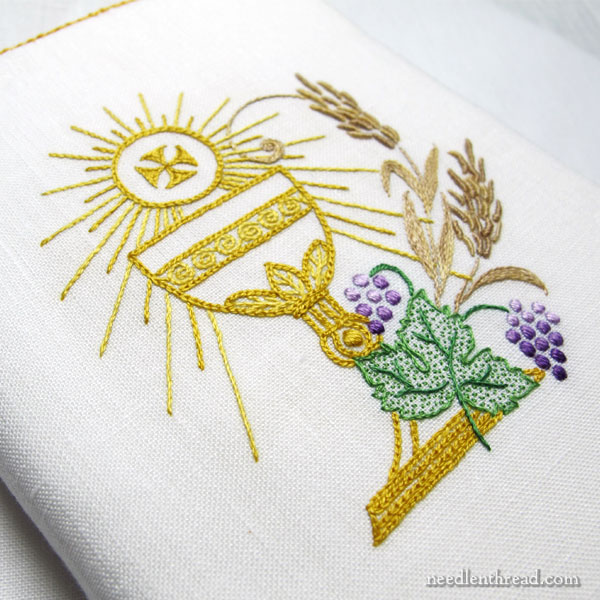
With an hour to spare on Sunday morning, I put the last stitches in this embroidered prayer book cover for my niece’s First Communion, slid the thing in a plastic bag (who needs gift wrap?) and hustled it off to the happy recipient!
So here’s a recap on the project, materials and techniques, in case you want to duplicate something similar. I suggest perhaps allowing a little more time, so you’re not hustling at the last minute!
In retrospect, if I were re-doing this project, I’d most likely select different colors on the gold-yellows. But when you’re doing a last minute project…well, you tend to settle.
Well, I tend to settle – and that’s not always the best practice.
Still, for a child’s gift, the color selections were suitable enough. I used the following DMC colors on this piece:
For the yellow-golds, I used 3820 (darker) and 725 (lighter).
For the purples, dark to light, I used 552, 553, and 554.
For the greens, I used 3345 (darker) and 988 (lighter).
For the wheat, I had a hard time settling on a DMC color that would be suitable and work. I messed with browns and tans and golds, but nothing grabbed me, so I resorted – happily! – to House of Embroidery floss, which is an over-dyed by colorfast in cold water (which is how I tested it) in #13.
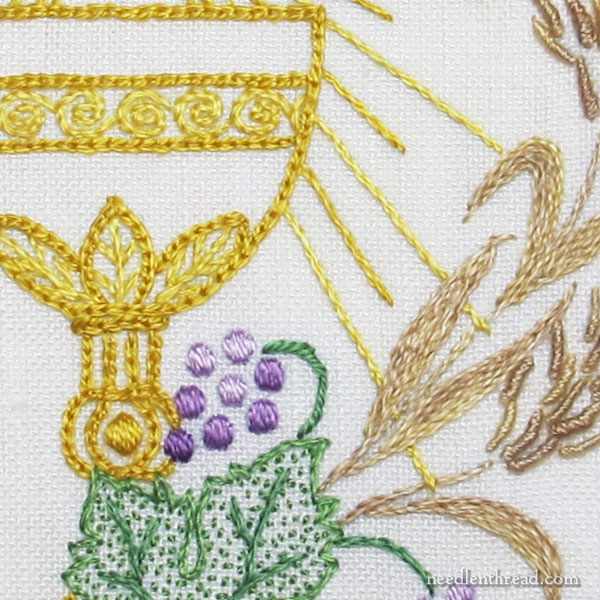
This photo will give you an overview of every stitch used, and some mistakes! I didn’t re-do anything on this piece. If I ended up with a stitch that was less than satisfactory (can you say “wiggly bullions”?), I left it.
In the scheme of things, it won’t be noticed. And eventually, the cover will probably be put in a box and forgotten until my niece (Mary) is older and comes across it and says, “Oh… I remember this!” And she’ll never notice wiggly bullions – unless she goes in for embroidery. In which case…well, good for her!
All the stitching was done with one strand (from the six) of floss.
I used chain stitch around the outline of the chalice (cup) and around the host (round wafer above the cup).
I used stem stitch for all the other lines in the design, including stems, filled filigree areas on the chalice, and rays around the host.
Incidentally, one stem – the grape stem at the top – ended up inadvertently being outline stitch. I think the photo illustrates very well the vast difference between stem stitch and outline stitch. The stem stitch keeps the individual stitch and the finish looks a bit ropey. With outline stitch, the stitches blend together so that you can’t see the individual stitches as well.
The grapes are satin stitch. You can see my very old video tutorial for satin stitch here. And here’s a list of satin stitch tips that you might find helpful if you’re tackling satin stitch for the first time.
I didn’t pad the grapes or outline underneath the satin stitch – they’re too, too tiny.
I used stem stitch around the leaf and on the leaf vein, and filled the leaf with an open, light seed stitch filling. You can see another very old video tutorial for seed stitch here, and read about using it effectively here, here, and here.
The wheat kernels (center of wheat head) are supposed to be bullion knots, and the outside lines on the wheat head should be stem stitch.
I didn’t even pause to think what I was doing when I stitched the wheat, and I stitched every line in the wheat head as a bullion knot. The insides are supposed to be bullions and the outside dashes on the wheat heads are supposed to be worked in a thin line stitch (like stem stitch) to mimic the hairiness of wheat. You can see where I did it correctly on this version of the design! No wonder the wheat in the most recent version looks so very bizarre.
The filling on the wheat leaves is also stem stitch. You can read about working stem stitch as a filling here.
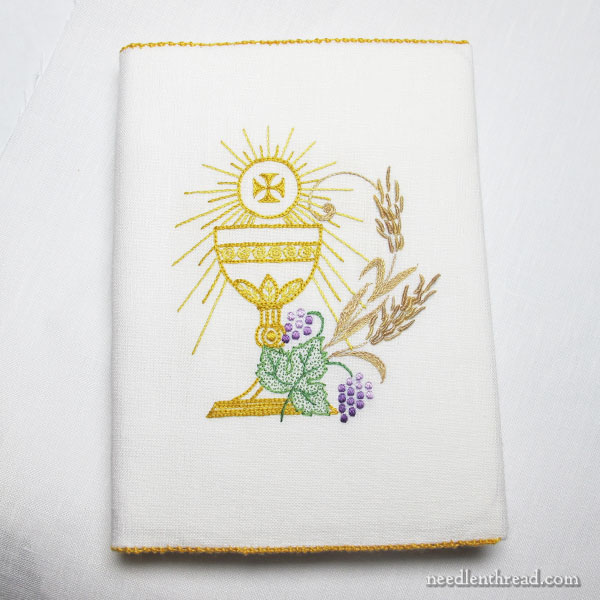
I finished the prayer book cover the same way I finished this prayer book cover, as far as construction goes.
On the edge of the book, though, instead of just using a white sewing thread and finishing with a tiny whip stitch, I worked a slightly more decorative edge using Palestrina stitch.
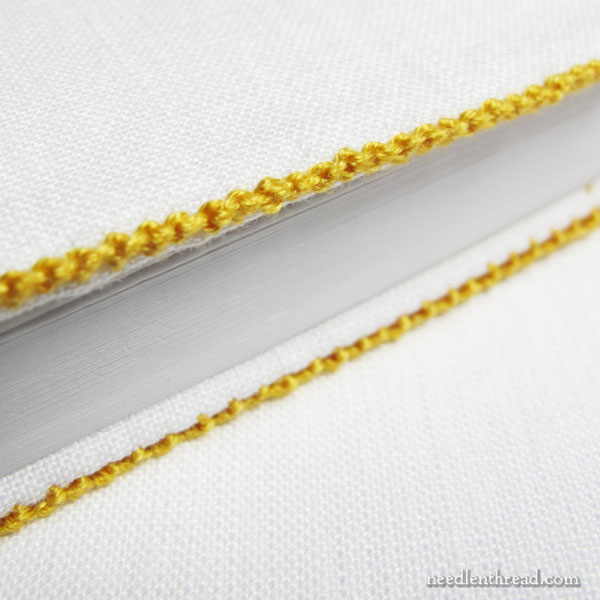
The Palestrina stitch makes a nice decorative edge – knotted, with a little space between each stitch.
I used this technique to finish one of the ornaments in my ebook Lavender Honey, and I really fell in love with it!
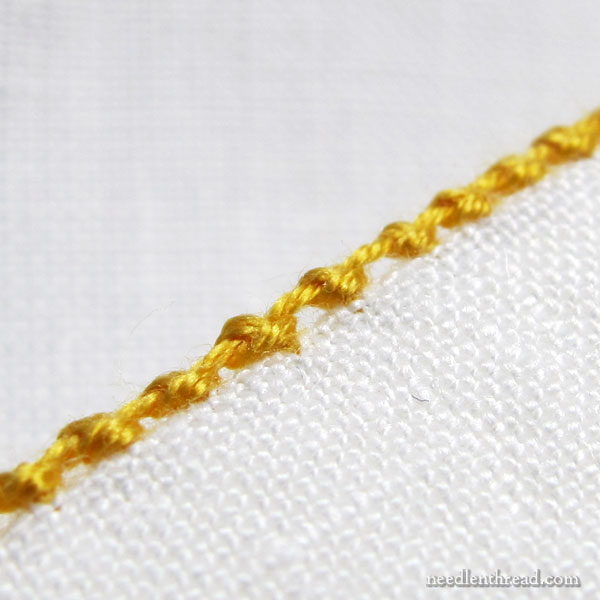
I used three strands of the darker gold floss for the edge stitching, and I used the stitch to bind all the folds that make the cover come together. In other words, I didn’t whip stitch it or baste it first. So it was a quick way of finishing, with a nicer looking edge.
I think this edging technique has lots of possibilities! Because you can vary the length between the stitches, you could, for example, use it as a base for a simple needle lace or buttonhole loop edge. It’s something I might experiment with a little more!
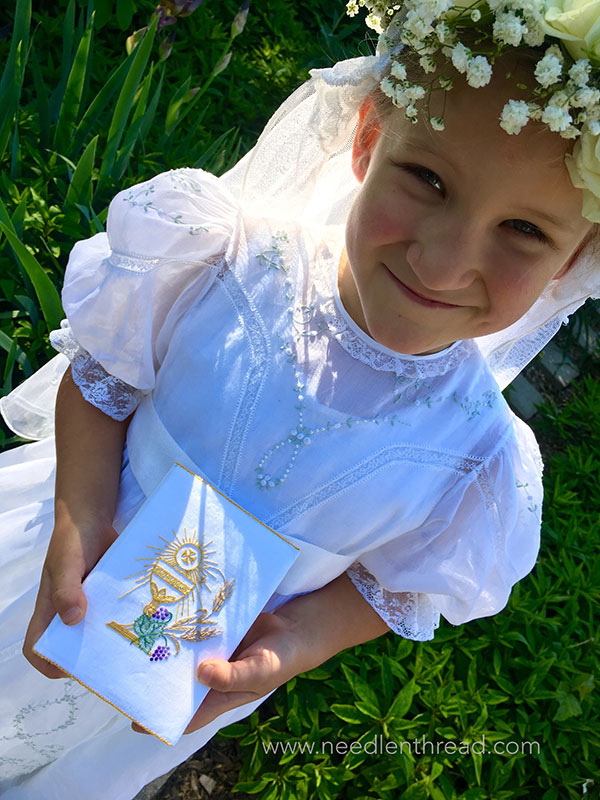
And here’s Mary, with her little prayer book. She loved it!
Several folks on Facebook asked about the dress – which is an example of my sister’s heirloom sewing and embroidery skills. You can read about it and see some close ups here.
And now it’s time to move on to other projects! Yay!


Beautiful–everything-the prayer book cover, the dress, and your niece. I think sometimes pressure is good–instead of agonizing over every little detail, we simply go to work and it turns out great. A wonderful example of how beautiful a piece of embroidery can be with a few simple stitches.
Thanks, JoyceAnne! I agree about the pressure – I seem to get more done when I’m under a bit of pressure, anyway!
Really lovely. And I can attest to finding first communion gifts in a box years later, and getting a lot of joy and pleasure out of the memories and love that came with them. Congratulations on getting it done in time!
Mary looks so sweet in her beautiful white dress with the crisp white prayer book. It is always nice to see the scale of the piece — I didn’t believe it was just one strand of floss until then! Great finish!
Lovely work, Mary! Little Mary is lucky to have you for an aunt And, while your self-critique is very interesting and I learned some new things from it, you will have to remain your own harshest critique as I really think the design and execution are beautiful.
Holly
Dear Mary
Well done for getting it completed on time with time to spare. It looks absolutely lovely and your so called mistakes do not even notice, I love all the colours you have used and I really like the design, Little Mary is so lucky to have an Aunt like you and I’m sure she will treasure the book forever. The dress is also lovely and she looks so sweet in it. Thanks for sharing the Holy Communion book cover with us and for all the photos, links and tips and techniques on the stitches you used. I hope you had a lovely day as well.
Regards Anita Simmance
Very very nice.
It’s a keepsake gift to your niece she will have forever. Her important day memorialized.
She looks like a sweet little girl.
I always like seeing and reading about your finished products, Mary. But – oh! That picture of your niece is just too precious! What a lucky little lady she is to have a mom and aunt who do such beautiful needle work.
That is lovely-no one would ever know it was a rush job. And that dress she is wearing is amazing too-I assume some other talented person in your family made it?
Hi, Linda – Yes, my sister made it. She is pretty talented all around!
Charming book cover Mary! Your niece is adorable!
I knew you would get it done, Mary! It turned out beautifully!
What a beautiful child! She looks so happy with her lovely prayer book and beautiful dress. Well done, getting the cover done in such a short time frame. It turned out beautifully.
Mary looks beautiful, and so does her prayer book! You know, I think I actually prefer the all-bullion knot version of the wheat.
The smile says it all. What a lovely gift for a child. I do not share your denomination, but I admire a “fuss” being made over a first communion. My particular church has become very nonchalant about the rite of passage of young people joining the church. Yawn. Hohum. And I think it’s a shame. We need to mark these milestones in a young person’s life, and you, and your sister, have done so in such a meaningful way. Only you see the wiggly bullions; the rest of us see a beautiful piece of art. And I think that’s why God is watching over you.
I think this might be my favorite thing you’ve ever stitched, Mary.
And your niece is just beautiful in her First Communion gown!
Awwww, that’s lovely!
Hi Mary,
Altogether a sweet story, and congratulations on getting it done in time! I think it’s lovely, and it must have felt so good to finish it in time to present it to your niece. Her dress is beautiful–obviously skill with needles runs in your family. This article will also be useful to me in seeing how an expert deals with certain challenges and chooses stitches and so forth, so this is a valuable piece from you in several ways. Thanks much!
Mike
Bravo Mary!!! Sometimes finished is better than perfect. I may try that Palestrina edging on a CQ Christmas Stocking I need to assemble. I love the look.
I am glad that it was finished in time.
It is lovely work, of course, and she will treasure it.
I also put projects off to the last minute which drives my husband crazy as he is the opposite. He tries to be patient even when the day before Thanksgiving with the family coming for Thanksgiving dinner and cleaning, precooking, baking, and table set up to do I was sitting at the kitchen table painting a ceramic centerpiece. Or I am to drop off an entry at the Long Island Fair by 6 pm – a doll of Pres. Theodore Roosevelt – and I was telephoning him at work – “I need wire for his glasses, where is the wire we have?”
I just found your blog last week and am overwhelmed at the beauty and expertise of your projects. I
The Prayer Book Cover is stunning! I stumbled across your blog last week and am overwhelmed at the beauty and expertise of your projects. I am also grateful for your honesty about your “mistakes” because it helps to know that perfection isn’t absolutely necessary in rendering beauty. (BTW – I like the wheat better they way it turned out on the finished product, but that’s just my take.) I listened to your interview on FiberTalks as well and it was encouraging and inspiring. I started embroidering as a child, did some in my 20s and 30s, but haven’t touched it in about 20 years. I’m itching to pick up the needle again, and your blog and projects are just what I need right now. Thank you for sharing the journey with your needle and thread, and for all the helpful tips that get us started and keep us going.
Beautiful! I was inspired both by this project of yours, and my husband’s complaint that his book of Psalms was falling apart, to get him a new book and cover it myself. I started six days ago and his birthday is today but I’m only halfway done so he might have to wait a little longer. I’ve based it off this image: http://thegraphicsfairy.com/vintage-clip-art-amazing-silhouette-bird-vines-lyre/ (this website is a great source for images for those like me who are unfortunately not very artistic). I’m doing it in colours and on black fabric. I will definitely be using the Palestrina edging, it is stunning!
sweet and sweeter! Both the embroidery and the little girl……
and, you come from a very dedicated and talented family(after checking out the heirloom sewing!)
may you all be well!
kaethejean
Mary, I don’t think you are capable of stitching anything that isn’t beautiful. This really is lovely, as is your lucky niece. Wiggly bullions are a clever touch, perfect for wheat! And the palestrina stitch edging makes a beautiful finish.
I can’t believe how quickly you finished that cover. It is beautiful. I’m envious of your niece. When I had my first communion we were living in veterans student housing (a corrugated tin tiny house) while my dad finished his PhD. I had dreamed about the fancy white dress but we just wore Sunday clothes. I guess the parents in that parish didn’t have the money for fancy dresses . I’m sure she will cherish that prayer book cover.
The prayer book cover is beautiful as is the dress your niece is wearing.
Well done Mary!
Your niece looks lovely in her gown!
Stunning work. The colours are lovely. I would be over the moon if someone made me something so beautiful
Lovely work Mary. Is your niece named after you? She is a very lucky girl to be given such a treasure.
You might have to modify your pattern in the future though – I guess prayer books will be out and some form of technology will be in…
Adorable !
A lovely picture – niece, dress and book!
Actually, I think the wheat looks a lot like barley – which is certainly historically appropriate!
I think it turned out lovely! And aren’t nieces fabulous? Mary is adorable and her dress is just wonderful.
I’ve a question about the appearance of your single count work. How do you get things like your stem and chain stitch to look so…full? Mine always looks very thin.
Hi mary, your prayer book design is superb, really good, i lov embroidery and occasionally do something or the other, my request is that if you could pls show this same project with bead work, i could have some idea, because I want to work on this project,hope you will be kind enough to help, thank you
I’m looking for snowflake patterns to do in Redwork. I found several in Pinterest but they are from 2011. Is there a book you have or patterns that you still can sell! Thank you! I hand embroider not machine.
Sincerely gorgeous! Congratulations to your niece ! She made a beautiful little bride of Jesus….as my first grade teacher: Sr. Annelle told me on my first communion day