Yesterday, we looked at this old piece of embroidery featuring abundant goldwork on a velvet ground, and I opened it up to any questions you would explore if you had the piece in front of you.
Today, I’ll answer some of your questions regarding what’s behind the embroidery, looking at the piece a little more closely.
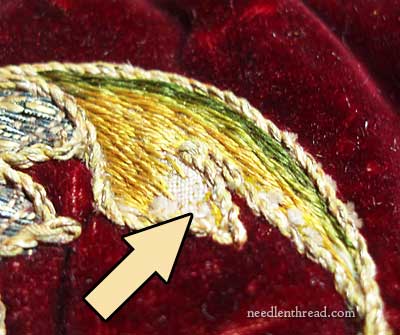
The first question we’ll address is how they worked the embroidery on the velvet. Did they work a slip – a separate piece of embroidery on linen – and then appliqué it to the velvet? Or some other method?
You see, working embroidery straight onto velvet is problematic, because of the pile of the velvet. With goldwork, the threads tend to sink into the velvet. And with silk, there’s always the difficulty of the nap of the velvet poking up between your stitches. So normally, there’s something between the embroidery itself and the velvet ground.
Historically, we often hear of slips taking care of this problem. Embroidery was worked on linen (or petit point was worked on canvas), and then the embroidered area was cut from the linen or the canvas and applied to the velvet ground, with the edges sometimes turned under (and sometimes not), and often with the edge “neatened” with a fine cord or twist or something similar.
In the photo above, the arrow points to one of the few bare spots in the silk embroidery. So you can see the linen behind the embroidery.
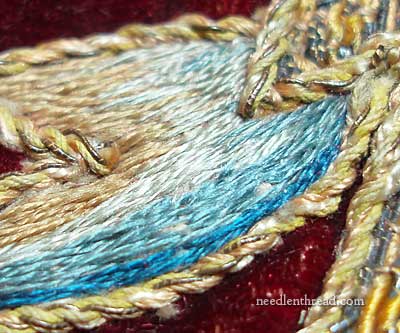
You can also see that the embroidery on the entire piece is outlined with a twist of silk with a gold thread running through it (more on that later).
So everything points to a slip, right? Well, not really…
I initially thought of a slip, too. When considering the whole design, though, it seemed unlikely. The design is viney, it’s scrolly, it’s kind of “loose” and open. And it would be a pain in the neck to work the whole thing as a slip and then transfer to the ground fabric, neatening all the edges and whatnot afterwards and keeping all those open sections in place and in proportion, especially if there are easier ways to go about solving the velvet pile problem.
Then I thought the design could have been pieced together – each element worked as a separate slip, applied to the right place on the fabric, and the cord on the edges serving to tie the whole piece together.
But there are no markings on the velvet at all to indicate placement of the pattern. So the latter scenario doesn’t seem likely, and both scenarios seem like taking the hard way.
Those were my thoughts, anyway. It’s just too much work. And I’m just lazy that way. There are other ways to embroider on velvet – the most common way being to cover the velvet with another piece of fabric, do the embroidery, and cut away the excess fabric
The answer would be on the back, so let’s take a look at it.
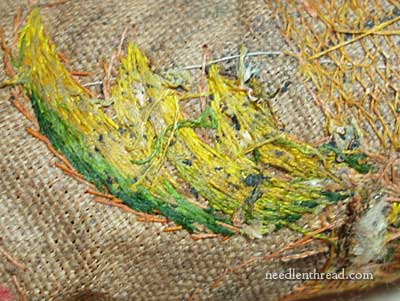
If this were a slip, we wouldn’t see the silk embroidery threads on the back. We would only see the appliqué threads.
So now we know a couple things:
We know that the ground fabric is supported by a fairly heavy weight linen.
We know that the velvet ground fabric was layered between two pieces of linen like a sandwich, and the embroidery was done into the top layer of linen, into the ground, and into the heavier backing layer.
We know that the embroiderer had tough fingers and sharp needles.
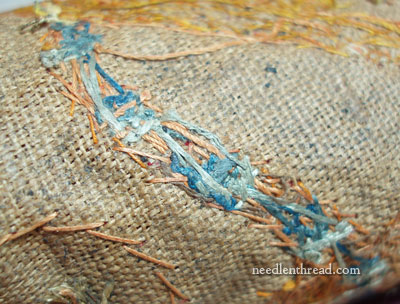
We know that the layer of linen on the top is quite a bit finer than the layer of linen on the back (Thank goodness! Stitching through two layers of that backing linen, which looks and feels like burlap or buckram, would be … yucky.)
And now what can we guess?
Well, we can guess about the design transfer. It was surely done (and much more easily) on the top layer of linen, with a prick-and-pounce method, which would suit the older piece.
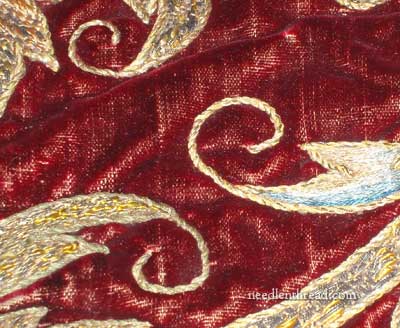
Concerning the ground fabric, it is silk velvet. It’s not as plush as it looks in some of the photos, I’m afraid. Light does funny things on fabrics with a pile. Here, you get a better idea of the thinning of the velvet. It many little places, there are full-fledged bald spots. In most places, though, the velvet pile is just somewhat thin and worn (like in the photo above). But it really isn’t all that noticeable, unless the light is shining on it the right way. I think the ground fabric is in remarkably good condition.
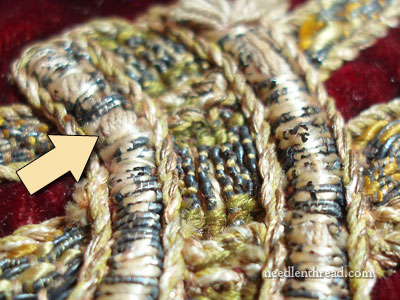
What else is behind the embroidery? The raised goldwork areas are padded with bunches of string.
All in all, the piece is in remarkably good shape. The stitchery is tight and whole – there are very few spots of any broken stitches or disintegrated stitches, except in the case of bare parts of the metal threads. The silk, the couching stitches – they’re all sturdy as all get out. It’s really well made!
Later on, we’ll look at individual types of goldwork threads and techniques used, and I’ll continue exploring to answer your questions!


The burlap backing is no surprise to me, at certain points in history, and in the lower classes, they couldn’t afford to be incredibly fussy and used what was available. WW2 was like that, they would put “war economy” stamps on some things asking you to reuse them. Envelopes (for letters) being one thing that had those stamps on them sometimes.
Well, it’s not really burlap – its just heavy like buckram, but it’s definitely linen. This isn’t really a piece where someone made do with less-expensive materials. All the materials used on it point to its being quite costly. I would even go so far to say that it was made with the best materials available, which is probably one reason why it has withstood the test of time so well.
The backing was probably for support while hanging.
When I was reading your remarks on the problems with stitching directly on the velvet, and with using slips for this design, my first thought was “they shaved it?”.
Lol the shaving remark made me laugh 🙂
I had this thought too. It seems very difficult to embroider through 3 layers, velvet in the middle. I believe it’s quite possible the pile was shaved in some manner. Because my first thought, that it was cut away, Mary didn’t think so though I don’t see why it couldn’t be done.
Thanks for showing the construction of all these beautiful vintage pieces. It’s eye-opening to see how they were put together and how they’ve held up over time.
Could it be that the velvet was cut away in the shapes where the embroidery was, and the cord surrounding the motifs, instead of neatening the edges of the linen, were actually neatening the edges of the velvet? I’m not sure I understood everything you said Did you say this? In which case I apologize for being thick headed lol.
Another thing: what you say is a thick linen looks to me like hemp. I have handwoven hemp and it looks very much like this.
Hi, Brigitte – No, the stitching is definitely done on a finer linen on top of the velvet. The finer linen was cut away around the embroidered areas. Reverse applique is not seen so much in this style of stitching – it is a difficult technique and isn’t usually seen in complex designs and it usually doesn’t involve exposing heavily embroidered areas, but rather, plain cloth. So, you might see reverse applique with the top cloth heavily embroidered, and then some cut out areas, where a plain colored velvet is exposed as part of the design. The backing fabric is linen, too, though it isn’t unusual for heavier, “rough” weaves like this to look similar, whether made from hemp or linen or cotton or other fibers. But linen is definitely more in keeping with the richness of the piece, the skill of the embroidery, the era, and the origins… but more on that later! ~MC