I love the pomegranate as a symbol in art, and I especially love it rendered in embroidery, so I was really excited to see the crewel embroidery kit on the Tristan Brooks website that featured this seedy fruit. And, better yet, it was one of the “smalls” – a little complete embroidery kit, with all the threads and everything ready for stitching, for a project that can easily be completed in two evenings (and maybe one, if you want to spend several hours in a row stitching!)
These little crewel embroidery kits (which I’ve found rather addictive!) take me three sessions, approximately: one session for setting up, and two stitching sessions, If I can spend a couple hours straight stitching. The first crewel kit I finished took a lot less time than this one, for some reason. Last week, I finished this pomegranate small, and overall, I really like it a lot. However, if I were stitching it again, there are a couple things I’d do differently.
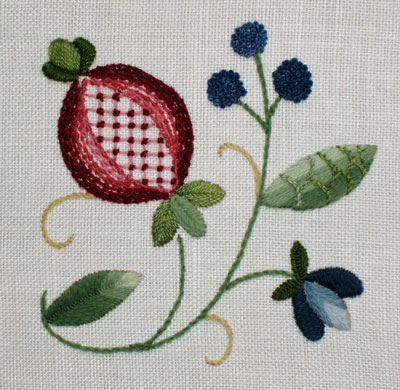
This is the finished piece. The colors are really appealing to me – I love the reds and the blues and the greens, with just a tiny touch of yellow.
In retrospect, I would have paid a little more attention to the shape of the pomegranate. The top edge on the right side of the fruit is looking a bit flat.
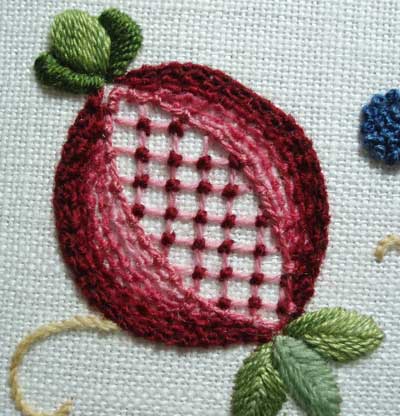
The only thing I changed in the design and kit directions on this one was the center of the pomegranate. The original design has a few scattered French knots in red in the center, with a tiny green fly stitch at the base of each French knot. These look like teeny flower buds of some sort. I’m a sucker for lattice work in embroidery, and I love seeing laid work in crewel embroidery. So I filled the middle of my pomegranate with a lattice in the medium pink, tacked down with the dark red at the intersections.
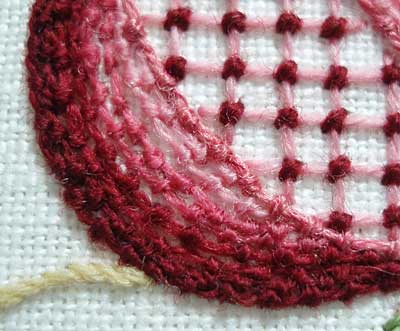
Concerning the stitch chosen for the skin of the pomegranate, the kit called for coral knots, layered from dark on the outside to light on the inside, all worked in Heathway wools, except for the innermost line (in medium pink), which is stitched with Gumnuts Poppies.
On the picture accompanying the project, the lines of coral knots become a bit more spaced out as they move towards the center, so that the fabric is visible. Two things I wonder, now that the project is finished: 1. I wonder if this would have looked better, if the rows of coral knots were packed together all the way to the edge, so that the ground fabric isn’t visible? 2. I wonder how the pomegranate would have looked if stitched in a different stitch – for example, stem stitch used as a filling?
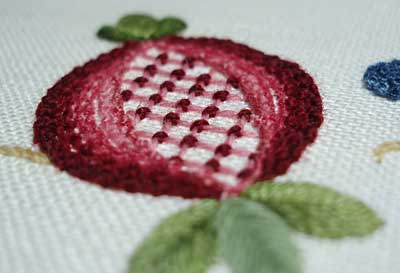
I do like the texture of the coral knots, but stem stitch would’ve been a bit more pomegranate-skin-like. A pomegranate has very smooth skin. But – I like the texture. So I’m happy enough with the coral knot pomegranate. I just wonder if I would like it as well (or maybe better?) in stem stitch. Maybe I’ll test that some day….
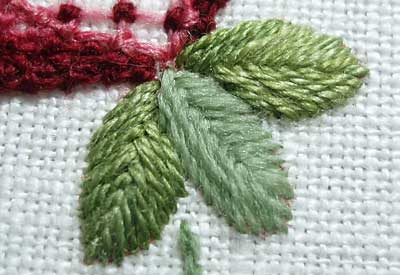
One thing I do really like about these kits is the use of Gumnut Yarns (poppies) and Heathway wool next to each other, creating a noticeable contrast. Poppies by Gumnut Yarns is a 50 / 50 wool / silk blend, so it has a very nice sheen. It’s a really beautiful thread to stitch with! I’d like to try the other threads from Gumnut yarns to see if they are comparable in quality. Maybe someday I will. (In the meantime, if you’re interested in seeing the threads available through Gumnut yarns, check out their website! Their threads look enticing!)
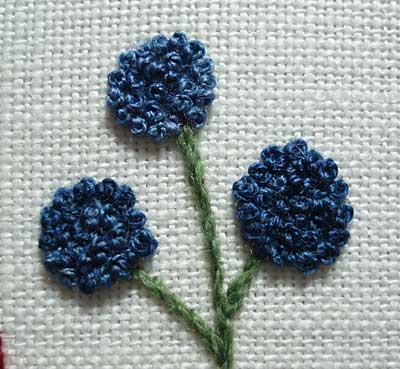
The blueberries are clusters of French knots, worked with Gumnut Poppies. This is actually two colors of thread – the middle berry is slightly lighter than the side berries. It’s a great thread for French knots, by the way!
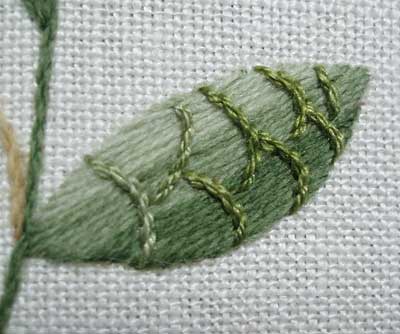
This is the other thing – probably the Biggest Thing – in this design that I don’t like, and now, I wish I had worked it differently. While I like the Heathway and Gumnut Poppies next to each other (the base of this leaf is Heathway wool, the weird vein-things are worked in stem stitch with Gumnut Poppies), I don’t like the striped effect in the leaf, and I don’t like the shape of the stem stitching in the middle. I ended up eyeballing this, actually, because once the satin stitches are in, you can’t see the lines for the stem stitching. My first instinct, actually, was to substitute the stem stitched bumps with a double fly stitch, worked down across the leaf. I wish I had done this! That’s really my only Big Regret in this kit. I didn’t pick the stem stitching out, because it would have ruined the satin stitching underneath, and I didn’t know if I would have enough thread to replace the satin stitched leaf if I had to.
And, well. It’s not that big of a regret! Overall, I really like this kit, I’m pleased enough with the way the piece came out, and I’m dying to get going on the next small!
“But what about the rooster?” you ask.
Oh, I started him. I started one of the flowers, and I have taken good photos of the parts I’ve put in and picked out again. And then the parts I put in and picked out yet again. I put in and picked out on the flower three times so far. It’s been great fun! I’m hoping to remedy the situation today by switching colors.
I hope you’re having a terrific weekend! Back to my needle and thread….


Very pretty. Your pictures are always so good. I love the laidwork in the center of the pomegranate and you are right, the blueberries look great in that thread. I have used the Gumnut wools but not the blends. Very nice.
Hi Mary, your pomegranite looks lovely. When I read your comments about the skin of the pomegranete being smooth, I just had to go to the refridgerator to have a look at one I have sitting in there. I do like the textured look of the coral stitch, however, if we want to be technically correct, then stem stitch would have been better, but who wants to be technically correct all the time 😉
I have a question on crewel work, namely your rooster. I have chosen this to be my main, new project for January and I have been thinking about the background fabric. On Saturday, I visited the shop of a friend and she was ironing out scraps of material. One piece was lovely and the design was obviously inspired by crewel embroidery. The background of the fabric was a light biscuit on dark lemon.
I liked it and so today, when at the fabric store looking for something else, I looked for something similar. I found a med/light lemon tone-on-tone, but in a 100% cotton, similar to those used for quilting. My question is, is this cotton good to use for the rooster? Would it be too fine to use wool for the embroidery?
Mary,
First, let me say I love this project, the colors are beautifully balanced, as are the textures.
Second, let me say that I have chosen you for the Beautiful Bloggers Award!
Come visit me to learn more: http://wendysbees.blogspot.com/2010/01/just-let-me-catch-my-breath.html
WendyBee
Hi, All –
Thanks very much for your comments!
Martha, I'm dying to try "Daisies" by Gumnut Yarns. It sounds like it would be right up my alley. Have you tried it? What do you think of it?
Marian – Oh, good questions about fabric. If you're going to be working in wool threads, I'd not use quilter's weight cotton. See, what will happen is this: the needles used for crewel embroidery (when using wool or heavier threads) are crewel needles, usually around a #4, or, if you're using a very fine wool, then maybe a #7 crewel. In any case, they are larger needles, and when they go through the fabric, they create a good-sized hole. With linen, the fibers hug back around the thread, but with a tightly woven cotton (like quilter's cotton), the hole will just stay. If you have a medium-weight linen, you could back it with muslin and use that. Or, if you're looking for a fabric at a local fabric shop, then you might have to go with a cotton twill. Traditionally, linen, linen twill, or fustian was used for crewel work. Fustian is simply a sturdy twill. You can probably find a natural-colored (like a flax or wheat-colored) cotton twill at your local fabric shop.
These cotton twills are not technically a needlework fabric, but they'll work ok for a practice piece.
Now, if you're not going to be working this in heavier threads – say you're just planning on working it in DMC cottons, and using just two strands to keep it light-weight – then you can probably get away with the quilter's cotton. Basically, you'll be doing surface embroidery with stitches typical of crewel work, and that's just fine!
Anyway, feel free to e-mail me (use the contact form in the top menu of the website) if you have any other questions, or anything, ok? Or you can ask here!
Wendy! Thank you very much for the blog award! That is very kind of you! I noticed you have Hooked on Needles on there, too – I'm sure MGM will be thrilled! (We know each other quite well…) Thank you again!
MC
Thanks for bringing those crewel "smalls" to my attention. I love the look of crewel, but any kits I have found are quite large an complicated. Something like this seems more manageable.
Don't fret about the slightly flat section of poomegranate. They are never quite perfectly round. I think you're right about having less background fabric show through on the skin/rind. I suspect the instructions were so written because it's easier for most people to stitch straighter lines.
Gumnut threads are great. I didn't know they made wool or wool blends. My LNS carries some of their silks. Both the colors and textures are wonderful
Lovely stitching and beautiful colours.
I saw your post answering my question regarding woollen threads and I will stick to cotton floss and stitch along. Thanks
Hi Mary…a quick question with material for redwork, I have been doing it on Kona Cotton…someone suggested using it double..what are your feelings on using it that way and if so how do you keep the two layers from puckering on each other? Thanks for your input and Loving your projects and critiques, you keep us full of inspiration!!….
Kathy Kelly
Hi, Kathy –
Well, to keep it from puckering, you'll need to line both layers up with the grain of the fabric (not on the bias – try to keep the weave of both pieces in line with each other), and then baste the fabric together before putting it in a hoop. I'd pin it all around first, then work a close running stitch or even a herringbone stitch around the perimeter.
Hope that helps!
MC
Really it is fantastic and a very neat work , well done , i loved it …..
Infact i'm learning too much through your posts …. thanks alot for your efforts.
Perfect Pomagranate! Blustery Good Winter Morning to you Mary! Pittsburgh is literally buried in snow and thank heaven for a crewel piece which I have bravely commenced, with hopes for Christmas giving. You may or may not be satisfied with the pomagranate (?) but I love love love it! The perfect embellishment that I was searching for. Keep all your lovely ideas a'cummin"! And thanks so much.
(I can always depend on you for the "perfect idea!)…Judy in Pittsburgh
Hi,well,thanks for you
Mary, I love your newsletter!! So glad one of my EGA friends introduced me to it. I am an experienced stitcher but learn something new every time one arrives in my mailbox. This is the first time I am writing, having been a silent admirer.
I do hope you are well now – you have been so generous with your knowledge.
Syd Baroff
Just love the wool embroided pomegranate and was wondering if it is still available, how much it is ,and if it is in a kit with all the wools etc .?
Love the pomegranate and the colors are beautiful. Could you please tell me what linen and count if there is one you are using. Pictures are deceiving when it come to fabric. I’ve been a subscriber for years and I do love all you embroidery and tutorials. Stay well and happy stitching❣️
Hi, Caroline – Not sure what count that is – but I would guess around a 32. This was done quite a while ago!