


In my world, the verb iron is a four-letter word.
You know what type of four-letter word I’m talking about – like darn or drat. Or even crud.
That type of four-letter word.
I’m not a huge fan of ironing.
However, embroidered household linens usually need to be ironed if you really want them to look nice.
And while I only iron my clothes when I absolutely must, I iron embroidered household linens – such as table cloths & runners, hand towels, flour sack towels, pillow cases, and so forth – whenever they need it. The satisfaction of seeing the pieces beautifully ironed outweighs my disinclination for ironing in general.
I also iron fabric for sewing or for finish work whenever I need to, and that kind of ironing is satisfying, too.
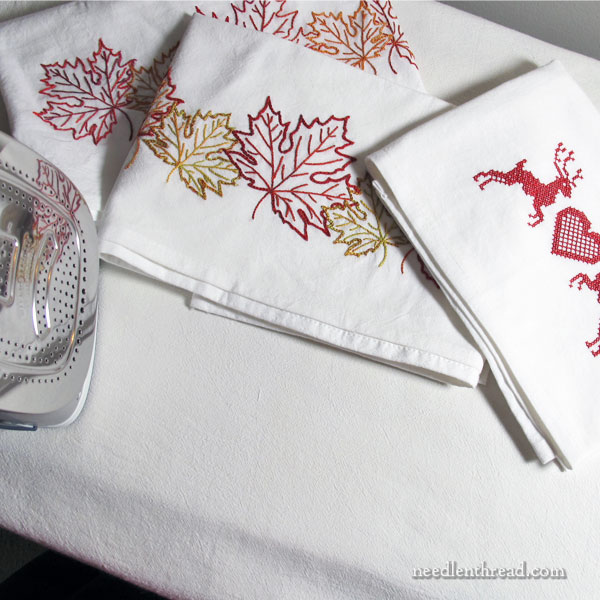
Since the question about ironing embroidered flour sack towels has come up a few times, I thought I’d show you my ironing set-up and tell you how I iron such things.
So, as many of you know, I sell a range of ready-to-stitch flour sack towels in my shop. These are great projects for learning embroidery, they’re wonderful when you want to have a relaxing and portable project on hand, and the finished towels make lovely gifts. I tend to stitch quite a few of them.
And I always iron them when I’m finished. That way, they’re ready to give away (or use), as the occasion arises.
Whenever you iron household linens that are embroidered, you want to do it in a way that preserves the look of the embroidery. The best way is to iron the piece upside-down, with the front or top of the item (the embroidered side) facing down, so that you’re actually ironing the back of the embroidery.
This saves the embroidery from being crushed or overly-smoothed by the iron. It maintains the texture of the embroidery.

But in order for this to work well, your ironing surface should be well-padded, and not necessarily just with the padding that comes with a typical ironing-board cover.
You can see my ironing set-up in the photo above.
Wide Board
First of all, I use a wide ironing board. This was the greatest revelation to me, ever, in the world of ironing! If you iron a lot, don’t settle for the standard ironing board width (which is usually 12″ – 15″). An extra 4.5″ makes a big difference! The one I have is 19.5″ wide, and I love it.
Once upon a time, I had an ironing table that someone had made for ironing larger pieces of fabric, but I found it very awkward to iron on. I prefer a standard wide ironing board to a whole ironing table. Plus, I can take down the ironing board and get it out of the way when I’m not using it.
Dry Iron
Second, I always use a dry iron.
I never add water to the reserve in my iron. If I need steam or dampness, I spray it on with a misting bottle that releases a very fine mist. The reason I don’t add water to my iron is that I don’t want any surprises down the road. I’ve had too many irons go amuck and release water when it wasn’t wanted.
My favorite iron that I’ve ever owned is a Rowenta, but I think there are lots of good irons out there. The choice of an iron is rather a personal thing, I think.
Pad It!
It’s never quite good enough just to use the standard ironing board cover and pad that comes with an ironing board when you’re ironing embroidery. You need extra padding under the face-down embroidered surface, to give the embroidery something to sink into.
I used to use several layers of flannel folded in half, and then covered with a clean cotton flour sack towel as my ironing board padding. And this works quite well!
You can also just fold several cotton flour sack towels in half so that you have a nice, thick layer of them, and use that.
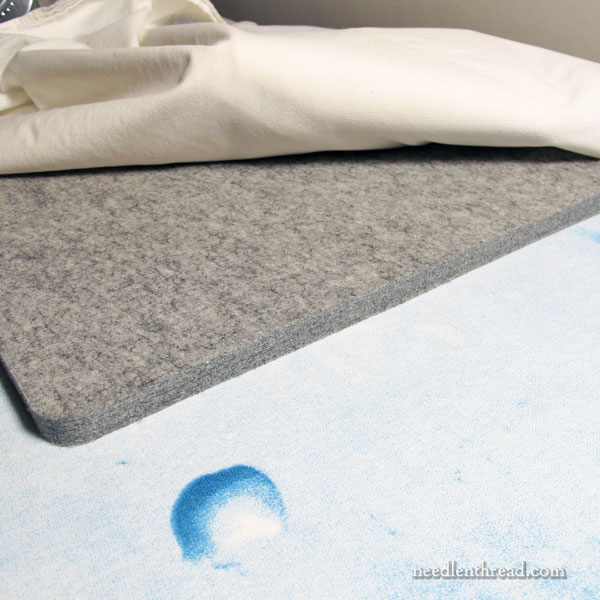
This year, I discovered the wonder of the wool ironing mat, though, and this is my go-to padding on my ironing board. I have a 13.5″ x 17″ wool ironing mat on my ironing board, which I cover with a flour sack towel.
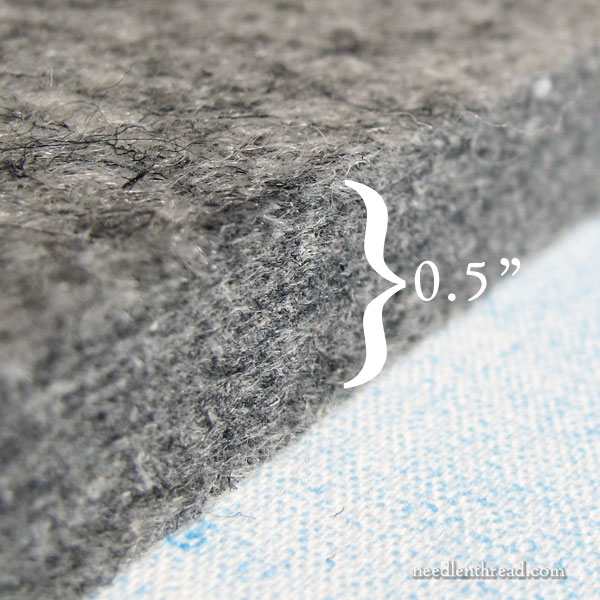
Essentially, it’s just a half-inch-thick layer of wool felt. It provides good padding under the embroidery and it has enough give when covered with the flour sack towel to give the embroidery something to sink into.
I love this thing! It heats up so well, and it makes a noticeable difference in how efficient and effective the iron is. I’m not sure where this has been all my life. It works really well, too, if you like to use iron-on transfers for embroidery. It just seems to provide better and more even heat.
I’m even thinking about tracking down a nice big piece of thick felt, cutting it to the size of my ironing board surface, and making a cotton cover to go over it. It’s great to iron on.
And… it’s portable. If I need to iron at my work table, I can lay this thing on the table and iron. This is fabulous when I’m working on wee tiny things that I want to keep ironed for ease of finishing. I have a mini-iron that works perfectly with it in these circumstances. I know this is an approach that’s been used by quilters for quite a while, but I find it handy when I’m doing finish work with small embroidery projects, too.
I can also use the wool mat as a pinning and layout board of sorts. Fabric, lace bits, ribbon, and other trim don’t move around much when you put them on wool felt. It’s the same concept as a story board. It’s fun!
If you have never tried a wool pressing mat, you might want to! I love mine and I use it for all kinds of things, in addition to ironing.
So those are the things I use when I iron my embroidered household linens and the like. They all make a difference in one way or another.
The ultimate point to remember, though, is always iron over the embroidered parts from the back, with the embroidery face down on a padded surface.
If you’re looking for them, you can find the ironing mat, the wide ironing board, and the fine misting spray bottle all listed under “Tools & Accessories” on my Amazon recommendations page here.
Now go forth and iron Everything! You’ll find that ironing isn’t as bad as it seems.
Well.
Ok.
It’s still ironing… and iron is still a four-letter word!
This article contains an affiliate link to my Amazon recommendations page, which means Needle ‘n Thread receives a small commission for any purchases made through that link at no extra expense to you. Thanks!
Mary, check out horse dot com. They sell wool saddle pads. I purchased one and cut it to fit my ironing board, with some extra left over for small mats that are great for taking on retreats.
Yes, someone referred me to a different tack shop – where they had saddle pads on sale for something like $25. 1/2″ thick 100% wool – I think 30×30? My sister bought two for her ironing table (she sews clothes), and I bought one to use on my whole ironing board. Who would’ve thought?! I’ll keep my small one for easy transport!
Are you making the leaf and the pumpkin designs available for purchase? I love them but I wouldn’t use them for tea towels, possibly a table runner.
Thanks for the article-felt pad ordered. Actually, I kind of like to iron although I don’t do much ironing and I have to be in the mood. If I’m not using steam, I prefer a non-steam iron, in other words one without the holes in the plate. It’s really more important if you are pressing rather than ironing. JoyceAnne
Mary –
I started reading and wondered if you were going to head to the wool pressing pad! I purchased my first one about 5yrs ago. Quilters blogs were all raving about how wonderful it was for getting seams beautifully flat. I loved mine too but the small size made awkward for pressing larger pieces.
I did the same thing you are talking about — purchased a large sheet and covered my ironing board! The exact type I bought is no longer available on Amazon but they still do carry a number of versions. It apparently has a number of industrial applications. On Amazon – check out Pressed Wool Felt and you will find a number of options re: thickness, width and length.
When I was young (7 or 8) I watched a lady do an ironing board and I got hooked on it!
My usual way at that age was to put down a blanket on the floor with an iron next to it! We ironed EVERYTHING even sheets and towels! When I was a sewing professional we ironed EVERYTHING because ironing is a big part of tailoring. “Iron” is a nice word!
Actually, I kind of agree (except when it comes to my everyday clothes). My favorite part of ironing is actually the smell. :-/
Once again, you have opened my eyes! WIDE ironing board! Wool ironing mat! Who knew?! Mary, that’s who. I have a little list on Amazon with some of your recommendations. It just gets longer.
Thanks and have a great stitchy day!
Katherine
Hi, for large pieces of this felt check out the following:
The Felt Company
The pieces sold in quilt shops etc. are Gray wool Needle felted or Cream pressed felt padding for carpet laying. This link is where they sell end pieces. You can get large wide pieces for much less expensive pricing.
Mary, I smiled when I read about your ironing board. Mine was purchased before my marriage (over 50 years ago 🙂 ), as was my featherweight (non steam) iron. It came with felt padding and I have added a padded cover. It is 17 inches wide. (19 sounds even better) – and yes like you, I love crisp linen!
I don’t mind ironing fabrics for quilting or embroidery, but I hate ironing clothes.
Morning Mary – I know you’ve mentioned this before but there’s a difference between ironing and pressing. Ironing is the gliding back and forth of the iron and has the potential of distorting the fabric, possibly permanently, if it’s not spread and smoothed on the ironing surface. Pressing is leaving the iron on the surface for a moment then lifting it and placing it in another area to press.
My iron is a Black and Decker basic iron, it’s never had water in it and I’m on my second one now, although it has the capability of other settings, it knows only one temperature – hot. We have a second, fancy iron, that my daughter uses for her clothes, mine are all permanent press so very rarely need ironing.
I’m basically a quilter and have found that my yardage piece of thick toweling works great but I love the idea of that felt pressing surface for my applique to be pressed from the back, I like the applique to be raised from the ground fabric and often it has embroidery on it that I don’t want to be crushed. It’s so sad to see a piece of vintage embroidery that has had the dickens ironed out of it and the stitching has been squashed flat.
Thanks for all this useful information, learning by trial and error can sometimes be disastrous.
Brenda
Hi Brenda! A sewing person uses ironing not pressing because the seams sometimes need to be twisted, especially in tailoring. You’ll have a seam that is part in a sleeve and the rest of it whipstitched on the lining!
Dear Mary
Great advice to iron from the back. I’ve never heard of an ironing mat before, but what a good idea and I have just ordered one, the mat will be great for ironing fabric on freezer sheets for printing photos, this is my present project. I’m looking to buy an iron and I wondered what make is your rowenta iron, is it lightweight and small or is it just normal size. Thank you for your tips and techniques on how to iron embroidered pieces and for sharing them with us and for the photos.
Regards Anita Simmance
Thanks, great tips! Ir*n is a ‘bad word’ in my house too.
I am so envious of the wide board & would do that if my board wasn’t part of my kitchen.
I have always wanted one of the boards that would fold out of the wall. I am 5’0″ and man-handling an ironing board has ALWAYS been a royal pain for me PLUS where do you set it up so it is close to a plug & where it will actually fit so you can iron & not bump into things, etc…
So years ago Ikea had one that folded into a drawer & I bought it & held onto it for “when I remodel the kitchen”. I knew they would discontinue it (which they did after a year or so) BUT the drawers were a standard size. When I finally did remodel the kitchen, I put the ironing board in a drawer above an appliance lift for the mixer (also way too big for me to maneuver). The drawer-board is a bit shorter than a “normal” board, BUT it folds into & out of a drawer, so no more wobbly legs.
On the wall above the counter is an outlet, no more cords across walkways!
I also HATE ironing clothes & have a steam area set up near the washer & dryer for those. BUT for my needlework, I use the kitchen ironing board.
The disadvantage of the drawer-board is that the middle has a crease where the board folds. I have always used my big fluffy terry towels as a pad underneath & ironed my needlework from the back side. HOWEVER, your wool pad is a fabulous idea!!! I can make up for the crease & get a smoother surface for the un-embellished areas of my needlework! You are an amazing source for us all as usual!
I do a lot of fleece appliqué with wonder under and also yardage ironing. I broke down last year and bought the large Cricut Easypress. I love it. Large (12” x 10”) flat surface area with no freakin steam holes(I hate steam holes!) Also allows for higher temperatures than a regular iron. It works beautifully with flour sack towels straight out of the washer. The best part is it’s cheaper or comparable to a lot of irons out there today. Saves a bunch of time. Wish I’d bought one sooner.
Hi Mary,
I love your flour sack towel designs but I live in Australia. So I wondered if it would be possible for you to simply put the patterns up for sale that I could transfer them myself since I know you only sell these to customers inside the US. A recommendation from Amazon or the like for buying plain flour sack towels would be great too if you know of one. Thanks so much for your blog either way, it keeps me sane