


After yesterday’s post on working the stem stitch with two strands on silk using a laying tool, many people asked “What’s a laying tool and how do you use it?” Here’s a bit about laying tools and how they’re used.
A laying tool is pretty much just a stick of some sort. In Japanese embroidery, the laying tool is called a tekobari, but in western embroidery, it’s pretty much just called a laying tool. The laying tool is used in embroidery for stroking threads and keeping them flat, or for tensioning threads as you take a stitch, to assure that the threads stay smoothly parallel to each other (instead of twisting up on each other). I’ve already got a video on how to use a laying tool – if you haven’t seen it and you’re curious about how to use a laying tool, you might take a look at it. It demonstrates how to use a laying tool when working satin stitch with several strands of floss at a time.
Laying tools come in all types. Some are ornate and decorative, some are simple steel shafts, some are highly polished wood, some are plastic, some bone. The material of the laying tool is not of crucial importance; what’s important about a laying tool is that the shaft is perfectly smooth so that the threads don’t snag on it. And when you don’t have a laying tool, a large needle can work just as well!
Like any hand embroidery accessory, it can be fun to collect interesting and beautiful laying tools, but chances are, if you use them, you’ll soon settle for your favorite one – it’ll be the one that’s easiest to handle, that has the smoothest shaft, that has a nice weight, and that is comfortable to hold.
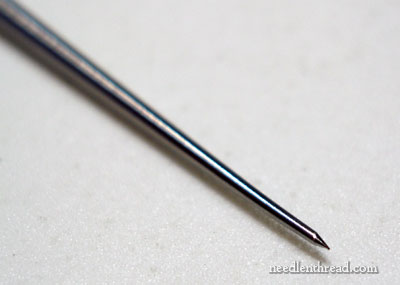
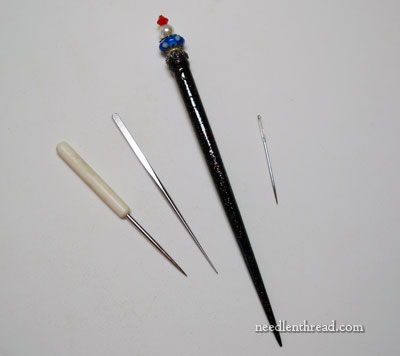
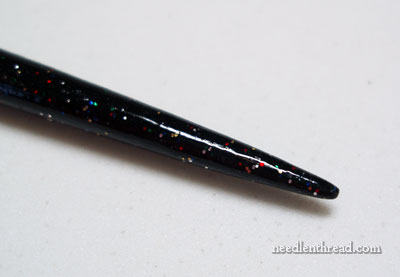
Some laying tools have very sharp tips, like this particular one, which is called the BLT (Best Laying Tool), by Shay Pendray. This is my favorite laying tool – it is stainless steel, has a nice weight to it, is perfectly smooth, has a squared handle that makes it easy to hold, it is unobtrusive, and frankly, it’s just All Business – it does the job and it does it well. It has a Very Sharp Tip (as in, don’t stab yourself with it, because it will hurt!), and the tip serves as a great stiletto, for piercing holes in fabric, or for opening up holes and pushing the threads apart. So this laying tool easily serves a triple purpose – a laying tool, a stiletto (for piercing fabric) and an awl (for opening holes). It’s a nice tool.
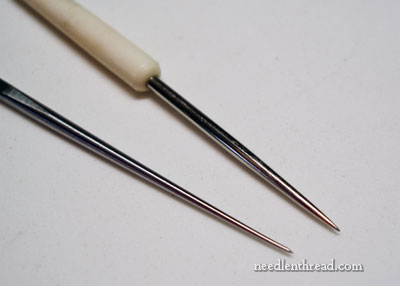
Next to the BLT (the lower tool in the photo above) is an awl. It has a stainless steel shaft and a bone handle. The shaft is perfectly smooth and can be used as a laying tool as well. The primary purpose of an awl is to open holes in fabric. This awl goes from tapered tip to wide shaft more quickly than the BLT and can open larger holes in the fabric, but it’s not as big an awl as some. In hand embroidery, normally you open holes in fabric for whitework (eyelets, especially) and for any other techniques where you might want a hole in the fabric – whenever you might want to push the threads apart without necessarily piercing, breaking, or cutting the threads. I use this awl as a laying tool now and then, but I use it more often as an awl.
This is the tip of the decorative laying tool that’s shown in the very top photo. This tool is made from wood, which has been painted and decorated with glitter, and then highly lacquered and polished. The top of the tool has some fun decorative beads on it. The shaft of this laying tool is smooth, but it isn’t as smooth as the shaft of the awl and of the BLT. I don’t like using this tool for silk, especially for flat silk, because it isn’t as smooth as I would like. You can see the tip is rounded and blunt – it would not open up holes in fabric. Personally, I find decorative beading a bit iffy. It’s much easier to catch things on the decorative stuff at the top of special laying tools like this one.
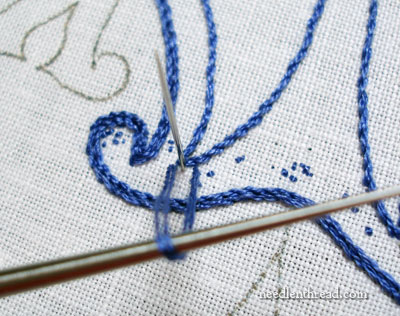
In the photo above, I’m using the laying tool while working stem stitch. You can see that the tool pulls the working thread away from where the stitch is being worked, and it holds both threads in perfect tension, and keeps them parallel. So you can that you normally need two hands to use a laying tool – one hand for managing your needle and working thread, and the other for managing your laying tool. I use a floor stand to hold my embroidery frame so that both of my hands are free for stitching. If I were working with one strand of floss, I would actually stitch with both hands (one above the work and one under), but since I’m using two strands, I prefer to use a laying tool to keep the strands in sync with each other.
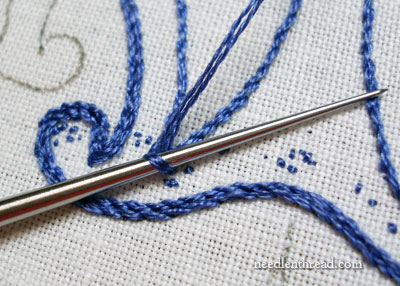
As I pull the stem stitch through, I keep the thread hugging the laying tool, until the tool is on the fabric and the stitch is pretty much finished, and then….
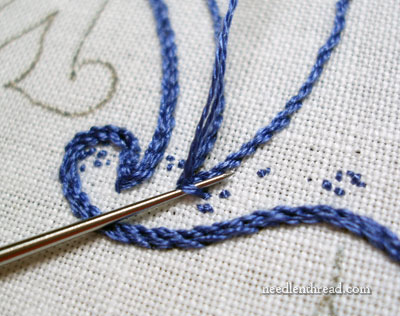
… I just slide the laying tool out of the stitch as I tighten it.
At first, using a laying tool can be a little awkward, but once you get used to it, it becomes second nature to use it. Once you develop a nice stitching rhythm while you’re using the tool, progress is quick. Of course, you don’t have to use a laying tool all the time – it’s used only when it’s needed, like any tool.
There are many situations in surface embroidery where a laying tool can come in handy. There’s the already-mentioned satin stitch worked with more than one strand of floss, when you want a completely smooth satin stitch surface. There’s this stem stitch situation above, when I’m working with two threads and I want to keep them perfectly tensioned so that one doesn’t pull through before the other. There’s also those Boingy Thread Situations, when you’re working with cranky threads. Tensioning these types of threads with a laying tool will help tame their wild & twisty boingy nature as you take a stitch.
Most specialty needlework shops carry laying tools, so if you have a favorite local needlework shop, you’ll most likely find several available there. If you don’t have a local shop, you can find them online through most specialty needlework shops.
So, what about you? Do you use a laying tool? Do you see a noticeable difference with your stitching? If you haven’t used on, are you curious to try one? Or do you think it looks like too much trouble? And how many of you are collectors of laying tools? Do you have more than one? What’s your favorite? I’d love to hear about your experiences with laying tools, too! Leave a comment below and feel free to pipe up about laying tools!
If you’d like access to all the tips and techniques discussed in the Medallion Project (which I’m working on in this article above), including complete coverage of the Tudor-Style Rose, conveniently collected in one document, interlinked, referenced, and indexed, why not add the Marian Medallion Project e-book to your library? It’s packed full of all kinds of embroidery tips for undertaking a project like this, all in a convenient electronic format for easy searching.
You hit on one of my favorite fetishes today when you talked about laying tools. I have the BLT and wooden tools but one of my favorite is from Susan Porta. I bought mine at Needle Point in Paradise in Naples, FL. It is longer and has a thicker handle than the BLT. It is all metal and dangerous. However, after EGA Seminar I forgot to put it in my checked luggage and it did get through security. I could not find one on line. If you want a picture, send me an email address.
I have used laying tools quite a bit. I often even use one while cross stitching. My favorite laying tool is a hat pin or a decorative pin with a pearl on the tip. I keep it on my magnet on my work surface so it is convenient to grab. Sometimes I will file the end so it is dulled. I have use BLT but find it is not convenient for me to grab. The pin is small, always available, and cheap. I also use a rubber band from broccoli as a needle tugger. These items were just there when I needed something. So they have become my favorite tools.
I use a laying tool most of the time. I do mostly cross stitch but, even with that unless it’s just one strand I use a laying tool. I have noticed my stitches are always so much neater and look so much more even. I love my laying tools and wouldn’t do any stitching without them.
Hi Mary: I use a Japanese Tekobari as I find this the best of any laying tools I have used. Margaret Kinsey, a teacher who has taught many times at our EGA events was the person that got me turned on to this handy tool. Whatever one uses-it makes a terrific difference to the way a finished silk embroidery piece looks. Thanks for this additional information.
Dee.
I have two laying tools, one is a simple slender piece of perfectly smooth metal that has a slightly rounded point at the end that I found in my father’s garage (I have no idea what it was originally for, but it served my purpose perfectly, and for free =}) and more recently a porcupine quill I found at the local renaissance fair. It’s very light, it’s got a light layer of laquer on it so nothing catches. I hold the dull end and the sharp end was also dipped in laquer. It’s a little unconventional but I really like it.
I use a laying tool on most hooped work and always with silks. Even simple stitching is better with it, I think. Even if I don’t really need it, it makes me more conscious of how my stitches lay. Also, when I stitch without one, I feel like I’m only using 1 hand or something. You get used to relying on it, I suppose.
I have always liked using a trolley needle. It’s basically a tapestry needle welded to an adjustable ring. You put it on the end of a finger (I use my index finger) on your non-stitching hand. It becomes an extension of your finger. Once you become used to using it, it feels like it’s part of your hand. It’s the only thing I’ll use while stitching. I know that Hedgehog Handworks carries them but I’m sure other shops or online stores carry them, too.
Mary, I too use a laying tool. I have a collection of them from which to choose, depending on the application. For Cross stitch I like to use a “trolley needle” which is available at NN. It fits over my left thumb so I can smoothe the fibers and keep my needle in my right hand. I also use the BLT when project is in a stand so I can use both hands. I know this probably doesn’t make sense, it just depends on what I’m stitching. I have a couple of hand made laying tools that I rarely use for stitching but enjoy looking at.
Cathy
I like a 2mm bamboo dpn (double pointed knitting needle). It’s about 6″ long and I find it very easy to handle. I tried more traditional laying tools, but I found that the shorter length was difficult to manage and that I had to put the tool down when I wasn’t using it. The dpn, perhaps because I’m a knitter, seems to float around my hand into and out of the desired position as needed.
Hi Mary, I don’t have a laying tool. Maybe I will try using old, thick needle. Laying tool is a little bit similar to stiletto, necessary with broderie anglaise.
Mary,
I use a laying tool any time I’m using more than one strand. I normally use a trolley needle because I don’t have to pick it up and set it down. I have a beautiful glass laying tool, but I’ve never used it. I purchased a BLT, distinctly remember taking it out of the sack, and it has never been seen again. Perhaps some day it will reappear and I can give it a try!
I use a hoop frame and embroider holding my work so this makes conventional use of a laying tool impossible. What I use (without realizing I was using a laying tool) is a pin; I secure it in a suitable area on the fabric and slide the thread under the stabbing end. I can make the pin as tight to the fabric as I like, usually.
Thank you so much for this website as I have been mostly using sketches to learn new stitches and they are not always that easy to follow. Now I also know what a laying tool is!
I like my trolly needle. It’s a big fat needle that has been welded to an open thimble. It slides on the end of my thumb, so all I have to do is wiggle my thumb to operate it, rather than use my whole hand. I’ve often said that I should carry several with me when I’m using it, becasue when I work in public with it, people always want to buy it from me. I eye the pretty laying tools often, but I always go back to “I just wiggle my thumb just so, and ….”
Hi Mary,
Thanks so much for explaining what a laying tool is. I read yesterday’s post and was wondering but thought that I would write at another time to ask. I can see how useful that tool will be as I frequently struggle with threads not laying flat- the fight is ridiculous.
Many thanks for answering before I asked,
Laurie
Great subject! Laying tools! I love the blt, but j’adore, I love, my needle trolley on the thumb.
Can you please explain how does one go about embellishing a canvas with beads in a way that it doesn’t take a lifetime??? How do people do this??? What is the big secret?
Thank you
Your wooden laying tool with the decorative beading looks like a hair stick! Just thought I’d throw that out there. I have many hair sticks, maybe I can use one as a laying tool.
Since I don’t have a frame or a stand for a hoop, I tape a tapestry needle to the top of my left thumb, letting it stick out for about 1.5-2 cm. This works very well as a laying tool, while allowing me to hold the hoop. It also helps to keep the thread taut when making french knots, for example.
I use a laying tool a lot and have tried practically every one known to womankind. But I keep going back to my needle quilling tool. I have big hands and find that laying tools are too small/short for me. The quilling tool is just right.
When I’ve used a laying tool, it drives me NUTS if it is something tapered–the threads never, ever end up in synch properly; the ‘uphill’ one is always looser than the other.
So I use needles (their taper is usually not a problem) and old stainless straight dental tools that I’ve polished to perfection (use gem/metal polishing media from your nearest rock shop and a dremel).
How do you deal with the tapered ones?
Mary: For years I pooh-poohed the expense of buying a laying tool and always used large needles because they are cheap and plentiful. Then I was given a BLT and fell it love with it. But since I usually have at least 4 projects going at any one time, I keep the BLT on one project (sitting on a magnet) and use the large needles on the others. The one advantage the needles have over the BLT is that I can tie a short piece of colorful ribbon through the needle’s eye which makes it easy to spot in the clutter of threads, scissors, etc. The BLT doesn’t stand out in the clutter, so it can be hard to find and you DO have to be careful when looking for it because you always find the pointy end first! Janet (PS: The woad-dyed threads came and they are simply beautiful to touch as well as to look at. Thanks so much!)
I almost always use a Tekobari since I do JE. For silk, there is nothing like it. The Tekobari, and, I think, Shay’s as well, are carbon steel which is porous and pull the suga from flat silk flat and smooth.
I’ve used others as well, but the Tekobari is best. I do some smocking and embroidery for my granddaughter in cotton. The teacher at the store wanted to know how I got my French knots so smooth. She said they were better than hers! The secret? A laying tool. Worth learning to use it.
Great tips and lesson, Mary.
Can’t wait to see the motif and how you are going to do it.
I don’t use one as often as I probably should. I use a needle when I’m having trouble keeping threads even. After reading the comments, maybe I’ll get an official one. If nothing else, it might be easier to keep track of.
I forgot to add – trolley needles are not for me. I had one, and could not get the hang of using it. Combined with the tendency to poke things that shouldn’t be poked, I got rid of it.
Heh heh – I’ve used trolly needles, too, Gail, but I’m so used to using a laying tool that the trolly needle always takes too long to get accustomed to – I can’t tell you how many times I’ve poked myself, especially in the face! So I just stick with my laying tool. But people who use trolly needles really seem to love ’em, so I think it’s just a matter of what you’re used to! ~MC
Hello there, firstly I want to say thank you for the article and video tutorial on the laying tool, I’ve been embroidering for a long time and always used another needle. However, I did buy a awl and realised that this would probably be easier. Secondly, I thoroughly enjoy your daily email, I look forward to it and you’ve taught me many a thing, which just goes to show you’re never too old or too experienced not to benefit from your lessons. Thank you very much, I don’t know if you get many notes of appreciation but I wanted you to know that someone out there, Surrey in England, in my case, is watching you and enjoying it. Regards Mandy
Thanks for your nice note, Mandy! I appreciate that! MC
MC
Recently we were comparing tekobaris and the BLT. I do Japanese Embroidery, so am likely biased. The tekobari goes to a point much more smoothly than the BLT. Here are photos I took comparing the two – http://www.facebook.com/media/set/?set=a.2557960830355.148698.1294026589&type=1&l=60966f0697
Hello Mary,
I wish I had seen your mail on laying tools last week!. I was using metallic thread to do stem stitch and did I have problems, even though I used beeswax. The thread definitely had a mind of its own – that didn’t coincide with mine. Thanks for the tip. If I find the courage, maybe I will unpick last week’s stitching.
Hi Christine, I was just about to mention our discussion about tekobaris/BLT (can’t help thinking about bacon, lettuce and tomato every time I see that :-)). The tekobari, while perfectly smooth, seems to grip the flat silk and smooth it in a way that awls or needles don’t.
Anyway, do I use a laying tool! Since I learnt to use a tekoibari for JE, I don’t seem able to stitch without a laying tool close to hand. Mostly I use one of my two tekobaris but if they are not to hand I will use a large needle, as small knitting needle, a cocktail stick, basically anything smooth and pointy.
As well as all the uses mentioned, I use it all the time to gently push stitches aside if I need to bring my needle up from beneath a stitch or between stitches and use it for reverse stitching.
Great to read what everyone else uses and what they use it for
I haven’t used a laying tool to much but it looks like something I should get used to using especially when using more then one thread at a time. Thank you Mary
Hi Mary
I think England has gone to sleep. Phoned my online needlework supplier for a laying tool and he had never heard of it. Went online at google and they suggested a hedge laying course! Checked other online embroidery suppliers and drew a blank. I knew we were in the dark ages but not that bad!!!
Have a good one Ilana
I typically use a thick needle but I could do with one of these. I hope I can find one easily in UK.
AND I’m investing in a free-standing frame – that I’ve needed a long time!
Thanks for the inspiration!!
Hello Mary
You are amazing! I am so delighted that I have found your site. The article about laying tools is excellent. I find myself “drinking in” all you have to say. Thankyou soooo much. I will now forward your details to several of my friends knowing they will be just as happy as I am to learn more about stitching. Can’t wait to use a laying tool as I can see how much better my stitching will be. I purchased one at a class years ago, but have not used it.
Thanks again for inspiring me in my much loved interst of stitching. Never happier than when I am stitching.
Gratefully yours, Gaye
Hi Mary ~
You have gorgeous work, almost looks like a painting
Many years ago I worked with crewel as a very young lady. I am interested in getting started again and would like your opinion on a good starter project. Do you sell kits? If not, will you recommend where to go?
Thank you kindly,
L. Peddie
Hi, Lori! Thanks for asking! I don’t sell kits, but if you’re looking for authentic crewel kits, you can take a look at The Crewel Work Company online (https://www.crewelwork.com) . They’re running a special right now in November for readers of Needle ‘n Thread, for 10% off with the discount code NEEDLEN. They have beginner kits and beyond. They ship out of the UK, but they get here to the US pretty quickly. Another option is to search eBay for older kits by Erica Wilson or Elsa Williams. If you can find the ones with 100% linen, and that have all the threads (never used), then they might do for you, too! It all depends on what style of kit that you want.
I found a metal thing in grandma’s embroidery stash. Put a picture of it on FB, and a friend suggested that it is a laying tool. Almost 3 inches long, with half of that length being a loop. Like maybe to go over a finger?
It sounds like a trolly needle. If you google trolly needle, you’ll see that it’s a laying tool type thing that you wear on your finger.