


This past weekend, I had a chance to try out Sulky’s Iron-On Transfer Pens. Readers have sent questions about them for a while, but they’re not something I’ve ever tried before, until this weekend. I could never give an answer beyond “I’ve heard they work ok, but I haven’t tried them.” This is something I wanted to remedy!
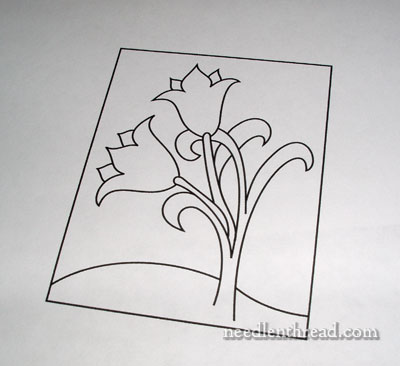
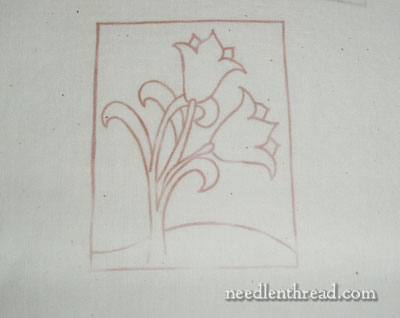
Now I’ve tried them. Here’s a little bit on how you’re supposed to use the pens, along with my impressions and some pros and cons while working through a couple transfers using the Little Tulips hand embroidery pattern.
Using the Sulky Iron-on Transfer Pens is pretty simple. First, print your design on regular computer paper. You can also trace your design on tracing paper or regular printer paper, but they suggest that if you’re using a non-porous paper (like vellum), to do the iron-on while the ink is still wet on the paper. I just used regular printer paper from my computer.
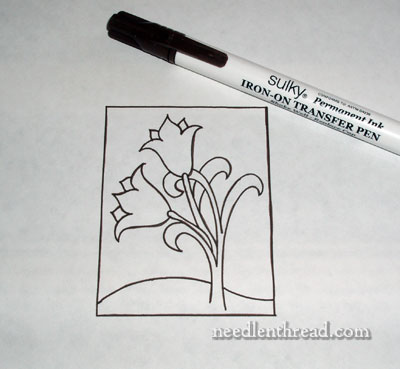
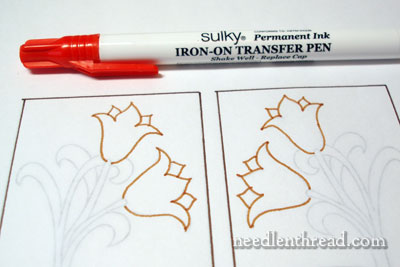
I’m using the sepia / brown colored transfer pen here (even though the cap looks black in the black in the photo…) I traced directly on the printed lines of the pattern. This is going to cause the pattern to be reversed when I iron it on, but that’s ok. It’s just a test pattern. If you don’t want your imaged to be reversed, you need to trace your design on the back of the paper, rather than directly on your printed lines.
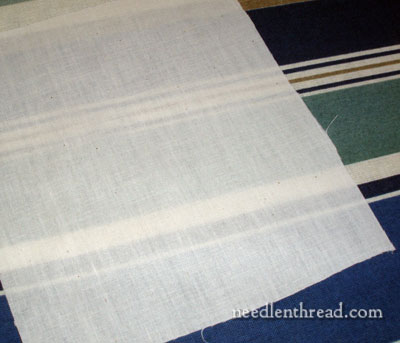
I’m just using a piece of regular muslin for this trial. It’s ironed and wrinkle-less, which is always important when you’re doing an iron-on transfer. You get a much cleaner transfer on ironed, wrinkle-free fabric. (That’s my other ugly ironing board cover, by the way!)
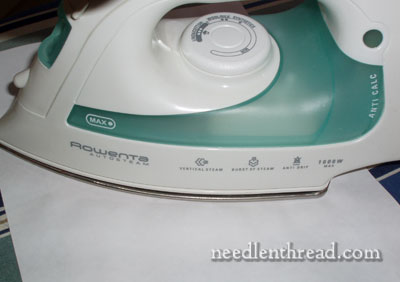
The design goes traced-side-down onto the fabric, and then, using the appropriate setting for the fabric you’re ironing (here, it’s the highest cotton setting), press the hot, dry iron onto the paper, which is on the fabric. It’s a typical iron-on transfer here…. but notice that I didn’t pin my design onto the fabric or adhere it in any way, so I’m not going to rub back and forth with the iron. In fact, picking up the iron and putting it back down is out of the question, too, or I may end up with a fuzzy image or a shifted duplicate on the fabric.
Generally, I pin iron-on transfers when I use them. Quilters may be familiar, though, with a spray on adhesive that dissolves with heat, and apparently, you can spray your pattern with this, and then adhere it onto the fabric and do the iron on. I’m not one to add adhesives to the front of embroidery projects, so this isn’t something I’d necessarily do, but you can always play around with that if you want to, to see if it gives you satisfactory results for your needlework.
Anyway, the upshot of this is that I simply pressed down directly with the dry iron and didn’t move it at all. This is not necessarily the best way to get a good transfer. For one thing, there are those little steam holes that can cause interference with the heat, and for another, not all iron surfaces heat equally from tip to base. I’d suggest pinning the pattern so that you’re free to pick up the iron and press it down again in other locations (especially if your pattern is large). Don’t rub the iron. Just pick it up and press it down.
The transfer came out pretty well, considering my limitations with moving the iron. You can see that the top of the pattern is quite crisp. The lines are relatively thick. You can gauge the thickness of your line when you trace the pattern, by applying less pressure on the pen, a lighter touch in your tracing, and by moving the pen quickly across the surface of the paper. But even on the areas where I went with as thin a line as I could draw, the transfer line is still relatively thick. This means that, when the piece is embroidered, the stitches are going to have to be heavy enough to cover the line, as the transfer is permanent.
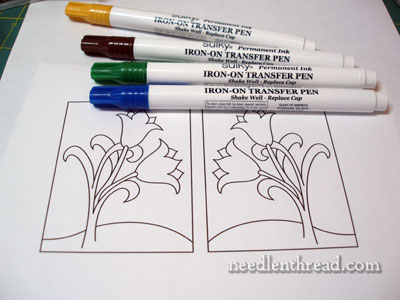
Ok, let’s move on to some other colors! The pens come in 8 colors. The colors don’t have to be used just for lines – you can color in areas of your patterns with them. Remember that the color transfer will be permanent.
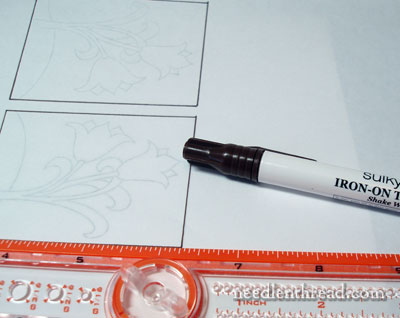
In this design, which is two of the Little Tulips side by side, it doesn’t really make any difference whether I trace on the front or the back of the paper. But just to show you that it’s pretty easy to trace on the back, I flipped the paper. If you’re using a pattern that’s printed off your computer and the lines of the pattern are dark enough, just put your paper on a white surface and it’ll be a cinch to trace on the back of the design. The pens work well with a ruler, if you want to draw straight lines.
How about some orange tulips? The cap is a bright, bright orange, so I was surprised at the dullness of the ink. But when ironed, the ink brightens up quite a bit.
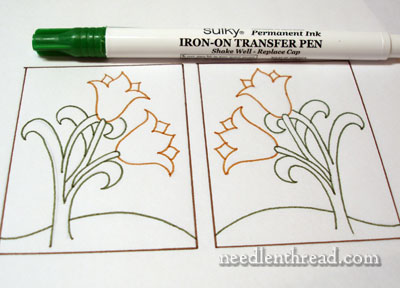
And some green leaves and a green hill….
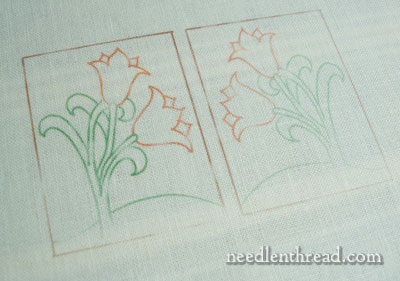
I should’ve pinned the pattern so I could move the iron. I also didn’t leave it on very long – a slow count to 8 (one Mississippi, two Mississippi…) but I think it could have remained on there to 12, easily. The lower part of my iron face doesn’t heat as well as the tip. Knowing that, I should’ve taken the time to pin the pattern. I’m sure the resulting transfer would have been much more vivid if I had moved the iron and replaced it.
On the other hand – keeping in mind that the transfer is permanent – you might want a lighter transfer for your hand embroidery projects. If that’s the case, decrease the amount of ironing time.
More on what will become of the tulips, later!
Pros and Cons of the Sulky Iron-On Transfer Pens:
Pros:
1. They work well, and certainly a lot better than other iron-on transfer pencils out there (the red pencils are not that impressive, in my opinion).
2. They come in colors, if that’s important to you.
3. They’re easy to use.
Cons:
1. No matter how thin you try to draw the line, you won’t get a very fine line out of the pens. If you’re covering the lines, that’s ok.
2. If you don’t cover the lines, the marks are permanent and you can’t remove visible residue. If you’re covering the lines, that’s ok.
Final Impressions:
Iron-on transfers are not my favorite way of getting a design on fabric, but if I were going to use this method of transfer, I think these pens work really well. I’d take extra care in fixing the pattern to the fabric, so that I could move the iron and get an even transfer. I’d also make sure my plans for the embroidery included very solid lines that would cover the transfer. I could see using these for flour sack towels and so forth – and especially for hand drawn designs (say, by kids – kid art would be a lot of fun!).
So there it is – now I can say I’ve tried them, and I can confidently answer any future questions about them! If you’re looking for the pens, you can find them at quilt shops, fabric stores and so forth, on the notions aisle usually near stabilizers somewhere. If your shop doesn’t carry them, but they do carry other Sulky products, you can probably ask them to order them for you. There’s more information on the Sulky pens on their website, too – including a demo video geared towards quilting, appliqué, and machine embroidery – it’s informative.
What about you? Have you used these pens before? Any opinion on them? Any suggestions for other uses? Do you have any questions that aren’t answered above? Feel free to leave a comment!
I just used a transfer pencil last night for the first time in a long time, after drawing the design with fine point sharpies. (Transfer pencil on the back of the paper, sharpie side touching the iron.) I was shocked to discover that the sharpie ink also transferred to the cloth. I would have been much more careful with my initial sketch if I’d known THAT could happen!
I’ve never used them. As you say the line seems to be too thick. Thank you for experimenting for us. I use the pencil with leads of different colours.
Since I usually use lots of colors when embroidering, it would be hard (and expensive!) to use different color pens for each color. I don’t like the idea of permanent lines when using this type of pen to transfer patterns, so I use graphite paper (from an art supply store) to trace the patterns onto my fabric. This washes out easily when I’m finished so I don’t have to worry about leftover permanent marks.
I usually use lots of colors when embroidering items, so it would be hard (and expensive!) to get a different pen for each color. And I don’t like the idea of permanent lines when using this type of pen to transfer patterns. Therefore, I use graphite paper (from an art suppy store) to trace my patterns onto fabric. The graphic washes out easily when I’m finished so I never have to worry about seeing leftover marks!
Thanks for being the pioneer on our behalf! I have a couple of questions regarding this transfer method – 1)Is your printer inkjet or laser? Just wondering about how that would affect not this transfer method so much, but others where you are directly transferring from the printer (such as Transfer-Eze).
2) Have you tested the transfer pens for color fastness? It would be awful to have those colors run after completing the embroidery!
I tried these in an Art Quilt class. Some people reported the transfer disappeared over time when used on 100% cotton. Sulky’s website says they are permanent on fabic with at least 35% polyester. You might want to test for that too. Disappearing might be okay for a quick project, not so okay for a long one. Justine
Thank you for trying this out Mary, it is such a help.
Looking at the picture I agree with you that for finer work the lines seem to be too thick and even if it was thinner I would worry about being “permanent” and the chemicals it would contain.
So far my most favorite pencil is the “Sewline” for transferring designs. When you have reviewed it before and I went on a hunt for it.
Last week I used it on Swiss Voile, the lines are very thin even for one strand of floss.and washes out beautifully. I just have to make sure that all the marking is washed out before I iron the piece or it will heat set it.
It works great!
why can’t they just make printer ink that can be ironed on and washable? I use the red pencils but by the time I get done my hand usually hurts.
I’ve been wondering if these would be a worthwhile thing to have in my sewing tools. Thanks to your test, it looks like I’d be more inclined to get them for drawing art to be transfered rather than to use as a means to get embroidery designs onto paper. As you say, the lines are quite thick.
When using iron-on transfers, I baste the transfer onto my fabric. That way I don’t have to worry much about shift if I have to move the iron a bit.
I use large stitches across both middle axes and just outside the edges of the design but don’t worry much about the edge of the paper.
thanks for trying these out. i followed your link and i think the best buy would be for the package price of all colors. i think this would be neat for t-shirts and such. you could embroider what you want and leave the rest of the image as is. i will definately buy a pen to try out myself, and i work in a quilt shop so i might suggest to my boss to get some to try
I regularly use sulky transfer pens but not always. My embroidery work/designs usually are less delicate than yours but I agree that the lines are quite thick and hardly wash out. So I only use them on ‘bolder’ pattern designs (like vintage Vogart patterns or something) that I stitch with 4-6 strands so the lines will be covered. You can also make a ‘first’ transfer on a scrap of fabric and do a second transfer (that will be less thick but also not as clear) on the fabric you want to embroider on. I have several colours Sulky pens but personally would not ‘colour’ my whole design in with them. I bought most of my Sulkys quite cheaply on Ebay btw. For more delicate designs I use a water soluble marker.
Thanks very much for this wonderful review Mary! I’ve never tried the pens, but have always been curious about them. I’d imagine that the colour options would be neat for free-form drawing, but as you have proved, the lines are very thick for tracing and are bound to be a bit uneven.
I do have one quick suggestion – to flip your image for tracing, you can flip before you print so you don’t have to trace off the back. You can do this in a number of ways, but basic MS Paint has a flip/rotate option under Image wherein you can change direction side-to-side (“flip horizontally”) and top-to-bottom (“flip vertically”). Might save on some hassle.
I’ve used the Sulky iron-on pens…and I love them! Thank you so much for reviewing them! I’ve actually been able to get lines fine enough with it that only 2 strands of floss will cover it. The trick is to do a thicker-lined project first (or just scribble on waste paper is what I do…yes it can be wasteful) at first, and then you can get thinner lines out of the pen.
I have used the Sulky Iron On Black Transfer Pen for years. Mostly used it for needle punch embroidery where the thicknes of the line didn’t matter. I liked the Sulky pens better then the other brands. One tip is to make sure you put the top back on as they have a way of drying out fast.
wow, wanna find one!!
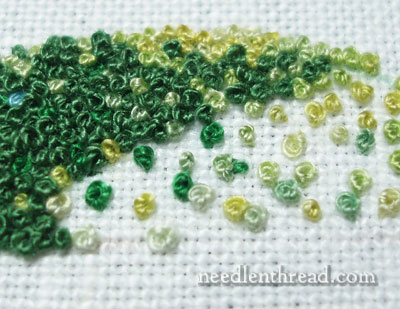
by the way, love your green french knot job…
^__^
Oh, I love my Sulky pens for many projects (not all, but having an “arsenal” is good). I recently did a project where I had to do 9 of the same design, and they came in very handy for that. I’ve managed some pretty fine lines, but it takes a very steady hand — pump on waste paper, then barely touch the paper. Love seeing that there are other colors becuase I wind up working on black a lot — have to try the yellow, becuase the only white iron on I’ve ever found was not acceptable (that one made only thick gloppy lines, but was a different brand).
Hi, Kandy – Just to let you know, the yellow doesn’t work on dark fabric – already tried it! The Sulky white pen for dark fabric doesn’t work too well, either. The best dark fabric transfer materials that work well for me are the “dressmaker carbon” papers in yellow and white. ~MC
If you get a stubborn stain on a favorite shirt, you can make little free hand flowers with the pen and iron them in various places on the shirt. No more spot!
Hi! I’ve used the Sulky pens for years, and love them. Yes, the lines are thicker than I would like, but I make it work.
ONE NOTE: I embroider on bed lines more often than not, and have found that the Sulky “permanent” lines WILL wash off or FADE dramatically off of cotton, cotton blends, or when washed with OxyClean. This is BAD if an embroidered piece is washed before the embroidery is finished. Heads up.
I use the sulky black transfer pen regularly. I have the same beef about not being able to get a real thin line with it. Otherwise, I am a fan of the pen. Perhaps Sulky will come out with a thin tip pen? I always wanted to get the different colors as sometimes using black isn’t always a good choice. I also have the white pen but for some reason, that is a fat tip and I hated it. I only tried it once so maybe I didn’t give it enough of a chance.
A small addition… I’ve noticed that my blue Sulky pen has a much finer tip than the black. Not sure why that is, but I use the blue Sulky for the thinner lines now.
I am trying to find information about the different types of stabilizers & on what fabrics they can be used. I am getting ready to embroider on a t-shirt, so I don’t want it to stretch. It said to wash it first to remove the sizing. Is that always necessary?
Thank you for your time,
Judy
Hi, Judy – I normally wash anything I’m going to embroider, before starting the work. It not only removes sizing, but it takes care of shrinkage, which may influence the outcome of the embroidery. If you need to use a stabilizer, I would go for something light, that is not an iron-on stabilizer, personally. The weight you use depends on what type & how much stitching you’re doing. T-shirts and other knits (like baby onesies and so forth) can be successfully hand embroidered without a stabilizer, but if you want to use one, get a lightweight one and hoop it up with your fabric at the same time. You don’t want to over-stretch your fabric in the hoop – you want it just tight enough to provide a decent surface for stitching, but not so tight that it pulls the knit so much, that when the stitching’s finished it ends up puckering.
Hope that helps a little bit!
MC
Well I had heard about these and was curious. And hoping they would be a wash out type. Now that I know, I guess I can spend that money on materials instead. Plus I do not like thick lines to cover up.
Thanks for the great review!
I’m assuming it isn’t normal for a purple Sulky pen to just emit liquid when the tip is pressed. I mean, there is a slight tint to the water. It looks like watercolor paint pretty much. I just got the one pen on Ebay-I better go try to order another.
I’ve had the hardest time with transfers. I first bought the Aunt Martha’s transfer pencil and DMC blue transfer pen-because that was all my local store had. The transfer pen is “water erasable” mine was “disappearing-reappearing” though. I tried getting it more wet, but the color still came back and now my fabric has water stains as well-the bright blue was visible under most of the stitches, and some blue ink had spread with the water. Great.
I tried the Aunt Martha’s pencil next. I didn’t realize that you needed special Aunt Martha’s tracing paper to use with the pencil. I had to order the tracing pad because all of the stores in town carried the pencil, but not the pads.
While I waited for the pad to arrive I tried it on regular copy paper. But the pencil barely appeared. I tried to press harder to make darker pencil markings, but the pencil tip would just break off. I’ve sharpen off at least a quarter per transfer. Then the pencil marks would barely show up when ironed. I tried letting the iron sit for 10-15 minutes (on the highest setting) on transfers. But I still couldn’t get a good clear line. I want the kind of line that appears with a real iron-on transfer. (Not one of the original patterns I’m trying to create.) Whew! I’ll be copying and pasting this rant to several embroidery sites. Any hints or advice anyone has to offer would be greatly appreciated!
Leslie
Hi, Leslie – very few transfer pens and pencils work as well as we would like them to, or as well as the manufacturers apparently intend them to. The Sulky pens are far too thick, in my opinion, for a good transfer. In any case, iron on transfers are rarely ideal, and the do it yourself kind are even less so. There are two methods of transfer that I generally use: tracing using s light box and either a pencil or a micron art pen, or prick and pounce. Prick and pounce is the most accurate method, but it does require a lot more work and some specialized equipment. I’ve got a few tutorials on Needle ‘n Thread on how to do it. You can use the search bar on the left to find them. Tracing, of course, works best when using white or light colored fabric that isn’t too thick. This week, I’ll be showing some tests on a new project I’m working on, using a transfer method I’ve not used before, but for this particular project, it may work out pretty well. That’ll be up later in the week.
You might also read this blog post below, where I’ve listed of many different methods of transferring a design to fabric, with pros and cons, along with links to tutorials:
https://needlenthread.wpengine.com/2010/09/beginning-embroidery-design-transfer.html
Hope that helps a bit!
MC
I have a design that I want to permanently put on the bottom of a dress for Alice and Wonderland. I want to simply iron on the design in black and leave it. What is the recommended way or product to use?
Thanks!
How do these work for doing cross stitch designs I am looking to see what would work better these or using something different wasnt sure how they would work on AIDA Cloth let me know.
Not sure, Shawna – I don’t have any Aida to test them on. I would imagine they’d work ok on lower thread counts -maybe 18?. – MC
I use the Sulky pens all the time and love them. I transfer patterns I design onto rug warp or linen to do rug hooking.
One thing I noticed is if you are constantly working your hand over the area, it will wear off. I discovered this the first few times and could barely see the pattern by the time I’d finished a large rug.
So now I go over it with a permanent marker. One extra step, but insures a very dark pattern. I cover my pattern with wool so it doesn’t matter how thick the lines are.
Hope this helps someone!
What color works good on black or dark denim fabrics.
Hi, Karen – I think they have a white, but yellow or red would probably work as well.
Thank you Mary for this review of the sulky pens.
I was keen to order and try but I think I’ll stick with my light box
Regards
Penny
I have used Sulky (black) for years. I don’t embroider. I use them to transfer a given quilt pattern to muslin or cotton fabric or even paper. As such my lines are always covered. I would like to see a finer line pencil.