


After considering the hanging direction of my Christmas ornament, I finally realized I wouldn’t know for sure whether it would look better square or on point until I finished the green shading. So I finished the green shading, and started the goldwork, then made one of those Moaner Mistakes…
My original concept for this ornament, as mentioned before, was to hand embroider a diamond-shaped Christmas ornament that would hang from the tip of the diamond, and be finished at the base with a tassel. You can see the original drawing of the pattern in the post where I was musing over different projects in planning stages.
Though I didn’t plan much beyond the initial design, I had in mind an ornament that would combine silk shading and goldwork.
Thinking Through the Embroidery Design
Originally, the four diamond shapes around the center of the ornament were to be silk shading in deep reds, raised on felt. But when I started, I discovered I liked satin stitch better for those. Then, once I got the satin stitch in, I found I liked the ornament turned as a square better. So I polled readers about it, asking which direction they liked better, and I think the majority said they liked the ornament hung on point – but many also agreed that the inside diamonds looked better turned. Well, it was too late to re-design the layout, so I decided to forge ahead through the green silk shading to see if it would make a difference in the look of the ornament.
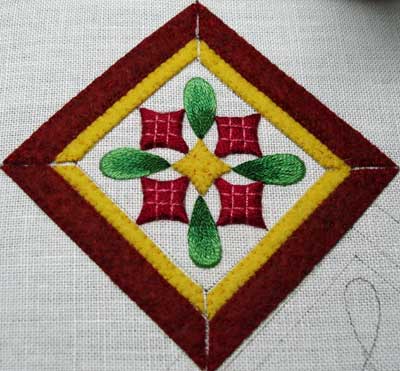
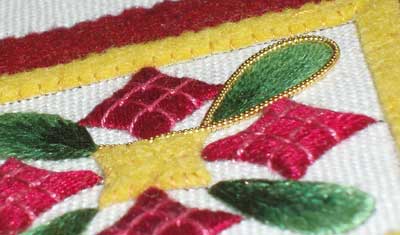
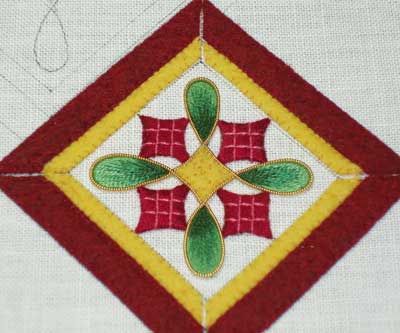
Once the green was in, I was back to liking it on point, as a diamond shape overall, despite the direction of the little red diamonds within. I think it all panned out ok.
I suppose this isn’t the most “professional” way to go about working up a project – this trial-and-error, not knowing where you’re going for sure before you start, type approach. But I like undertaking projects this way, because there’s more discovery along the way. I really had no idea how the red and greens would look together in the design. But I find I like them!
Haste Makes Waste
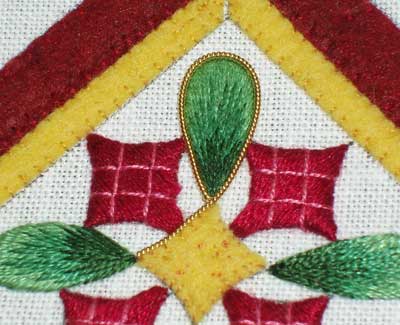
Once the greens were finished, I was itching to start couching on the pearl purl around the green shapes! I couldn’t wait (I thought) to see what the whole effect of the gold around the green would look like!
BUT – perhaps it was the late hour… perhaps it was my overeagerness… perhaps it was mere carelessness…
I made a mistake. One of those “ooooooooh nooooooooo” mistakes. Just as it happens, you realize exactly what you’ve done, but it’s all so quick, in such an instant, that the fact and the realization of the error all come into being at the same split second…
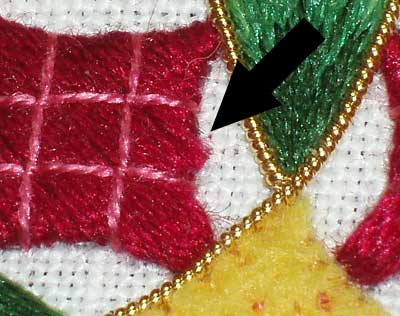
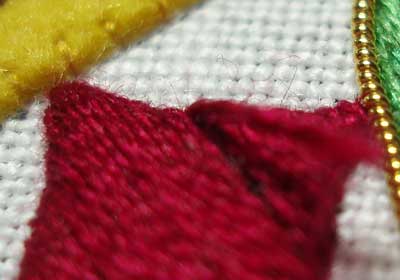
There it is. In trimming the gold purl pearl, my scissors grazed the edge of my satin stitching, and (I thought) cut through several threads.
In fact, it grazed the threads, and cut halfway through two of them, but not all the way through either. Still, it wouldn’t do – that needed to be repaired before I could rush into the rest of the gold.
I examined from all angles, and realized the mistake wasn’t really noticeable. But the problem was actually the threads – they wouldn’t survive the test of time if they began Life on an Ornament already damaged. So … on to the repairs.
Repairing the Satin Stitching
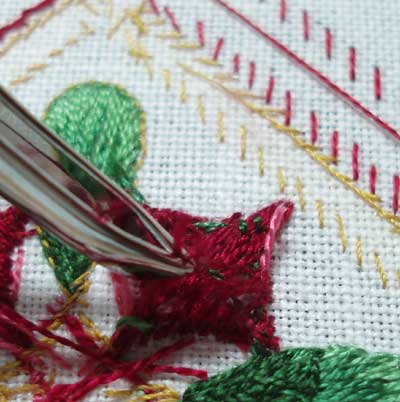
The first thing I did was carefully snip off the lattice.
Then, using the eye of the needle, I separated the threads that were damaged, to see if there was any way I could pull just one or two threads to the back, and fill in with a couple new stitches.
As I pulled the threads carefully out, though, I realized it would be a matter of complete removal.
On the top of the work, I ran my scissors carefully under all the satin stitches on this one diamond, perpendicular to the direction of the stitches, and cutting the diamond right in half.
On the back, I did the same thing, but I had to be much more careful, because I had ended and begun threads from other parts of the motif in the threads on the back of the diamond. After snipping just the red diamond threads, I carefully plucked out the satin stitching with tweezers.
Tweezers, by the way, are a necessary tool in any embroidery work basket!
I managed to get all the threads out with minimal damage to the felt. The front looked ok, but…
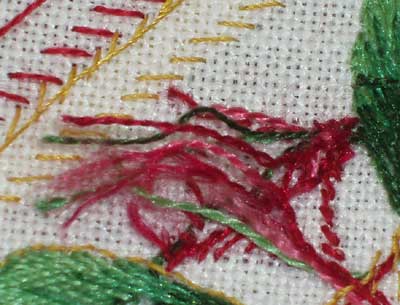
… the back was a Whole Nuther Question!
These were the threads that were anchored in the back of the satin stitching, and it was important that they return to their anchored state, so I was pretty careful with them!

It didn’t take too long to satin stitch the diamond again.
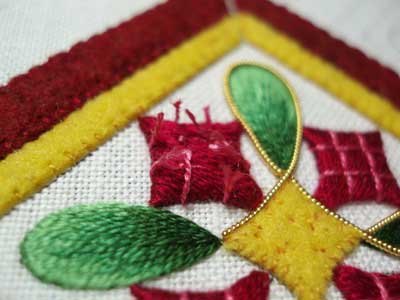
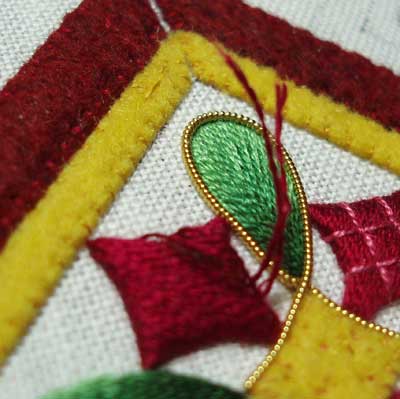
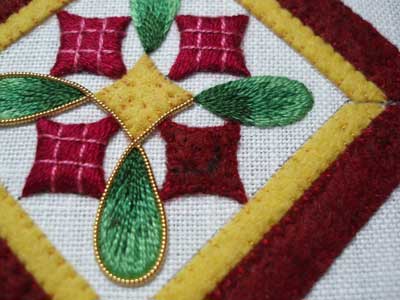
Once I got the lattice back onto the diamond, I charged into couching the rest of the pearl purl. Once the gold outline was on, I was sold again on the notion of the diamond shaped ornament!
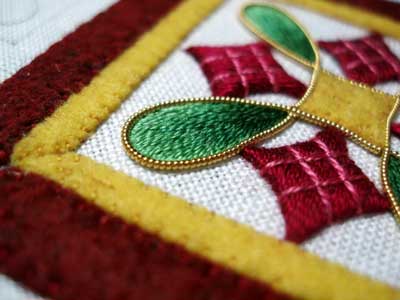
I love the look of the gold with these colors of silk!
A Lesson for Hand Embroiderers All
What have I learned so far on this project?
1. Don’t try to make decisions on a design until you get it to the point where you can really “see” it.
2. Haste makes waste. I was dying to get to th
e next step of the project, and, because I wasn’t as careful as I should have been, I had to pick part of the stitching out and start over again, using up valuable thread and valuable time. Take things slowly and pay attention to detail – in the long run, it’ll save you time!
3. But – everyone makes mistakes. As Shakespeare put it, “Roses have thorns, silver fountains mud. Clouds and eclipses stain both moon and sun, and loathsome canker lives in sweetest bud. All men make faults…” At some point, we all have to take out stitches! So instead of dreading taking out the stitches – or allowing a mistake to hault us in our tracks so that we don’t go back to the project (that’s hard to overcome – I find I’m always put off a project when I make a major mistake!), consider the picking out just part of the project. Picking out is, in a sense, an integral part of embroidery – at some point, even the best needleworkers pick out their stitches and re-do. It’s all part of the process… and mistakes are part of being human.
Heh heh. That’s the philosophical me – but don’t think that, at the time, it didn’t irk the heck out of me!
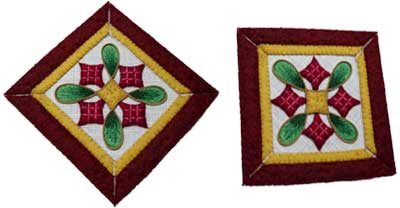
NOW – what do you think about the diamond / square question at this point? Do you think the diamond works better overall now? What’s your take?
Definitely a diamond now! Filling in the rest of the green petals made the difference. It’s really lovely.
Yes – definitely the diamond. Congratulations on avoiding just putting this project in the UFO box – it was definitely worth hanging in there (pun intended)!
That’s why I like so much this blog!!!
You make us feel soooo better! Well then! Even Mary Corbet makes mistakes!!!! :))
You are a very, very good teacher!
Thanks for the lesson, and the way you gave it
When you asked the other day I thought square, but definitely on the point now. Looks fantastic
I vote diamond! Love the gold around the green. The red squares no longer appear square anyway but I don’t know why. Can’t wait to see what you have planned for the rest of the ornament.
MGM
I vote for it as well.
I keep my fingers crossed for your next efforts, I wish you not to have to repair anything else on your work, as this repairing damage’s work that scares me:-)
On point, Mary.
If you really can’t live with the squareness of the squares, you only need remove the gold lattice and rework that at 45 degrees, as long as you work perpendicular to the foundation stitches first.
CA
Ouch…I don’t know if I would have been able to fix a mishap like that! As for the question, my vote goes to diamond.
Diamond for me Mary. My eye is drawn to the green, and it looks better on point.
Definitely the diamond, It looks … livelier?
I like it on point too Mary. I think the thing that bothers me though is the direction of the lattice on the red squares looked better square on. How difficult to change and make the lattice to diagonal instead of square on ? (have I confused you now, VBG?) That for me then would be the perfect combination. I think it’s coming along really nicely.
Hooroo,
Christine.
Commenting 9 years later seems odd, but Mary has recently remarked on this piece so I came to read all the steps and comments. My thought at this time (having read only this far) is that I think changing the direction on the lattice as Christine says would help – it would reinforce the diamond-ness. Looking forward to finishing reading the steps to see what happens.
Definitely diamond. The gold purl just sets it off so beautifully. Did you just couch the purl down with gold thread?
Lucky the tree that will have this ornament hanging on it.
Hugs
FredaB
Sticking with diamond! (and would totally add a golden tassel at the bottom) Your work is simply stunning =:)
I’m still stickin with the diamond…That’s my story and I’m stickin to it!
Annie (Michigan)
And just to be difficult…..I really like the diamond better. However, I like the interior orientation of the square better.
Hi, Mary, I had suggested to add a diamond behind the square but if not, then my vote goes for the square because the inner red and white space looks floral-like a burst of flowers. The diamond direction of course emphasizes the “cross” , which for XMas is probably a good thing. It’s a tough choice, Mary!
Hi, all –
Thanks very much for your input. I still seem to think that the orientation of the inside is more pleasing on the square, but the outside diamond shape is better than the outside square shape. Still, now that the green and gold are on, I can live with inside orientation of the reds. I will definitely try the suggestion of changing the direction of the lattice, as I think the squareness of it is one of the things that bugs me.
This is the thing: when I squint and look at both, I like the inside of the square shaped ornament, and the outside of the diamond shaped ornament.
I suppose I’ll stop squinting, and just go forward with the plan as it is – the finished product may tell a very different story! Right now, the outside goldwork is tedious, so it will take some time.
Yes, and definitely a tassel at the base!
Thank you all again for your kind words and good ideas! It’s so nice to have stitching friends to bounce these things off, isn’t it??
Mary, I think your work is amazing. You asked for opinions on the Christmas ornaments. As an art quilter, I would like to see what the ornament/picture would look like if the squares were on point, i.e., instead of the ovals pointing toward the corners, the squares pointing toward them. I don’t know if you have time to try this out, but it certainly would be very appealing to me.
Thank you for allowing us to make suggestions and comments on what is such a personal process.
Since you like the diamond shape overall but the way the inside looks when it is square, could you make the whole ornament bigger, adding triangles to the sides of the square shape to turn it into a larger diamond?
Hi, Angie –
Laura had suggested the same thing – to expand the square back into a diamond, by adding points on the square sides. It’s a good idea. I drew that out on the original pattern, to see if I would like it, and two problems arose: 1. the ornament would be really large, or at least a lot larger than I would want it; 2. I’m working completely off stash and already running short on the colored silk and on the gold, so I think it wouldn’t be prudent!
I’ll keep you posted on the progress!
Thanks again for all the helpful suggestions!